Document collaborators
Document collaborators are the people associated with a document.
External collaborators are stored in Scientific Publications Cloud as Contact records while internal
collaborators are stored as User records or in Document
Group (mvn__CM_Document_Group__c) records.
Contacts can be created locally or be derived from an external data
source that an administrator has configured. When a contact, user, or
document group is added as a collaborator to a document, a Document
Collaborator (mvn__PP_Document_Author__c) record is
created with the PP_External, PP_Internal, and PP_Group record
types, respectively. The Document Collaborator record is subsequently
related to the
Document (mvn__CM_Document__c) record along with any
corresponding Task records and Contact
Verification (mvn__PP_Contact_Verification__c) records.
Contact Verification records help track background checks and consent
details for external contacts. Reference the Configure Contact Verification and Task automation section
below for more information.
Document collaborators can be assigned specific roles on a document that determine the function or capacity in which they can interact with the document. There are two experiences for the searching, adding, and assigning of collaborators on documents. While V1 more clearly distinguishes the handling between external contacts and internal users and groups, V2 unifies all potential collaborators. Both are done in the Collaborators tab of a Document record.
Document Collaborator Search V1 vs. V2 unified experience
In the V1 experience of the Document Collaborator Search feature, contacts are managed separately from users and document groups. You can only add and assign document roles to external contacts in the SPC - Related Document Authors component and only add and assign document roles to internal users and document groups in the Document Roles related list.
In the V2 experience of the Document Collaborator Search feature, all contacts, users, and groups can be added and assigned roles on a document in the SPC - Related Document Authors component. V2 is therefore otherwise known as the "unified" Document Collaborator Search experience. This means that you no longer need to know whether a potential document collaborator is external or internal to Scientific Publications Cloud in order to be able to search for and add them to a document.
All new customers after the Spring '23 release will have the V2 unified experience. Existing customers from before the Spring '23 release will remain on the V1 experience. Existing customers who would like to take advantage of the unified V2 experience need to perform the necessary upgrade steps below.
Only active users and Contact records with related active User records will appear in the search results. Inactive users cannot be searched for in the Document Collaborator Search wizard.
Upgrade from V1 to V2
If you have a Scientific Publications Cloud environment with V1 of the Document Collaborator Search experience and would like to update it to the V2 unified experience:
-
In Setup, navigate to the Interface Handler (
mvn__PP_Interface_Handler__mdt) custom metadata type.-
In the Internal Contact Filter Search (
PP_Internal_Contact_Filter_Search) metadata record, update the Class field fromPP_ContactFilterSOQLSearchV1toPP_ContactFilterSOQLSearchV2. -
In the Internal Contact Omni Search (
PP_Internal_Contact_Omni_Search) metadata record, update the Class field fromPP_ContactOmniSOSLSearchV1toPP_ContactOmniSOSLSearchV2.
-
-
In Setup, navigate to the Pubs Global Setting (
mvn__PP_Global_Setting__mdt) custom metadata type.- In the Default (
PP_Default) metadata record, check the Document Collab Search V2 Enabled checkbox.
- In the Default (
Migration script
When upgrading to the V2 unified experience of the Document Collaborator
Search, you may not have any corresponding Document Collaborator records
for the roles you previously assigned in the V1 experience. To create
the missing Document Collaborator records, you can complete the
following migration script using Apex Anonymous and the batch class
PP_CreateDocumentCollaboratorBatchable.
You only need to complete the migration script if you are upgrading the Scientific Publications Cloud product (e.g., from version 1.19.0.4) to the Spring '23 release. migration script only applies to publication documents, not supporting documents, and will only create Document Collaborator records for the roles that do not already have the corresponding records. There should be only one Document Collaborator record per user and per document.
To complete the migration script:
-
Open an Execute Anonymous Window. Visit Salesforce's documentation on Apex Anonymous for more information.
-
In the Enter Apex Code window, execute the following code block:
mvn__PP_CreateDocumentCollaboratorBatchable b = new mvn__PP_CreateDocumentCollaboratorBatchable();
Id batchProcessId = Database.executeBatch(b, 100);
You can monitor the status of the batch process as well as view any
errors that may occur during the batch process with the Processing
Result (mvn__PP_Processing_Result__c) and Processing Error Message
(mvn__PP_Processing_Error_Message__c) fields on the Plan Team
Member (mvn__PP_Plan_Team_Member__c) custom
object.
SPC - Related Document Authors component
The SPC - Related Document Authors (ppRelatedDocumentAuthors)
component, also referred to as the Document Collaborators component,
lists all document collaborators and their assigned roles on the given
document. This includes pending, active, and inactive contacts, users,
and groups. From this component, you can add collaborators to the
document via the Document Collaborator Search wizard, provision pending contacts, view any
activities and communications related to the collaborators or contacts,
and more. You can also configure the appearance of the component by
choosing the columns that should appear and customizing the icons and
labels that represent the different types of collaborators.
:::: ::: title :::
In the V1 experience, only contacts can be viewed, searched, added, and assigned roles in this component. ::::
Provision pending contact
Document collaborators with a Pending status are contacts, such as
Collaborator Portal users, who have not yet been
provisioned. To provision a pending contact in the SPC - Related
Document Authors component:
-
Click the dropdown arrow at the right end of the row.
-
Select Provision User.
-
On the Provision User modal, enter and review all of the required details.
-
Click + Provision User.
A new User Request
(mvn__PP_User_Request__c) record will be created and processed
asynchronously to provision the contact. For more information, reference
Users.
Resend emails and reset passwords for Collaborator Portal users
When a Collaborator Portal user is provisioned, they are sent a welcome
email that instructs them how to set up their Collaborator Portal
account with their email address and, optionally, a password. If a user
wants to log into and use the Collaborator Portal without a
password, they must verify their email address so that
they can receive a verification code that authenticates them in place of
a password. For existing Collaborator Portal users, email addresses can
be verified through a password reset. When an email address is verified,
the User Verified Email (HasUserVerifiedEmail) field on the User
record will update and the Email Verified column in the Document
Collaborators component will display a green checkmark accordingly.
The welcome email, the user verification email, and the password reset email can all be (re)sent from the SPC - Related Document Authors component at any time, similar to how a pending contact can be provisioned.
After the SPC Welcome email Hotfix (Fall’25), the Resend Welcome Email and Reset Password actions no longer send emails instantly. Instead, the system adds a User Request (mvn__PP_User_Request__c) record to the queue. When a user triggers one of these actions, they may see messaging that the email is queued. This means that the email is not sent immediately, but it will be sent the next time a background job runs, which by default happens every 10 minutes.
Before scheduling, go to Setup → Scheduled Jobs for existing PP_Process_PasswordReset and PP_Process_ResendWelcomeEmail jobs to avoid duplicates. “Scheduled Apex runs with the permissions of the user who scheduled them. So the schedule should be created by a System Administrator.
Assign document role
All document collaborators are assigned an initial or default role when they are first added to a document. (For more information, reference step 4 in the Search for and add a document collaborator section below.) Additional roles can be assigned after a document collaborator is added.
To manually add a document role to a document collaborator:
-
Click the dropdown arrow at the right end of the row.
-
Click Add Document Role.
-
Select a role.
-
Click Save.
Document roles can also be automatically added if a document collaborator is assigned a task that requires a specific document role. For more information, reference the Workflow Stage Activities section below.
Remove document role
By default, you can only remove a document role from a document
collaborator if the user does not have any open workflow tasks on the
document that are associated with the document role. However, if you
have the CM Delete Document Role With Open Tasks
(CM_Delete_Document_Role_With_Open_Tasks) custom permission, you can
delete any document role from any user regardless of what open tasks the
document role may be associated with. The following steps on removing
document roles assume that the user either has no open assigned tasks or
that you have the CM Delete Document Role With Open Tasks custom
permission.
To remove a single document role from a document collaborator, including the Owner role:
-
Click the role to be removed. The Role Permissions modal will appear.
-
Click Delete.
- If you clicked on the Owner role in step 1, a Transfer Ownership button will appear in the Role Permissions modal instead of a Delete button. Click Transfer Ownership to remove the Owner role from the current owner and assign the Owner role to another user.
To bulk remove all document roles from a document collaborator:
-
Click the dropdown arrow at the right end of the row.
-
Click Remove Document Roles.
Document roles can also be automatically removed if a document
collaborator completes the task that was assigned to them because of
their role. To configure this, check the Strict Document Roles
(mvn__CM_Strict_Document_Roles__c) field on the Default (PP_Default)
metadata record of the MCM Global
Setting (mvn__CM_Global_Setting__mdt) custom
metadata type.
Mute notifications
By default, every document collaborator has notifications enabled (i.e.,
unmuted) on a document and will therefore have a blue notifications
( ) icon in the
Notifications column. However, if you have the Mute Notifications
(
) icon in the
Notifications column. However, if you have the Mute Notifications
(CM_Mute_Notifications) permission, you can mute notifications for a
specific document collaborator. To mute notifications for a document
collaborator, click the blue notifications
() icon, which
will become a grey notifications muted
( ) icon. To
enable notifications back, click the icon again.
) icon. To
enable notifications back, click the icon again.
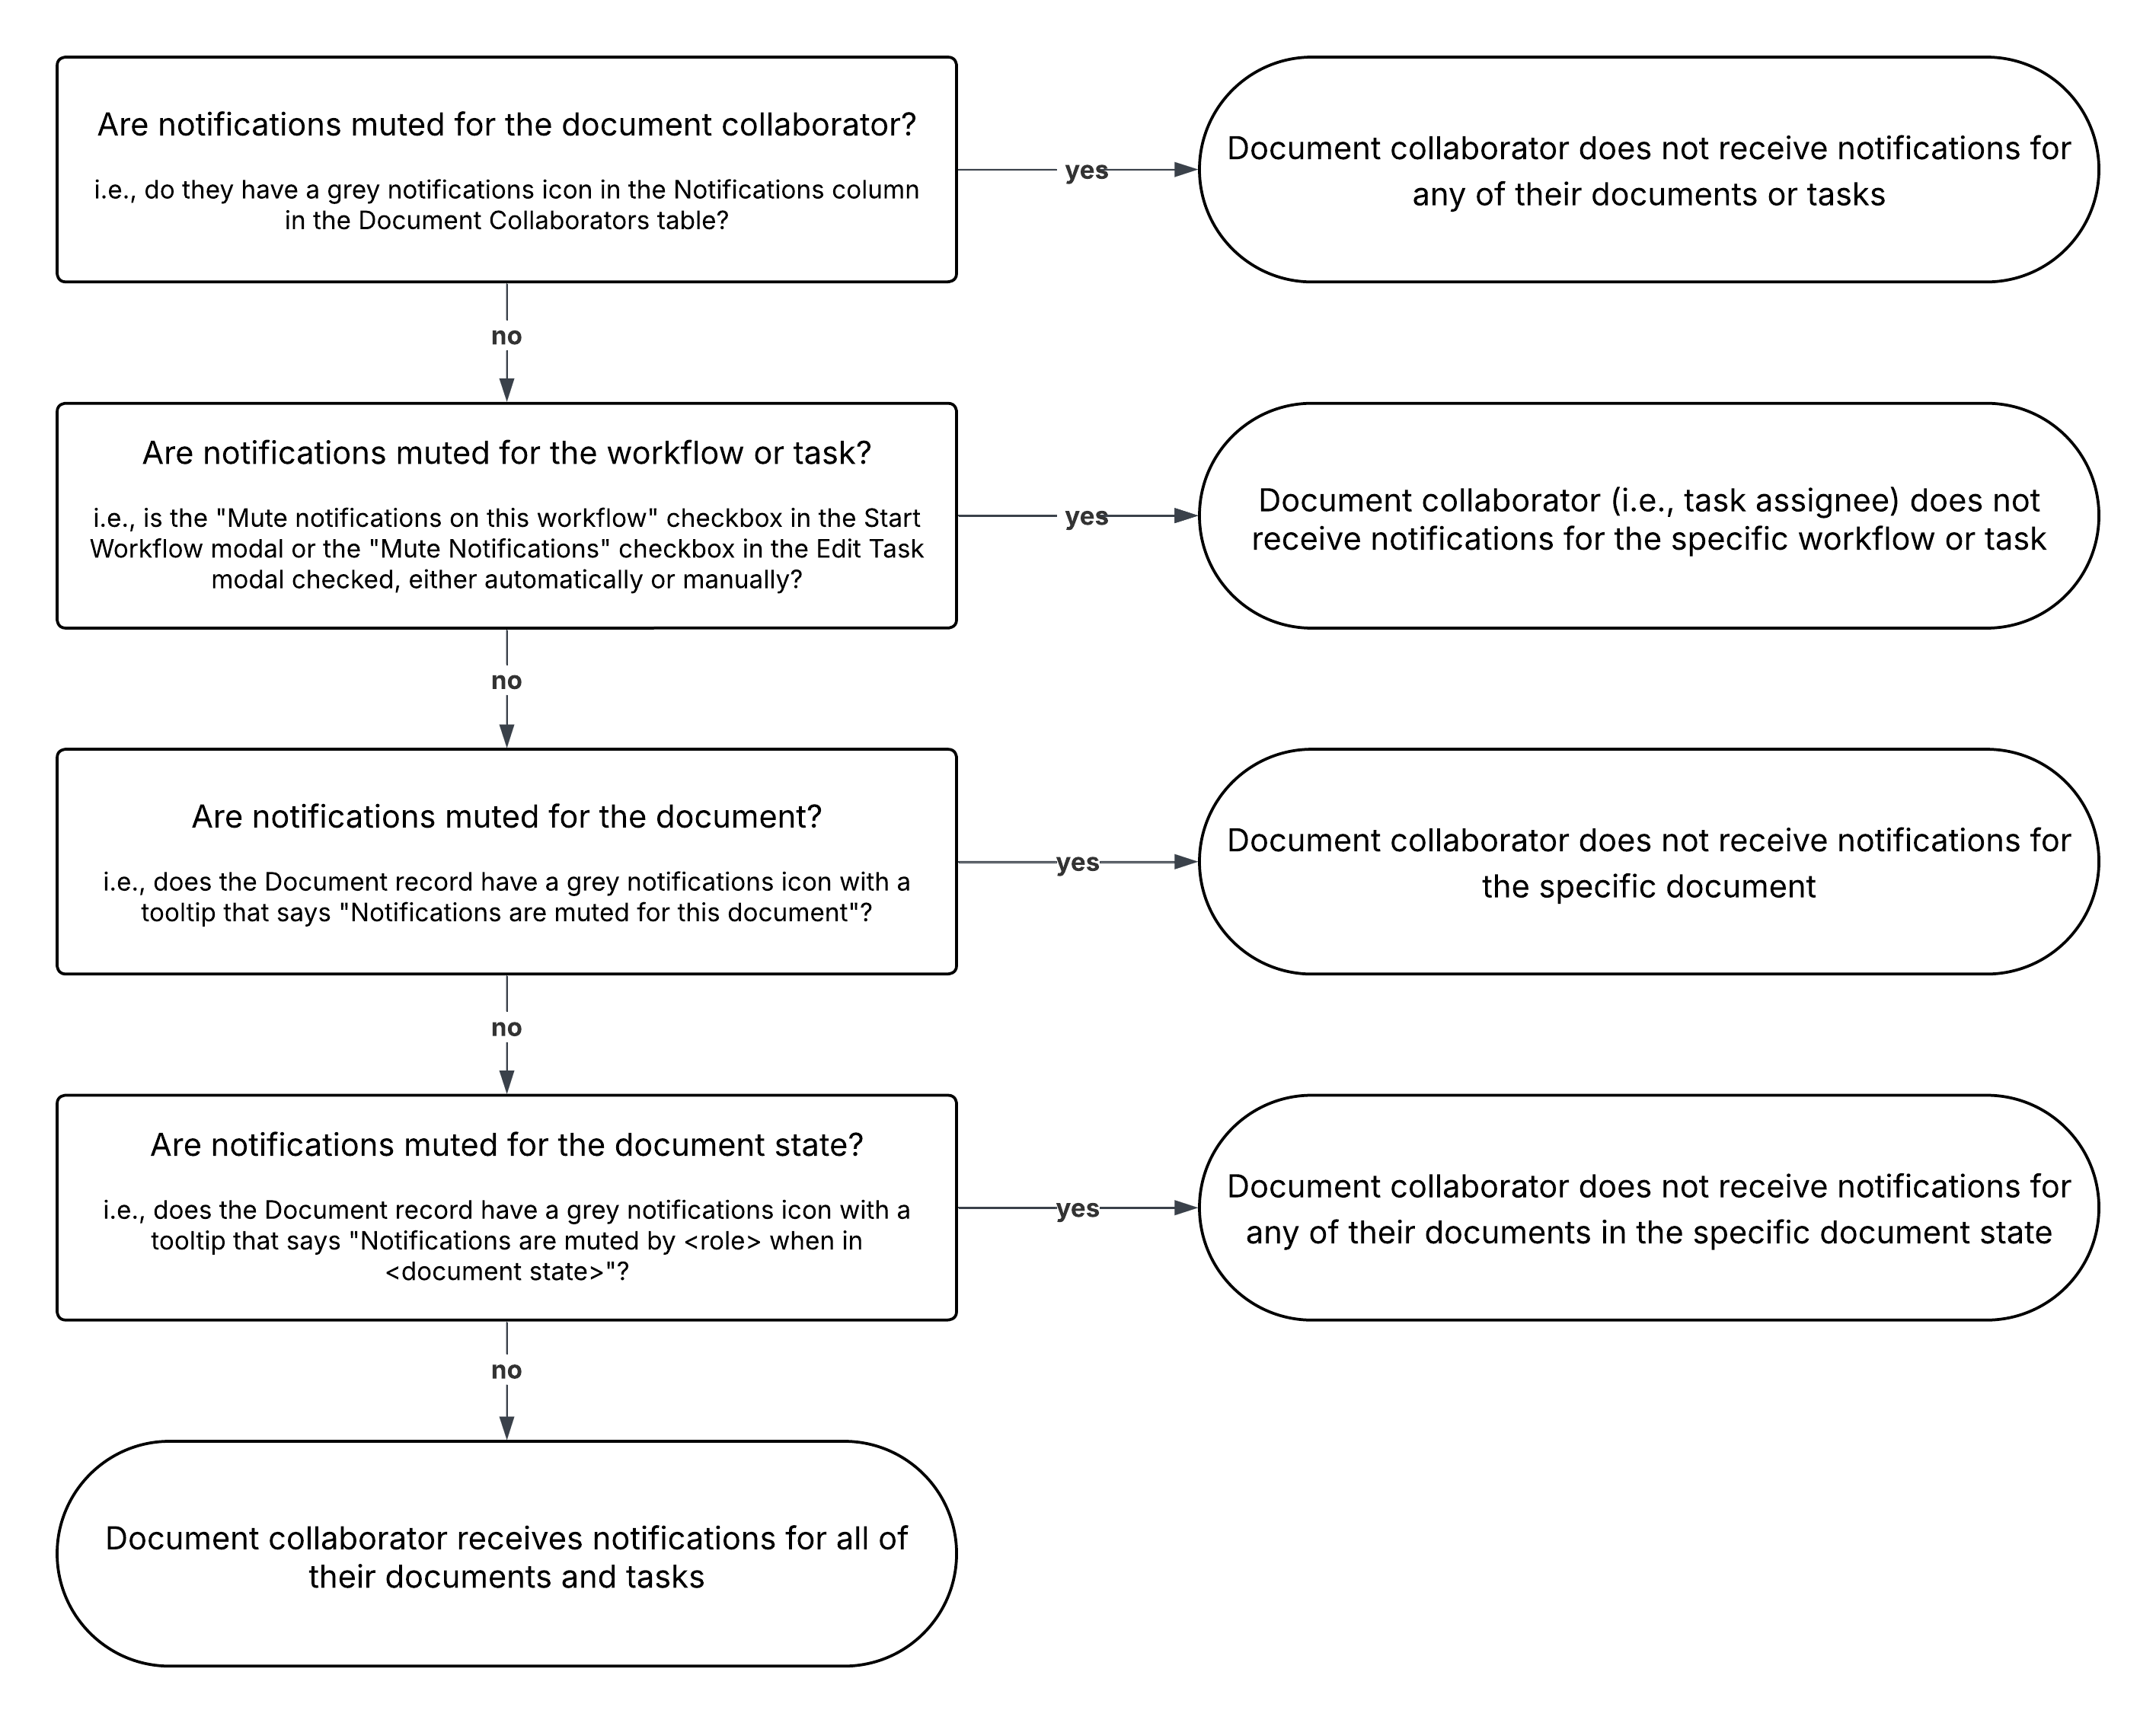
When a document collaborator has their notifications muted, they do not receive email notifications for any documents they are collaborators on or any related workflows or tasks they are assigned. This is because the notification settings on document collaborators supersede the notification settings on document types and states, the documents themselves, and the workflows and tasks on the documents. For more information about muting notifications for a document type or state or for a workflow or task, reference the Disable notifications and Disable email notifications sections, respectively. For the order of precedence on the muting of notifications, reference the decision tree diagram below.

View related activities and communications
Each row in the Document Collaborators component can be expanded to
display all of the activities and communications related to a specific
document collaborator. To enable this functionality, check the Enable
Expanded Doc Collaborator List
(mvn__PP_Enable_Expanded_Doc_Collaborator_List__c) field on the
Default (PP_Default) Pubs Global Setting
(mvn__PP_Global_Setting__mdt) custom metadata type (i.e., set to
true). The Activities table will then list all of the Activity and
Task records assigned to the selected document collaborator for the
current document while the Communications table will list all of the
Notification Log
(mvn__SE_Notification_Log__c) records where the document collaborator
received an email or notification related to the current document.
Notification Log records are created automatically whenever an email or
notification is sent to a document collaborator, such as when a workflow
task is assigned or when a welcome email, user verification email, or
password reset email is sent to a Collaborator Portal user. Additional
Notification Log records can also be created programmatically through
the Notification Log
Service (SE_NotificationLogService) global Apex
class for any custom emails, such as for activities that are not native
to the Scientific Publications Cloud product.
The Communications table is also available in the Communication History
tab on the Contact Record Page (Contact_Record_Page) where it lists
all emails and notifications sent to the contact irrespective of the
document. For more information, reference the
View communication history section on the Collaborator
Portal page.
The Communications table on both the Document Collaborator component and the Contact record pages only contains email and notification logs from the Fall '25 release and beyond. It does not retroactively retrieve and display all of the emails and notifications that have been sent out prior to this Fall '25 release. If you would like the Communications table to be populated with any older emails or notifications, please reach out to the Customer Support team.
Configuration
Configure general component columns
To configure the fields that appear as columns in the Document Collaborators component:
-
In Setup, navigate to the Document Collaborator (
mvn__PP_Document_Author__c) custom object. -
Click Field Sets.
-
Click the Related Document Authors Fields (
mvn__PP_Related_Document_Authors_Fields) field set. -
Modify the field set and click Save. Each field in the field set will appear as a column in the SPC - Related Document Authors (
ppRelatedDocumentAuthors) component.
Out of the box, the Document Roles (mvn__PP_Document_Roles__c) field
is used to format and list all of the selected roles from the Assigned
Roles (mvn__PP_Assigned_Roles__c) field. This includes the initial or
default role identified in the Role (mvn__PP_Role__c) field and any
additional role that is assigned to the collaborator. You can click on
each role in the Document Roles column to identify the specific
permissions of that role. If a collaborator is added to the document
without a role or if all of a collaborator's roles on the document are
removed, the Document Roles column for that collaborator will say "No
assigned roles."
Similarly, the User Type (mvn__PP_User_Type__c) field is used to
format and represent the different types of document collaborators. For
more information on configuring the icons and labels of each document
collaborator type, reference the Configure collaborator icons and labels section below.
Configure Activities and Communications columns
The fields that appear as columns in both the Activities and Communications tables can also be configured.
To configure the columns in the Activities table, modify the Related
Activity List (mvn__CM_Task_Related_Activity_List) field set on the
Task object; to configure the columns in the Communications table,
modify the Related Notifications List
(mvn__SE_Related_Notifications_List) field set on the Notification Log
object.
Updates to the latter will affect the Communications table on both the Document Collaborators component and the Contact Record Page.
Configure collaborator icons and labels
To configure the icons that represent the different types of document collaborators as well as the labels that appear when you hover on an icon:
-
In Setup, navigate to the Pubs Global Setting (
mvn__PP_Global_Setting__mdt) custom metadata type. -
In the Default (
PP_Default) metadata record, modify the following for each document collaborator type you wish to configure:
| Document Collaborator record type | Pubs Global Setting metadata fields |
|---|---|
External (PP_External) | External User Icon (mvn__PP_External_User_Icon__c) External User Icon Label (mvn__PP_External_User_Icon_Label__c) |
Group (PP_Group) | Group Icon (mvn__PP_Group_Icon__c) Group Icon Label (mvn__PP_Group_Icon_Label__c) |
Internal (PP_Internal) | Internal User Icon (mvn__PP_Internal_User_Icon__c) Internal User Label (mvn__PP_Internal_User_Icon_Label__c) |
- Save your changes.
The icons and labels identified in this metadata record are surfaced and
formatted in the User Type (mvn__PP_User_Type__c) field of the
Document Collaborator object.
Document Collaborator Search wizard
The Document Collaborator Search (ppCollaboratorSearchModal) wizard is
the wizard that appears when you click New in the SPC - Related Document Authors component
(ppRelatedDocumentAuthors) component. You can use it to search for and
add document collaborators. You can also click the columns to sort the
search results and hover over a result to view its details.
Search for and add a document collaborator
To search for and add an existing contact, user, or group as a document collaborator:
In the V1 experience, only contacts can be viewed, searched, added, and assigned roles in this component.
-
In the SPC - Related Document Authors component, click New. The Document Collaborator Search wizard will open.
-
(Optional) In the search box, enter the exact names of the people you wish to add or use a wildcard search with the asterisk (
*) symbol, and click Search. Local Contact records and external MDM Contact records that match your filter criteria will appear.noteOut of the box, the Country field is pre-populated with the value on the Region (
mvn__CM_Region__c) field of the Document Version (mvn__CM_Document_Version__c) record.:::
-
Select the document collaborator to be added, and click Next.
- If you selected a contact, modify the details about the contact as needed, and click Next.
-
Select a role. This will be the initial and default role of the collaborator on the document. To assign additional roles at a later time, reference Assign document role. The available roles that you can select may differ depending on if you are adding a contact, user, or group.
- If you selected a contact, select a status in addition to a role.
-
Click Save and Done.
A new Document Collaborator (mvn__PP_Document_Author__c) record will
be created with the appropriate record type and related to the given
Document (mvn__CM_Document__c) record. If you added a contact, a User
Request (mvn__PP_User_Request__c) record will also
be created and processed asynchronously to provision the contact. For
more information, reference Users.
note
::: title
:::
You do not have to manually search for and add document collaborators who you will be assigning workflow tasks. If you assign a user a workflow task on a document and the user is not yet a document collaborator for the document, a corresponding Document Collaborator record will be created automatically for the user. ::::
Add new contact
To create a new contact and then add them as a document collaborator:
-
Complete steps 1-2 from the section above. You do not need to enter any name or filter criteria in the search box to click Search.
-
Click Create New Contact.
-
Select a Record Type ID and click Next.
-
Enter the details about the contact and click Next. A Contact record will be created.
-
Complete steps 4-5 from the section above.
To configure the fields that appear in the new Contact form, reference the Configure new contact form section below.
Configuration
Configure search filters
To configure the search filters in the Document Collaborator Search
wizard, create or modify Layout
Type (mvn__LY_Layout_Type__mdt) metadata
records. Depending on if you are configuring basic or advanced search
filters, make sure the Layout Type metadata record relates to the
appropriate
Layout (mvn__LY_Layout__mdt) metadata record.
For more instructions on how to configure Scientific Publications Cloud layouts, visit Layout configuration.
| Search filter | Layout metadata record |
|---|---|
| Basic | Collaborator Search - Basic (PP_Collaborator_Search_Basic) |
| Advanced | Collaborator Search - Advanced (PP_Collaborator_Search_Advanced) |
Out of the box, if the collaborator type filter is left blank, both
users and contacts are included in the document collaborator search
results. Conducting an employee search will also include both users and
contacts while conducting an HCP and non-HCP search will exclude users
and only include contacts. To configure whether or not a collaborator
type filter should include users in the search results, update the
Collab Wizard Searches Users?
(mvn__PP_Collab_Wizard_Searches_Users__c) field on the Author
Mapping (mvn__PP_Author_Mapping__mdt) custom
metadata type. There are four metadata records provided out of the box,
one for each of the collaborator types available (PP_Employee,
PP_HCP, PP_Non_HCP) and one for when no collaborator type is
selected (Default).
Configure list view columns
To configure the columns in the recently viewed list view and the search results list view:
-
In Setup, navigate to the Contact standard object.
-
Click Field Sets.
-
Click the Author Search Result Fields (
mvn__PP_Author_Search_Result_Fields) field set. -
Modify the field set and click Save.
Out of the box, this field set is used on the Author Search Result Field
Set (mvn__PP_Author_Search_Result_Field_Set__c) field of the Default
(PP_Default) metadata record of the Pubs Global Setting
(mvn__PP_Global_Setting__mdt) custom metadata type.
Configure search result popover
To configure the fields that appear in the additional information popover when users hover on a search result:
-
In Setup, navigate to the Contact standard object.
-
Click Field Sets.
-
Click the Author Search Popover Fields (
mvn__PP_Author_Search_Popover_Fields) field set. -
Modify the field set and click Save.
Out of the box, this field set is used on the Author Search Popover
Field Set (mvn__PP_Author_Search_Popover_Field_Set__c) field of the
Default (PP_Default) metadata record of the Pubs Global Setting
(mvn__PP_Global_Setting__mdt) custom metadata type.
Configure new contact form
To configure the fields that appear when creating a new Contact record:
-
Create Author Mapping (
mvn__PP_Author_Mapping__mdt) custom metadata records to connect a Contact field set to a Contact record type.noteAuthor Mapping records control what Contact record types are available to create.
:::
-
Modify the Contact field set. warning ::: title :::
Do not add MailingState or MailingCountry to a field set because
the fields will not map correctly for external contacts. Instead, use
MailingStateCode and MailingCountryCode.
::::
The field sets do not need to contain every field that you want mapped
for external contacts as long as the fields are correctly mapped via the
Class (mvn__PP_Class__c) field on the Interface
Handler (mvn__PP_Interface_Handler__mdt) custom
metadata type. For example, you can leave the mvn__PP_External_ID__c
field off a field set as long as the corresponding
mvn__PP_Interface_Handler__c.mvn__PP_Class__c correctly maps the
field. For more information, reference the Add external collaborator search handler section
below.
Configure available roles for collaborator type
You can specify which document roles can be assigned for each document collaborator type. To configure the available roles based on a document collaborator type:
-
In Setup, navigate to the Document Collaborator (
mvn__PP_Document_Author__c) custom object. -
Click Record Types, and select the record type you would like to configure the available roles for.
-
Click Edit next to Assigned Roles and/or Role as appropriate.
-
Modify the picklist values available for selection.
-
Click Save.
Add external collaborator search handler
You can extend the Document Collaborator Search interface to support an external, master data management (MDM) search handler. Once configured, you can search the external source, create a local Salesforce Contact record from an external contact, and add the new Contact record as a document collaborator. Search behavior is the same for both external contacts and internal users and groups.
To add an external search handler, create a custom Interface
Handler (mvn__PP_Interface_Handler__mdt) metadata
record. Key Interface Handler fields include:
-
Interface - select a search interface.
Contact Omni Searchmaps to the document collaborator quick search whileContact Filter Searchmaps to the document collaborator advanced search. -
Class - enter the API name of the custom class that implements the interface you selected. The class must map the relevant Account and Contact fields using
fieldName.noteIf you map the State field, you must also map the Country field as State is a picklist field that depends on Country.
:::
-
Sequence - enter the order number that this class should be called if there are multiple configured.
Automation
Configure Contact Verification and Task automation
The Contact
Verification (mvn__PP_Contact_Verification__c) custom
object tracks background checks and consent details for external
contacts. You can use flows to automate the creation of Contact
Verification records and corresponding
Task records. To help you get started, Scientific Publications Cloud provides
the flows listed in the table below.
warning
::: title
:::
If you initially installed a version of the Scientific Publications Cloud product into your org that is earlier than Scientific Publications Cloud Fall '24, then some of the flows may be process builders instead and are denoted below. All of the process builders that had shipped with the product have been migrated to flows in Scientific Publications Cloud Fall '24 as Salesforce ends support for process builders. ::::
Out of the box, the contact verification flows are designed to work
together. When a Document Collaborator record is created or edited, the
Document Author: Create Contact Verification
(Document_Author_Create_Contact_Verification) flow determines if a
Contact Verification record is needed. If so, the Create Contact
Verification (PP_Create_Contact_Verification) flow is triggered and
creates a Contact Verification record of the appropriate record type.
Upon creation of the Contact Verification record, the Contact
Verification: Create Task (Contact_Verification_Create_Task) flow then
determines what tasks are needed to complete the verification and
triggers the Create Background Check Contact Verification Tasks
(PP_Create_Background_Check_Contact_Verification_Tasks) flow as
appropriate. This creates a Task record of the Background Check
(PP_Background_Check) record type and relates the Task record back to
the Contact Verification record. When a user marks the task as complete,
the Task: Update Contact Verification Status
(Task_Update_Contact_Verification_Status) flow then updates the status
and verification date of the Contact Verification record.
Using standard Salesforce Flow Builder functionality, you can modify the following flows as needed to meet your specific business needs and requirements.
Contact verification flows
| Label | Description |
|---|---|
| Document Author: Create Contact Verification | Determines if contact verification is needed for HCP and non-HCP document collaborators and triggers the Create Contact Verification flow if so. Out of the box, this flow is triggered when a Document Collaborator record is created or edited and is used for step 1 of the contact verification process. :::: warning ::: title ::: In versions prior to Scientific Publications Cloud Fall '24, this flow was a process builder with the same name. :::: |
| Create Contact Verification | Creates a Contact Verification record of a specified record type. Out of the box, this flow is triggered by the Document Author: Create Contact Verification flow and is used for step 2 of the contact verification process. |
| Contact Verification: Create Task | Creates Task records of a specified record type and triggers the Create Background Check Contact Verification Tasks flow as appropriate. Out of the box, this flow is triggered when a Contact Verification record is created, such as in the Create Contact Verification flow, and is used for step 3 of the contact verification process. :::: warning ::: title ::: In versions prior to Scientific Publications Cloud Fall '24, this flow was a process builder with the same name. :::: |
| Create Background Check Contact Verification Tasks | Creates a Task record of the Background Check (PP_Background_Check) record type. Out of the box, this flow is triggered by the Contact Verification: Create Task flow and is used for step 4 of the contact verification process. |
| Task: Update Contact Verification Status | Updates the Status (mvn__PP_Status__c) and Verification Date (mvn__PP_Verification_Date__c) fields on a Contact Verification record when the related task is closed. Out of the box, this flow is triggered when a Task record is created or updated, such as in the Create Background Check Contact Verification Tasks flow, and is used for step 5 of the contact verification process. :::: warning ::: title ::: In versions prior to Scientific Publications Cloud Fall '24, this flow was a process builder with the same name. :::: |
Configure Document Collaborator and Plan Team Member automation
Users can retroactively add plan team members to existing plan documents as document collaborators. This can be automated by scheduling batch jobs to run every hour or ad hoc via Apex Anonymous.
To ensure that the batch jobs create the appropriate document
collaborators with their specific roles, populate the Existing Role
(mvn__PP_Existing_Role__c) field on the Plan Team
Member (mvn__PP_Plan_Team_Member__c) custom
object.
To schedule a batch job to run every 10 minutes:
-
Open an Execute Anonymous Window. Visit Salesforce's Apex Anonymous for more information.
-
In the Enter Apex Code window, execute the following code block:
System.schedule('PP_PlanTeamMemberQueueSchedulable 1', '0 0 * * * ?', new mvn.PP_PlanTeamMemberQueueSchedulable(0, 400)); System.schedule('PP_PlanTeamMemberQueueSchedulable 2', '0 10 * * * ?', new mvn.PP_PlanTeamMemberQueueSchedulable(0, 400)); System.schedule('PP_PlanTeamMemberQueueSchedulable 3', '0 20 * * * ?', new mvn.PP_PlanTeamMemberQueueSchedulable(0, 400)); System.schedule('PP_PlanTeamMemberQueueSchedulable 4', '0 30 * * * ?', new mvn.PP_PlanTeamMemberQueueSchedulable(0, 400)); System.schedule('PP_PlanTeamMemberQueueSchedulable 5', '0 40 * * * ?', new mvn.PP_PlanTeamMemberQueueSchedulable(0, 400)); System.schedule('PP_PlanTeamMemberQueueSchedulable 6', '0 50 * * * ?', new mvn.PP_PlanTeamMemberQueueSchedulable(0, 400));
The arguments passed in for PP_PlanTeamMemberQueueSchedulable class
are 0 and 400, respectively, where 0 is the offset and 400
is the number of documents related to the plan team members that
will be processed per queueable job. Do not modify the offset
value, and make sure the number of documents does not exceed 900
to avoid hitting governor limits.
This batch job will always create document roles. If you enable the V2
unified Document Collaborator Search experience, a Document Collaborator
(mvn__PP_Document_Author__c) record will be created in addition to the
Document
Role (mvn__CM_Document_Role__c) record.
Propagation of document collaborators onto cloned documents
By default, when a document is cloned, the document collaborators from the original document are automatically propagated onto the cloned document. To check if this feature is enabled:
-
In Setup, navigate to the Pubs Global Setting (
mvn__PP_Global_Setting__mdt) custom metadata type. -
Open the Default (
PP_Default) record. -
Ensure that the Clone Collaborators on Document Clone (
mvn__PP_Doc_Collaborator_Propagation_on_Clone__c) field is checked (i.e., equal totrue). Modify as needed.
If the original document is cloned by the owner of the document, then all of the related Document Collaborator records on the source Document record will also appear in the Document Collaborators component on the cloned Document record. However, if the original document is cloned by a user who is not the owner, all of the document collaborators from the original document will also appear on the cloned document except for the owner, even if they have other roles in addition to the Owner role. This is because each document can only have one owner, and the user who clones the document becomes the owner of the newly created document.
You can specify which Document Collaborator fields should be copied onto
the cloned document when the document collaborators are propagated. Out
of the box, the Document Author Clone Fields
(mvn__PP_Document_Author_Clone_Fields) field set on the Document
Collaborator is used. To use a different field set:
-
In Setup, navigate to the Pubs Global Setting (
mvn__PP_Global_Setting__mdt) custom metadata type. -
Open the Default (
PP_Default) record. -
Update the Cloned Doc Collaborator Field Set Name (
mvn__PP_Cloned_Doc_Collab_Field_Set_Name__c) field as appropriate.