Override Office 365 user interface labels
You can override the Office 365™ user interface labels based on the type of user checking out the document to Office 365™. To support the overrides, a Connected App Plugin assigns a userType to a user, and the CA_IOffice365CheckoutUserOverrides interface provides overrides for each userType.
Considerations
Keep these considerations in mind when implementing user overrides:
As Salesforce users can change user types while logged in to Office 365™, Office 365™ user data may be stale. To prevent this, revoke users' Office 365™ Connected App session. This forces users to log in to Office 365™, which refreshes the data.
All URLs display in anchor tags. Application engineers should follow best practices to ensure GETs are safe.
Implement overrides
To override the Office 365™ user interface labels:
Create a
ConnectedAppPluginclass that addsmvn__userTypeto the user's attributes. This ensures that the Salesforce identity provider (IDP) passes themvn__CA_O365_UserTypein the userscustom_attributes.Example 2. userType is set to the user's profile's namepublic with sharing class Office365ConnectedAppPlugin extends Auth.ConnectedAppPlugin { public override Map<String, String> customAttributes( Id userId, Id connectedAppId, Map<String, String> formulaDefinedAttributes, Auth.InvocationContext context ) { User user = [SELECT Profile.Name FROM User WHERE Id = :userId]; formulaDefinedAttributes.put('mvn__CA_O365_UserType', user.Profile.Name); return formulaDefinedAttributes; } }Implement
CA_IOffice365CheckoutUserOverrides.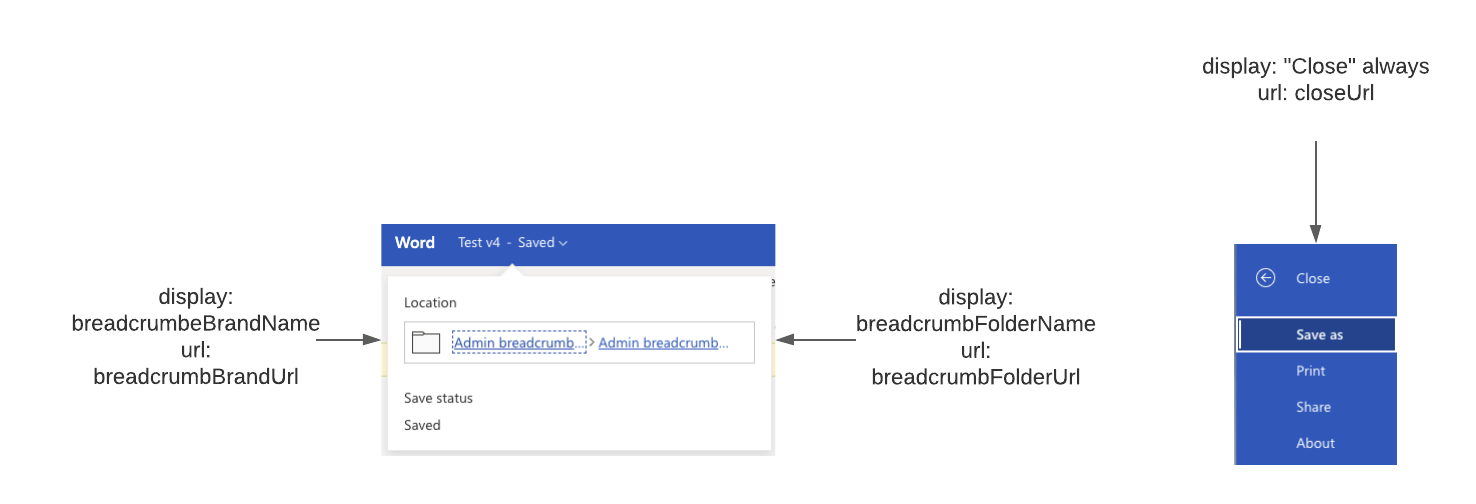 Example 3. Implement interface
global with sharing class CM_Office365CheckoutUserOverrides implements CA_IOffice365CheckoutUserOverrides {
    global Map<String, Map<String, String>> getOverridesByUserType(Id documentVersionId) {
        return new Map<String, Map<String, String>>{
            'System Administrator' => new Map<string, String>{
                'breadcrumbBrandName' => 'Admin action url',
                'breadcrumbBrandUrl' => 'Admin action name',
                'breadcrumbFolderName' => 'Admin return url',
                'breadcrumbFolderUrl' => 'Admin return name',
                'closeUrl' => 'Admin close url'
            }
        };
    }
}
Add the user override Apex class name and namespace to the Office 365 Setting (
CA_Office_365_Setting__mdt) custom metadata.In the Quick Find box in Setup, search for and select Custom Metadata Types.
Click Manage Records in the Office 365 Setting row, and then click Default.
Click Edit, and enter values for these fields:
User Overrides Apex Class Name - name of the Apex class that implements the
CA_IOffice365CheckoutUserOverridesinterface.User Overrides Apex Class Namespace - namespace of the Apex class defined in the User Overrides Apex Class Name field.
Click Save.
Add the
Auth.ConnectedAppPluginclass to the Office 365 connected app as a plugin.In the Quick Find box in Setup, search for and select Manage Connected Apps.
Click MCM Office 365 or MCM Office 365 - Test.
Click Edit Policies.
Enter
Auth.ConnectedAppPluginin the Apex Plugin Class field. This field is located in the Custom Connected App Handler section.Click Save.