Microsoft SharePoint
Microsoft SharePoint integration lets users check out Scientific Publications Cloud documents to a customer-managed Microsoft SharePoint site using Microsoft Graph. It lets you edit files stored in your tenant using the full Microsoft Word, PowerPoint, or Excel apps (desktop or browser), while Salesforce coordinates check-in, checkout, and permissions.
It complements but does not replace the Microsoft 365 integration, where Mavens hosts the authoring session in its managed Microsoft 365 environment. Use this page when your organization requires files to remain in your Microsoft 365 / SharePoint tenant.
When to use SharePoint checkout
Choose SharePoint checkout when:
- Enterprise IT requires documents to live in the customer SharePoint document library.
- Authors need native Microsoft 365 co-authoring, comments, and track changes against tenant-hosted files.
- You have (or can create) an Entra ID (Azure AD) application registration that allows Salesforce to call Microsoft Graph on behalf of a service identity.
Mavens does not operate your SharePoint tenant. You are responsible for Entra ID security, Conditional Access, licensing, site permissions, and data residency in Microsoft 365. The integration consumes Microsoft Graph and SharePoint as provided by Microsoft; Mavens cannot guarantee availability of those services.
User requirements
In addition to your existing document-version permissions (for example, Edit Document (mvn__CM_Edit_Document) where applicable), users who will use SharePoint checkout need the SharePoint Integration User (mvn__CA_SharePoint_Integration_User) permission set, which grants them access to the SharePoint Graph external credential principal.
The integration is exposed in the checkout UI only when both:
- The
mvn__CA_SharePoint_IntegrationFeature Activation (mvn__Feature_Activation__mdt) record is active (mvn__Feature_Activation__mdt.mvn__CA_SharePoint_Integration, field Active), and - The running user has the
mvn__CA_SharePoint_Integration_Usercustom permission.
Licensing
SharePoint checkout is available in two tiers:
-
Standard (included for all customers): Files are transferred directly between Salesforce and your SharePoint tenant. The Standard tier imposes a 5 MB file size limit across all supported file types (.docx, .pptx, .xlsx).
-
Premium (additional fee required): Mavens servers relay the file transfer. This removes the 5 MB constraint and raises the limits of Microsoft Office for the web as defined by the following Microsoft’s Cloud Storage Partner Program:
File type Premium size limit .docx 100 MB .pptx 300 MB .xlsx 25 MB Contact your Komodo account team to confirm whether Premium is licensed for your org before relying on the higher file size limits in production.
How sharing works
When a document is checked out to SharePoint, Scientific Publications Cloud grants access to the file for every Salesforce user who has access to that document at the time of checkout:
- Users with edit access receive the SharePoint write role.
- Users with read-only access receive the SharePoint read role.
Users already in your Microsoft 365 tenant are added directly to the share link using their email or federated identity.
Users not yet in your tenant receive a Microsoft guest-user invitation email. The invitation grants them access to the checked-out file and directs them to the SharePoint share link.
Sharing is applied once, at checkout. If document permissions change in Salesforce after checkout:
For example, a new user is granted access — check the document in and then check it out. The check-out event re-evaluates permissions and updates SharePoint sharing accordingly.
Configuration
The SharePoint integration requires setup in both Microsoft Azure and your Salesforce org. You will need a Microsoft 365 business subscription with Entra ID and an existing SharePoint environment.
Step 1: Create and secure the SharePoint team site
Create a dedicated SharePoint team site to use as the shared document library. The site permissions must be configured so that users cannot access or share documents directly through Microsoft 365 outside of the checkout workflow.
-
In the SharePoint admin center, create a new team site and set its privacy to Private.
-
After the site is created, navigate to Settings → Site Permissions → Change How Members Can Share, select Only site owners can share files, folders, and the site, and set Allow access requests to Off.
-
Navigate to Documents → Settings → Library Settings → More Library Settings → Permissions for this Document Library.
-
Click Stop Inheriting Permissions, then remove all Site Members and Site Visitors groups so that only the Owners group retains permissions.
-
Record the SharePoint site URL (for example,
https://yourorg.sharepoint.com/sites/YourSiteName) and your SharePoint Site ID for use later.
Your SharePoint Site ID is the composite identifier in the format
yourorg.sharepoint.com,{siteGuid},{webGuid}. You can retrieve it by calling the
Microsoft Graph API:
GET https://graph.microsoft.com/v1.0/sites/{hostname}:/sites/{siteName}
Step 2: Register your org as an Entra ID application
You must register your Salesforce org as an application in Entra ID and grant it the required Microsoft Graph API permissions to access the SharePoint site you created in Step 1.
-
In the Azure portal, navigate to Microsoft Entra ID → Manage → App Registrations and register a new application.
-
Navigate to Manage → API Permissions.
-
Add the following Microsoft Graph application permissions:
Sites.Selected— required for SharePoint file accessUser.Read.All— required for resolving user identities when sharing files
-
Add the following Microsoft Graph application permissions to support inviting external users to your SharePoint site:
Directory.ReadWrite.AllUser.Invite.All
-
After adding all permissions, click Grant admin consent for [your organization] on the API Permissions page and confirm. Admin consent is required for application permissions — without it, the application cannot use any of the permissions you added, and the token flow will fail even if the permissions are listed in the portal.
-
Navigate to Certificates & Secrets, create a new client secret, and record the Value for use in a later step.
-
Authorize the Entra ID application to access your SharePoint site by configuring the
Sites.Selectedpermission for the specific site created in Step 1. You can do this with Microsoft Graph using an app-only access token:-
Get an access token for Microsoft Graph with the
.defaultscope for your Entra ID tenant. -
Resolve the SharePoint site ID for the site you created in Step 1:
GET https://graph.microsoft.com/v1.0/sites/{hostname}:/sites/{site-path}?$select=id -
Grant the app access to that site:
POST https://graph.microsoft.com/v1.0/sites/{site-id}/permissions
Content-Type: application/json

{
  "roles": ["write"],
  "grantedToIdentities": [
    {
      "application": {
        "id": "<CLIENT_ID>",
        "displayName": "<APP_REGISTRATION_NAME>"
      }
    }
  ]
} -
Verify that the permission grant was created for the site before continuing.
infoFor the Microsoft Graph
Sites.Selectedpermission model and site permission APIs, see the official Microsoft Graph documentation: https://learn.microsoft.com/graph/permissions-selected-overview. -
-
Record your Tenant ID (found on the Entra ID overview page) and the application's Client ID for use in a later step.
Step 3: Configure Named Credentials in Salesforce
-
In the Quick Find box in Setup, search for and select Named Credentials, then navigate to External Auth Identity Providers.

-
Edit the SharePoint Graph identity provider:
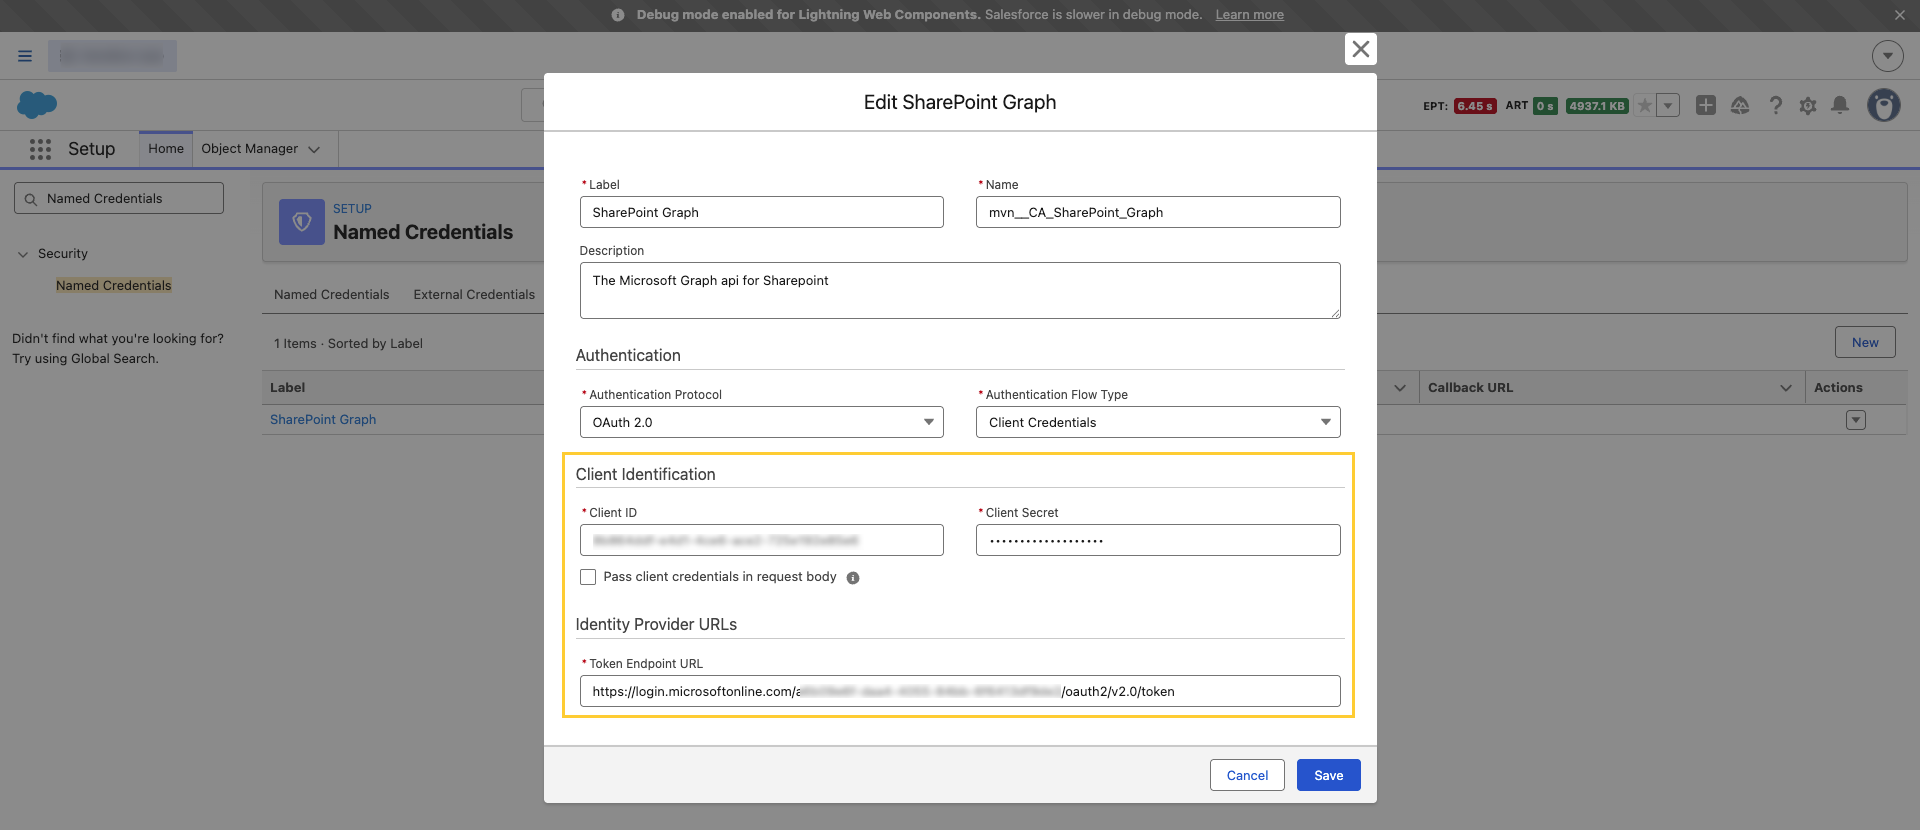
- Set the Client ID to the Client ID from your Entra ID app registration.
- Set the Client Secret to the secret value recorded in Step 2.
- In the Token Endpoint URL, replace the word
commonwith your Entra ID Tenant ID.
Step 4: Add your SharePoint domain as a Remote Site Setting
-
In the Quick Find box in Setup, search for and select Remote Site Settings. Create a New Remote Site.
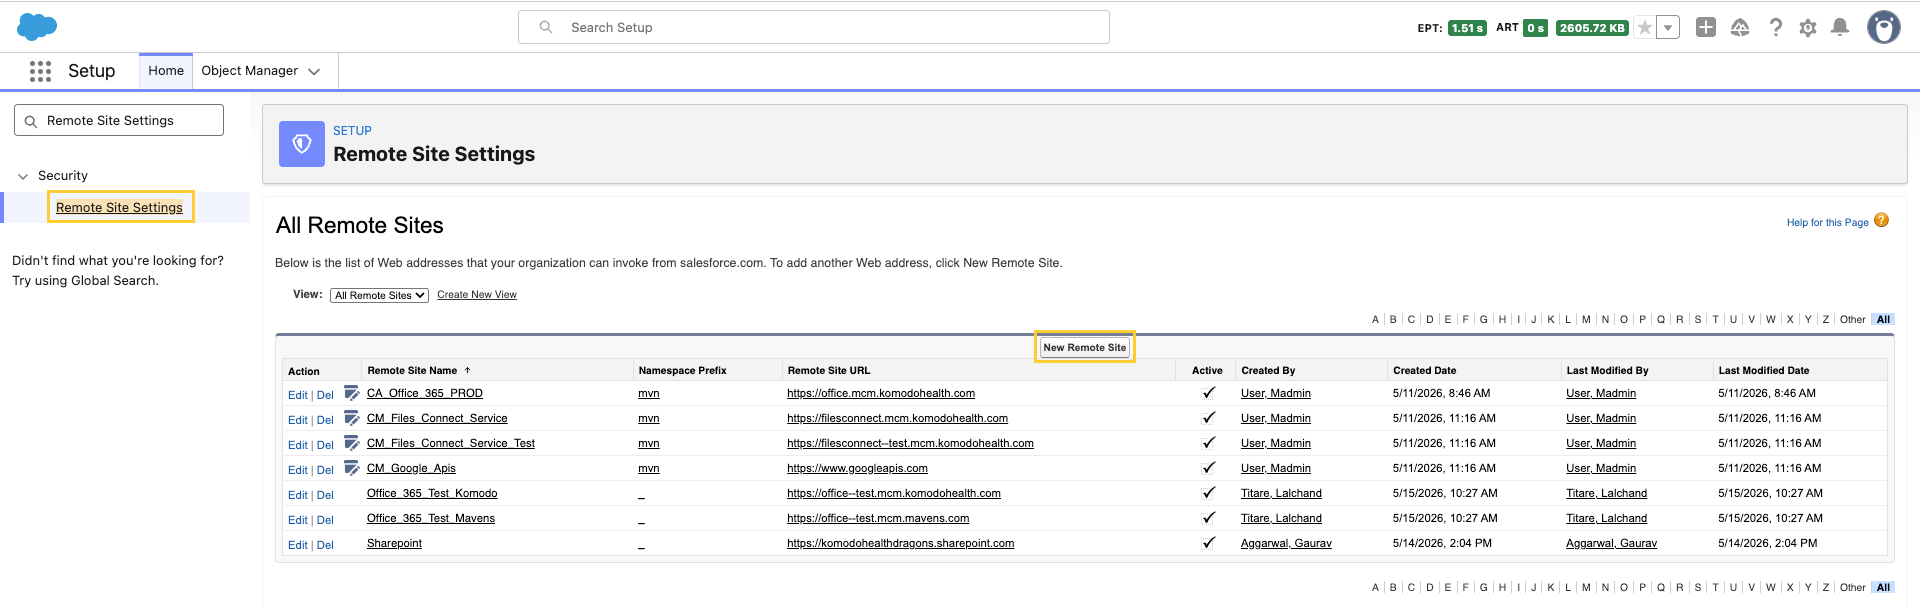
-
Create the remote site with your SharePoint domain, for example
https://yourorg.sharepoint.comand mark the remote site setting as Active.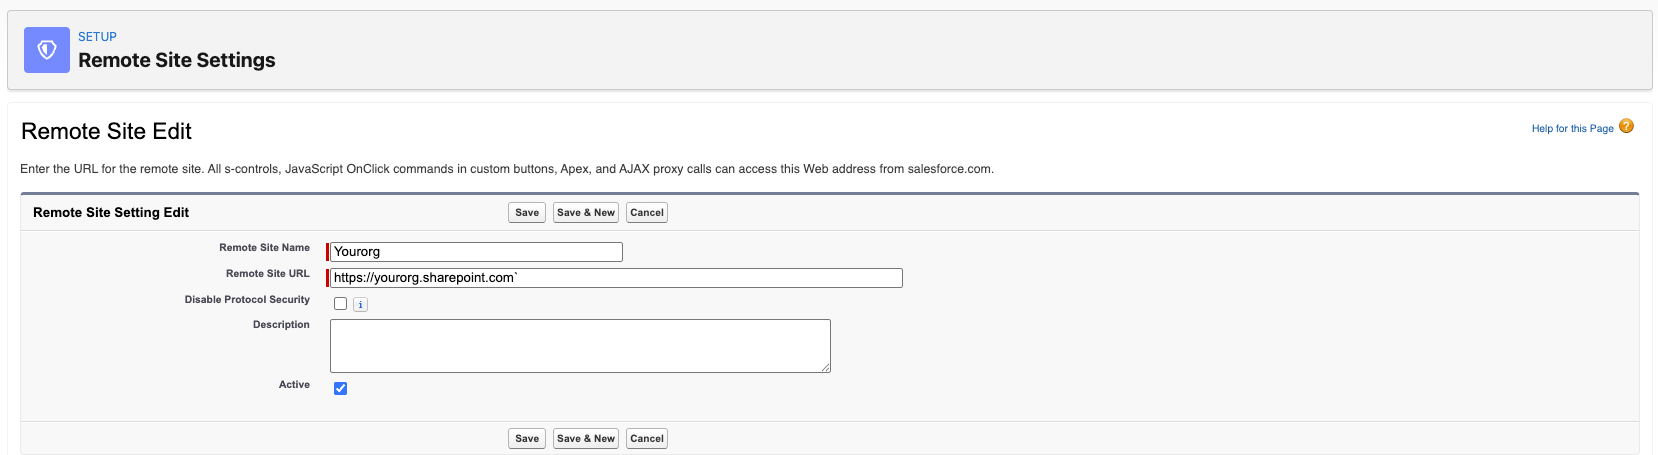
Step 5: Enable the SharePoint Integration feature
-
In the Quick Find box in Setup, search for and select Custom Metadata Types.
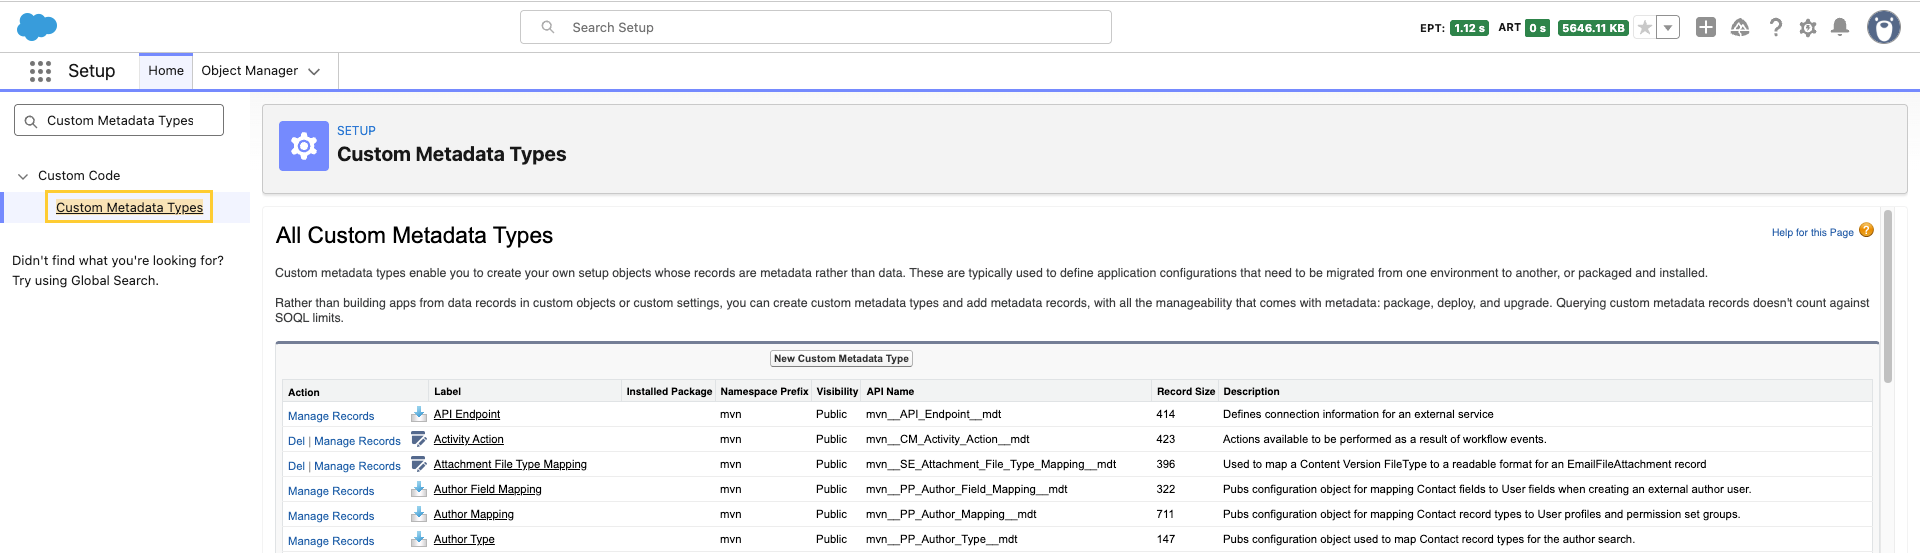
-
Navigate to Feature Activation and click Manage Records.

-
Click Edit next to the SharePoint Integration (
mvn__CA_SharePoint_Integration) record.
-
Mark it as Active and in the Text Value (
mvn__FA_Text_Value__c) field, enter your SharePoint Site ID (for example,yourorg.sharepoint.com,{siteGuid},{webGuid}) and Save.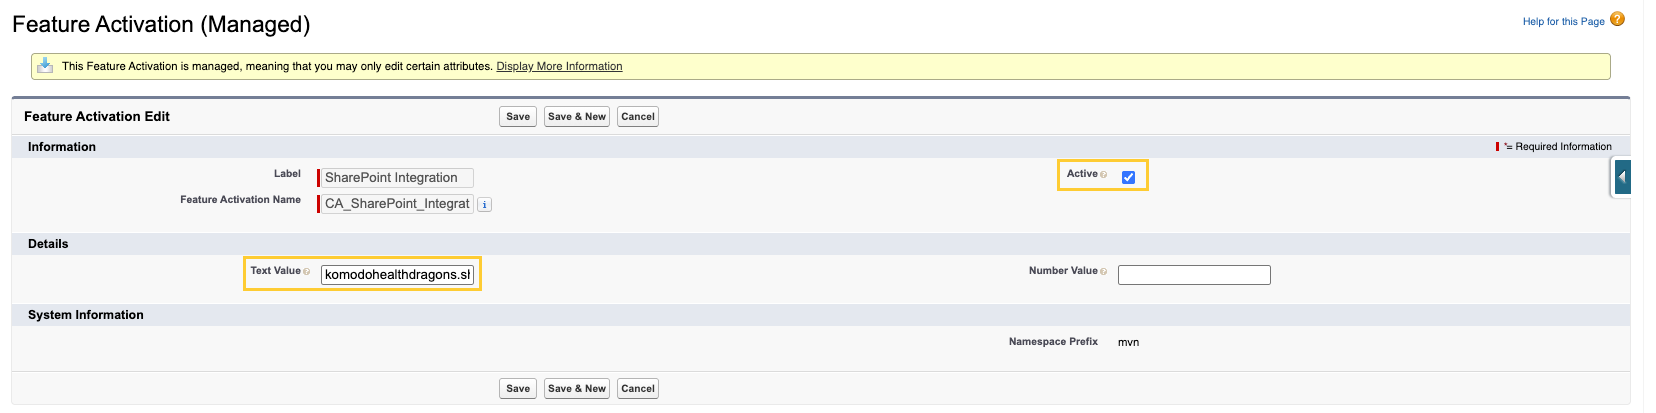
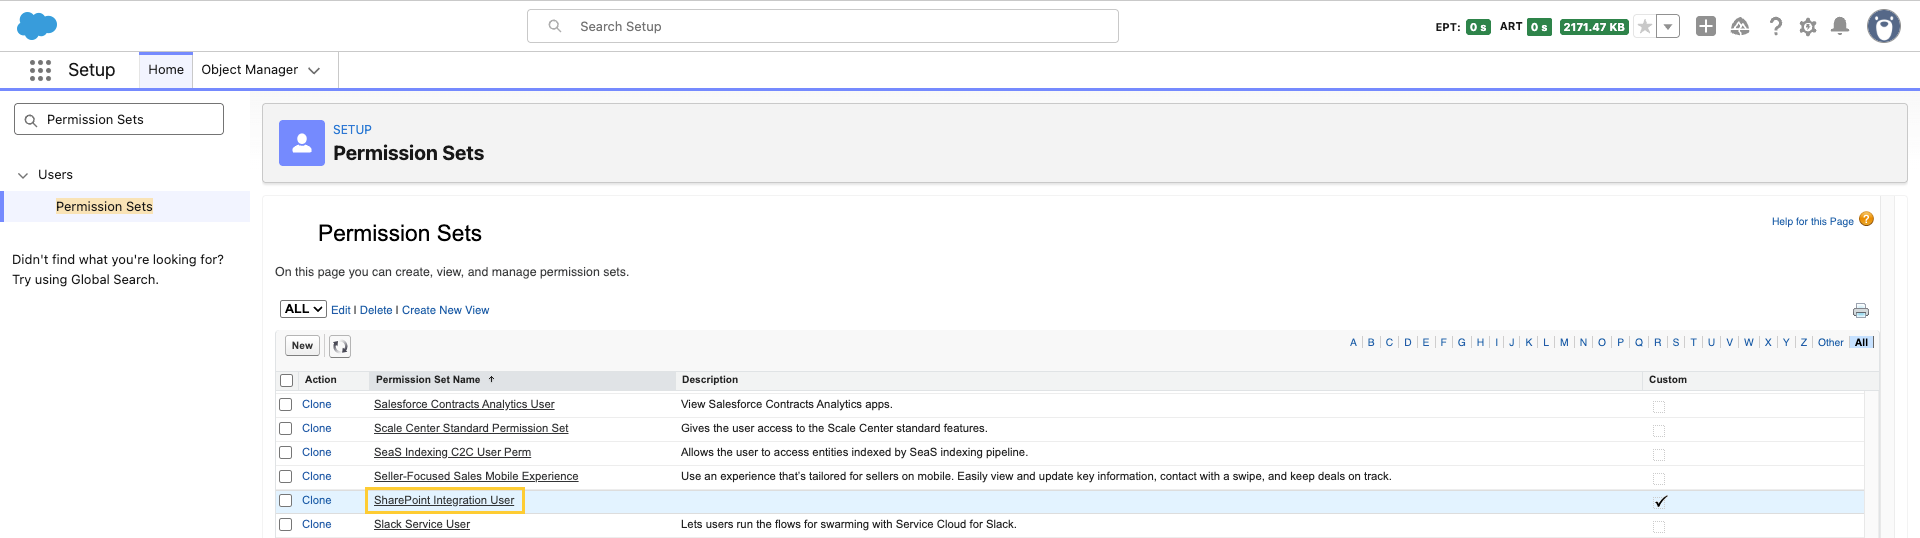
Step 6: Assign users the SharePoint permission set
Assign the SharePoint Integration User (mvn__CA_SharePoint_Integration_User) permission set to each user who needs to check out documents to SharePoint.
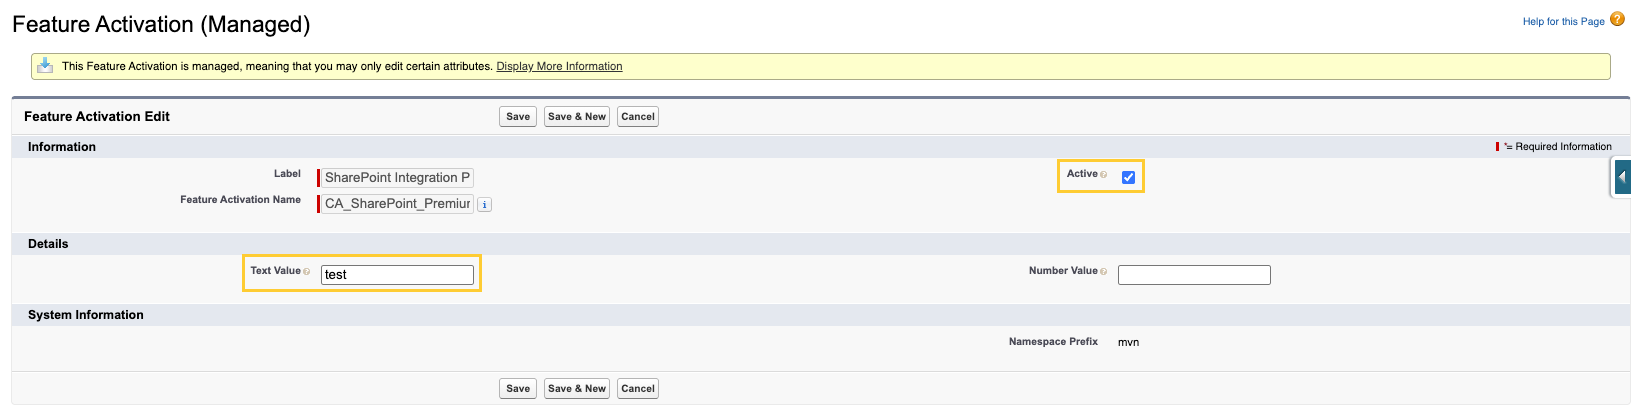
Step 7 (Optional): Enable SharePoint Premium
Skip this step if your org is on the Standard tier. Before enabling Premium, confirm with your Komodo account team that Premium is licensed for your org.
-
In the Quick Find box in Setup, search for and select Custom Metadata Types.
-
Navigate to Feature Activation and click Manage Records.
-
Click Edit next to the SharePoint Integration Premium (
mvn__CA_SharePoint_Premium) record.
-
Mark it as Active and Save.
-
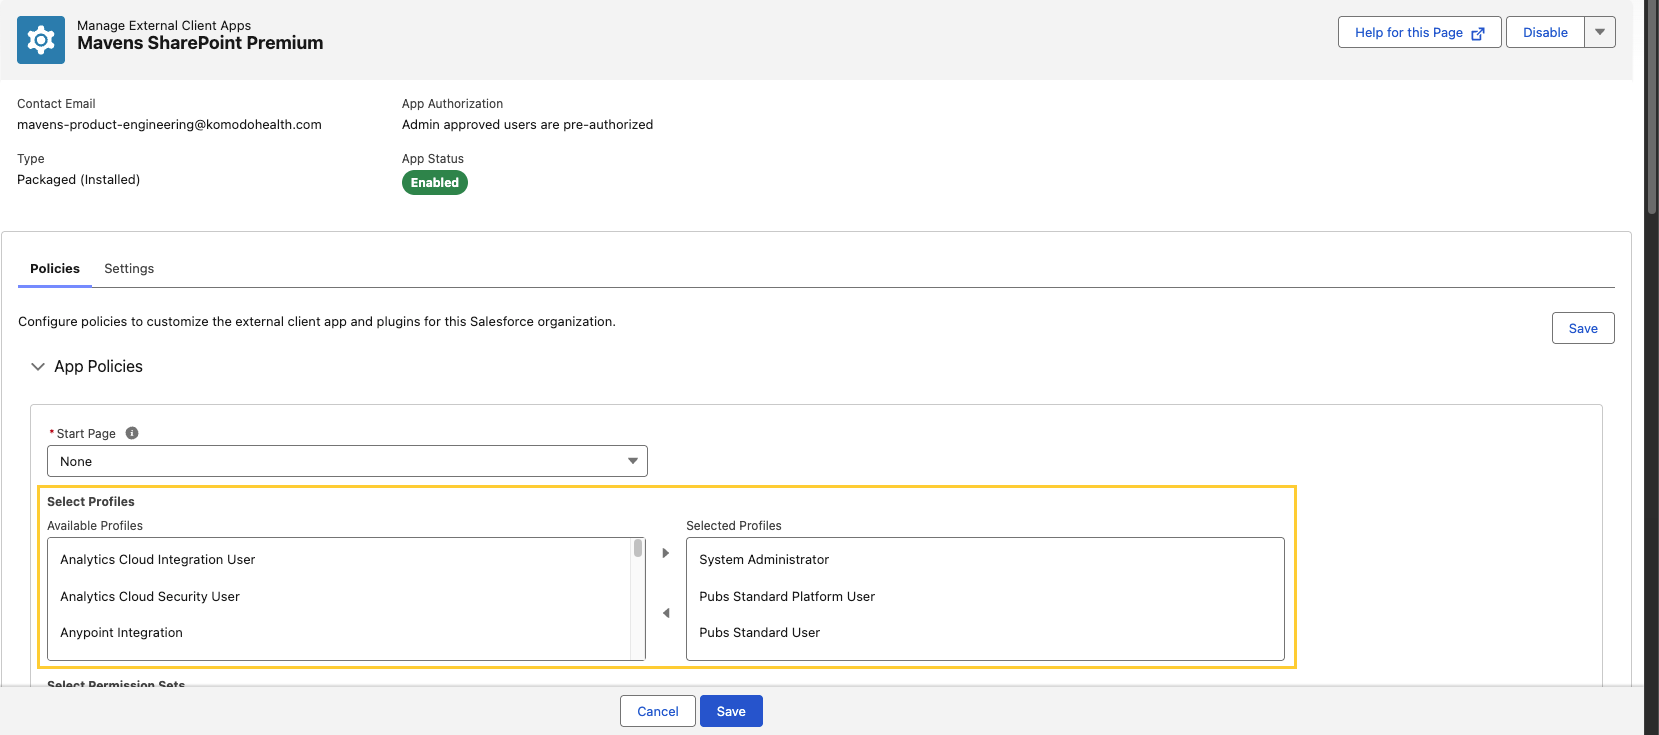
Again, in the Quick Find box in Setup, search for and select External Client App Manager. Then, open the Mavens SharePoint Premium external app.

-
In the Policies section, click Edit:
-
Under App Policies → Select Profiles, select each profile whose users should be authorized to use the Premium service.
-
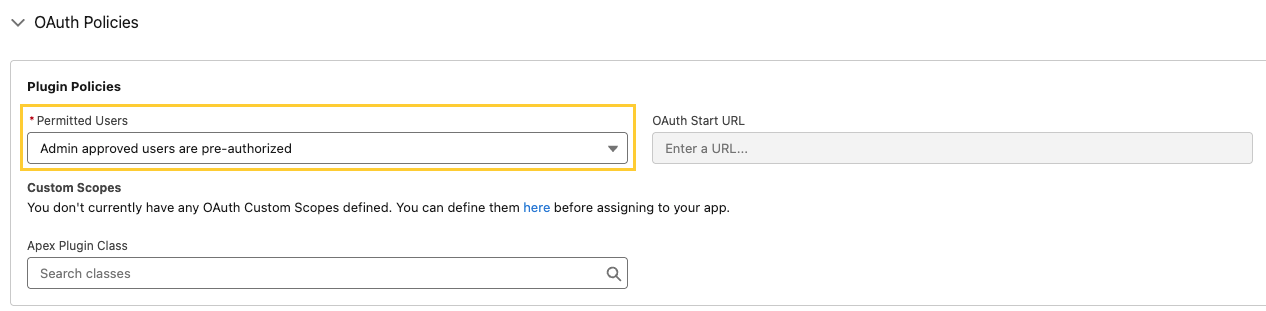
Under OAuth Policies → Plugin Policies, set Permitted Users to Admin approved users are pre-authorized and Save.
-
Troubleshooting checklist
-
SharePoint option missing: Confirm
mvn__Feature_Activation__mdt.mvn__CA_SharePoint_Integrationis active and the user hasmvn__CA_SharePoint_Integration_Userpermission. -
Callout or auth errors: Re-verify the Entra app secret/certificate, Graph permission grants, External Auth Identity Provider, and Named Credential Merge Fields/ Authentication settings.
-
Frames or previews blocked: Add CSP Trusted Sites for your SharePoint host; confirm browser and org CSP policies.
-
Wrong site or library: Confirm the
mvn__FA_Text_Value__cfield on themvn__CA_SharePoint_Integrationfeature activation record contains the correct SharePoint Site ID.
For product defects, contact Customer Support.