
Requests
A Request is a child record of an Interaction. Each Request stores information about the account's inquiry and any responses that have been provided. There can be multiple Requests in a single Interaction. For example, if an HCP asks multiple questions in a single email or conversation, each question will have its own Request within a single Interaction.
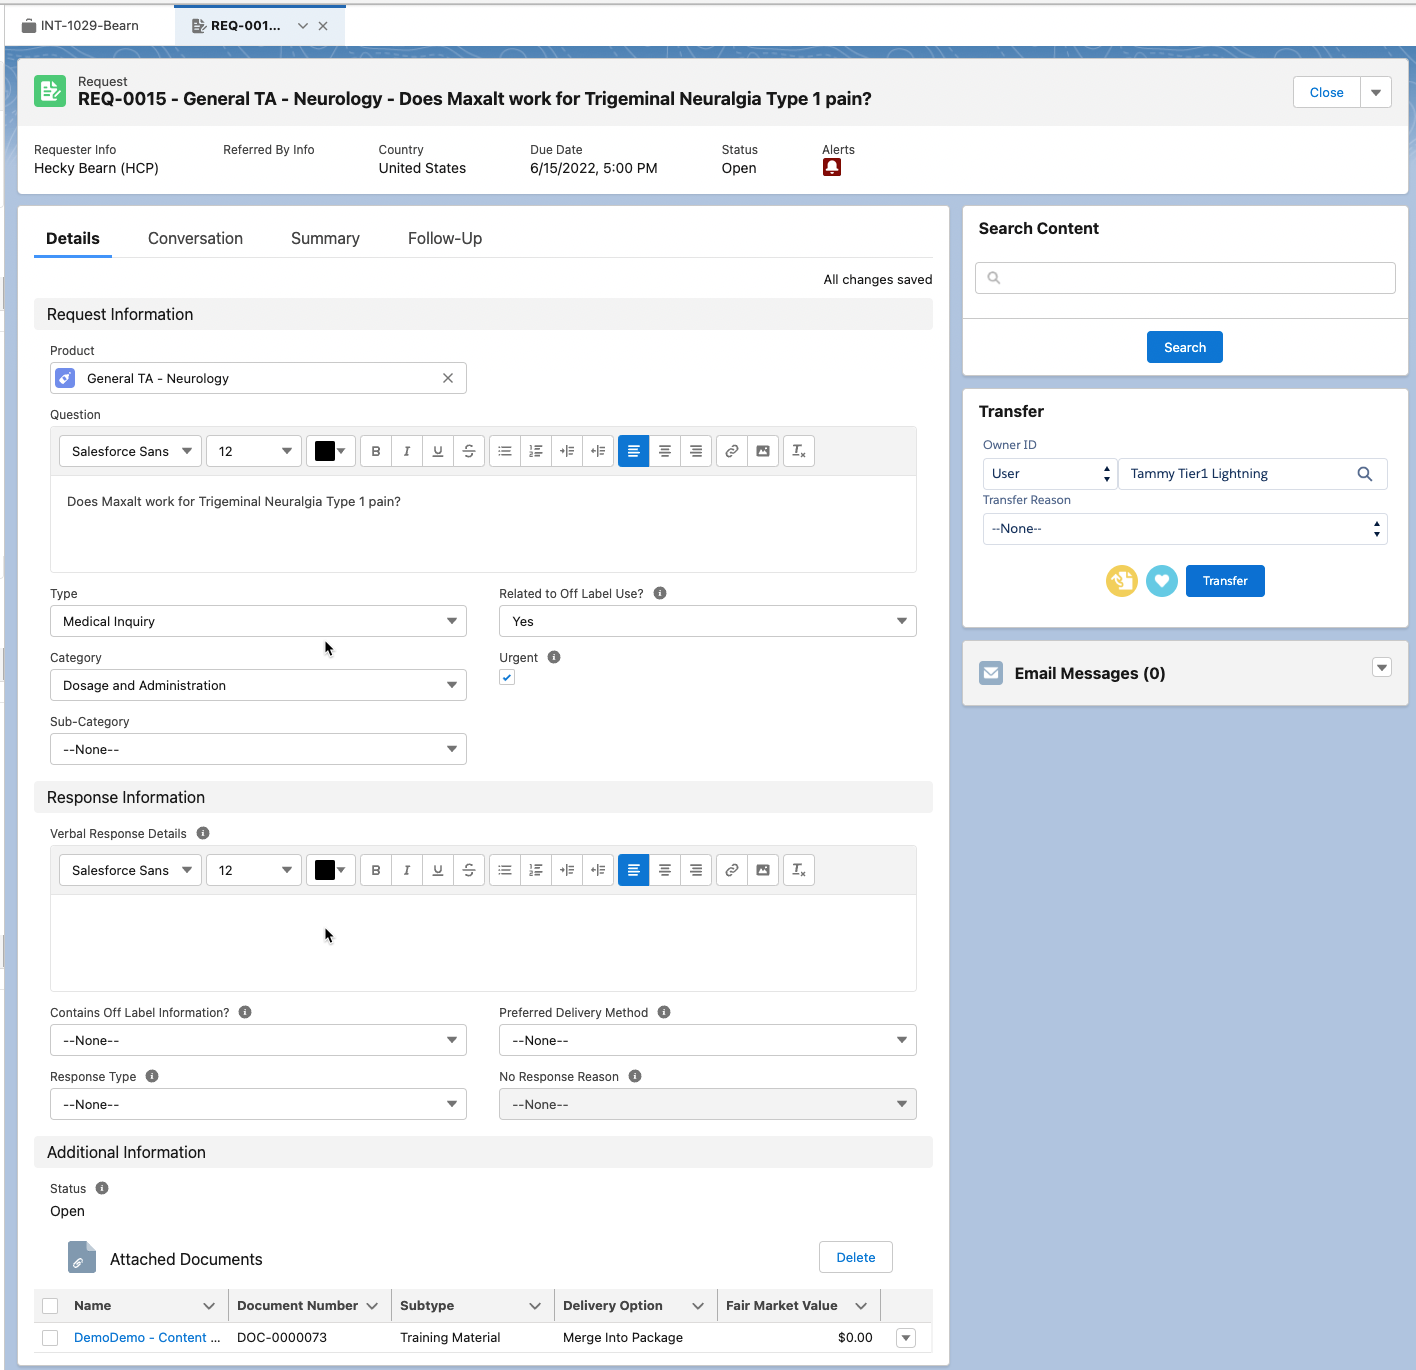
Request view
Besides the standard fields, the Request page layout also has embedded components in it. These components include:
Enhanced Record Edit
Requests can be edited as needed, with any changes automatically saved using the Enhanced Record Edit component. Visit the Enhanced Record Edit topic for more information.
Product Lookup
The Product Lookup Lightning component enables users to search the
product database and select a product value for MED_Product__c.
Each product result contains the name of the product and a subtitle. The subtitle is comprised of product metadata separated by the "•" character.
Visit Product Lookup for more information.
Request Content Search
The MIC - Request Content Search component adds a search bar and button to the default Request Record page. The search bar and button launch a search modal and immediately execute the search. From the modal, you can filter results, refine your search, attach documents to the Request record, and preview a document search result in a modal with the document viewer.
Visit Request Content Search for more information and configuration instructions.
Interaction Follow-ups
You can create a Follow-up Interaction and associated Request to communicate content updates to requesters who have given consent to receive them using one of the methods below.
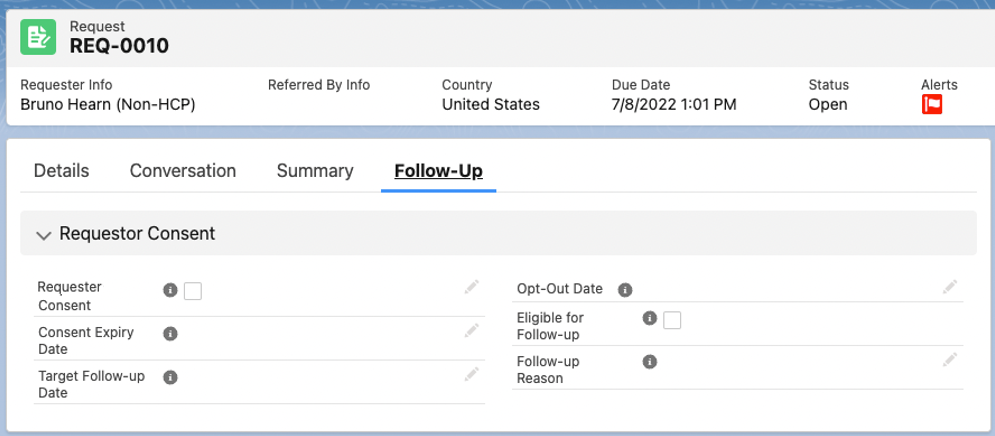
To record a requester's consent using the Edit icon:
-
In an open Request, click the Follow-Up tab.
-
Click the Edit icon in the Requester Consent field.
-
Check the box in the Requester Consent field to indicate their consent.
-
Complete the following fields, if applicable:
-
Consent Expiry Date
-
Target Follow-up Date
-
Opt-Out Date
-
Eligible for Follow-up
-
Follow-up Reason
-
-
Click Save.
To record a requester's consent using the Update Follow-up Consent Details quick action button:
-
In an open Request, click the dropdown arrow in the top right of the Request section.
-
Select Update Follow-up Consent Details.
-
Use the Update Follow-up Consent Details modal to record the relevant requester consent details.
-
Click Save.
You can use the Update Follow-up Consent Details quick action button if the request is open or closed. However, once the request is closed, you can only use the quick action button to update consent information.
To record a requester's consent on fulfillment, visit the Configure follow-up opt in/opt out emails section. You can use the fulfillment email templates that are provided out-of-the-box and configure them so that requesters can either opt in or out of receiving updates.
Adding a Follow-up Interaction to a Request
To add a Follow-up Interaction to a Request:
-
In an open Request, click the dropdown menu in the top right of the Request's highlight panel.
-
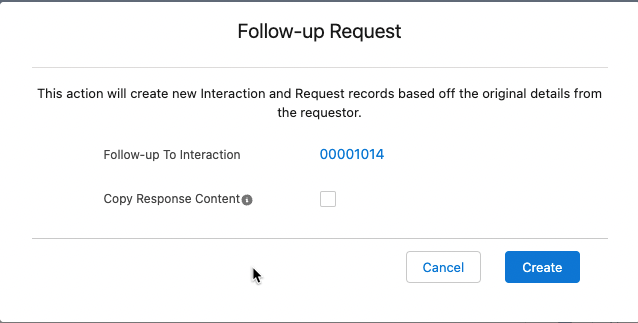
Select Follow-up Request. The Follow-up Request modal appears.
-
To copy content from the content repository, click the Copy Response Content checkbox. Otherwise, leave it unchecked.
-
Click Create. You are automatically brought to the new Request page within the new Interaction.
The new Interaction is created with the following values pre-populated:
-
Channel = Follow-up
-
Follow-up To = Original Interaction from which the Interaction was created
-
Status = Open
The new Request is created with the following values pre-populated:
-
Interaction number
-
Owner
The new Request has the following values removed:
-
Date Opened
-
Date Closed
-
Due Date
A request created by a Follow-up cannot be created from a request that is also a Follow-up. For requests that were made from a Follow-up, the contents of the Follow-up tab will not appear since the consent was recorded in the original request.
Cloning a Request
Previously created Requests can be cloned and associated with new Interactions. This helps facilitate an easier workflow by reusing commonly used question and answer content.
To clone a Request:
-
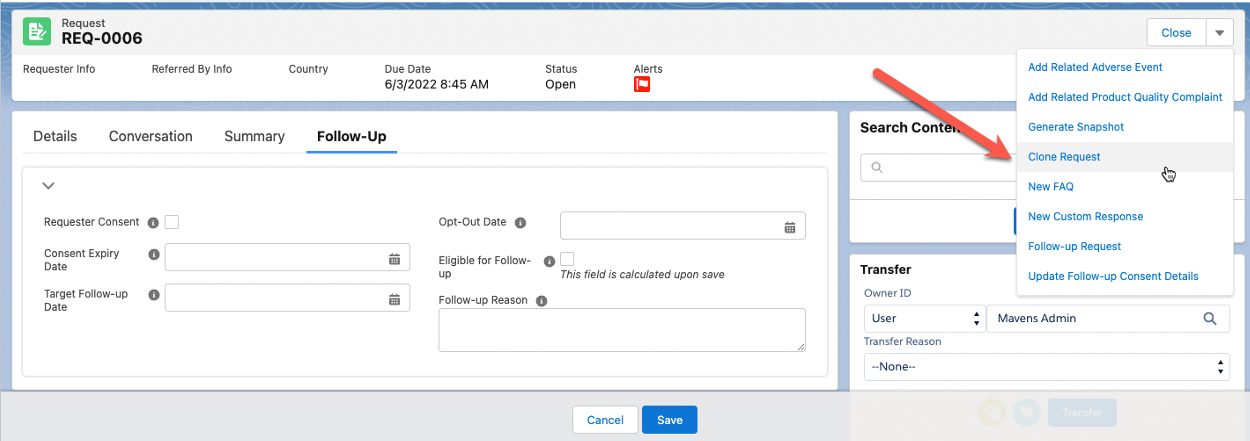
From a Request, click the dropdown caret in the top right and select Clone Request.
-
On the Clone Request modal, either keep the pre-populated Interaction in the Parent Interaction field or search for and select a different one.
-
Check the checkbox next to Copy Response Content to copy the content into the cloned request.
-
Click Clone.
Once cloned, the system will automatically:
-
Put the cloned request in "Open" status.
-
Clear any related Inbound Form lookups (if applicable).
-
Automatically update the Cloned From field with the record from which the new record was cloned.
Configuring the Follow up tab on a Request record
You can enable your users to capture consent details as part of a broader workflow. Using the steps below, you can allow them to capture consent from a requester to follow up with more information at a later date.
To configure the Follow-up tab on a Request record:
-
From Setup, click the Object Manager tab.
-
Search for and select the Interaction (
Case) object. -
Click Fields & Relationships.
-
Select the Channel field and add 'Follow-up' as a picklist value.
-
From Setup, click the Object Manager tab.
-
Search for and select the Request (
MED__Request__c) custom object. -
Click Lightning Record Pages on the left side navigation panel.
-
Click Request.
-
Click Edit. The Lightning App Builder appears for the Request page.
-
Select the Follow-up tab.
-
Click the Fields tab on the navigation panel on the left side of the page.
-
Under the Fields Component section, click and drag Field Section, and drop it onto the Follow-up section.
-
Under the Fields section on the navigation panel on the left side of the page, click, drag, and drop the following fields:
-
Requester Consent
-
Consent Expiry Date
-
Target Follow-up Date
-
Opt-Out Date
-
Eligible for Follow-up
-
Follow-up Reason
-
-
Click the Requester Consent section you just created. On the right side of the page, enter "Requester Consent" in the Label field.
-
Click Save.
Configuring the Follow-up Action on a Request
You can enable your users to create a Follow-up Interaction and associated Request as part of a broader workflow. This workflow would allow them to capture consent from a Requester to follow-up with more information at a later date, or simply associate a new Request with a previously relevant interaction using the methods below.
To configure the follow-up action on a request:
-
From the Request page in the Lightning App Builder, click the highlights panel.
-
On the right side of the page, under Actions, click Add Action. A search modal appears.
-
Search for and select Follow-up Request and click Done. It now appears under the list of actions.
-
Click the new Follow-up Request action and drag it to the appropriate position.
-
Click Save.
Custom Objects
Request - The Request object stores information about medical inquiries and the provided responses.
Create custom responses and FAQs from requests
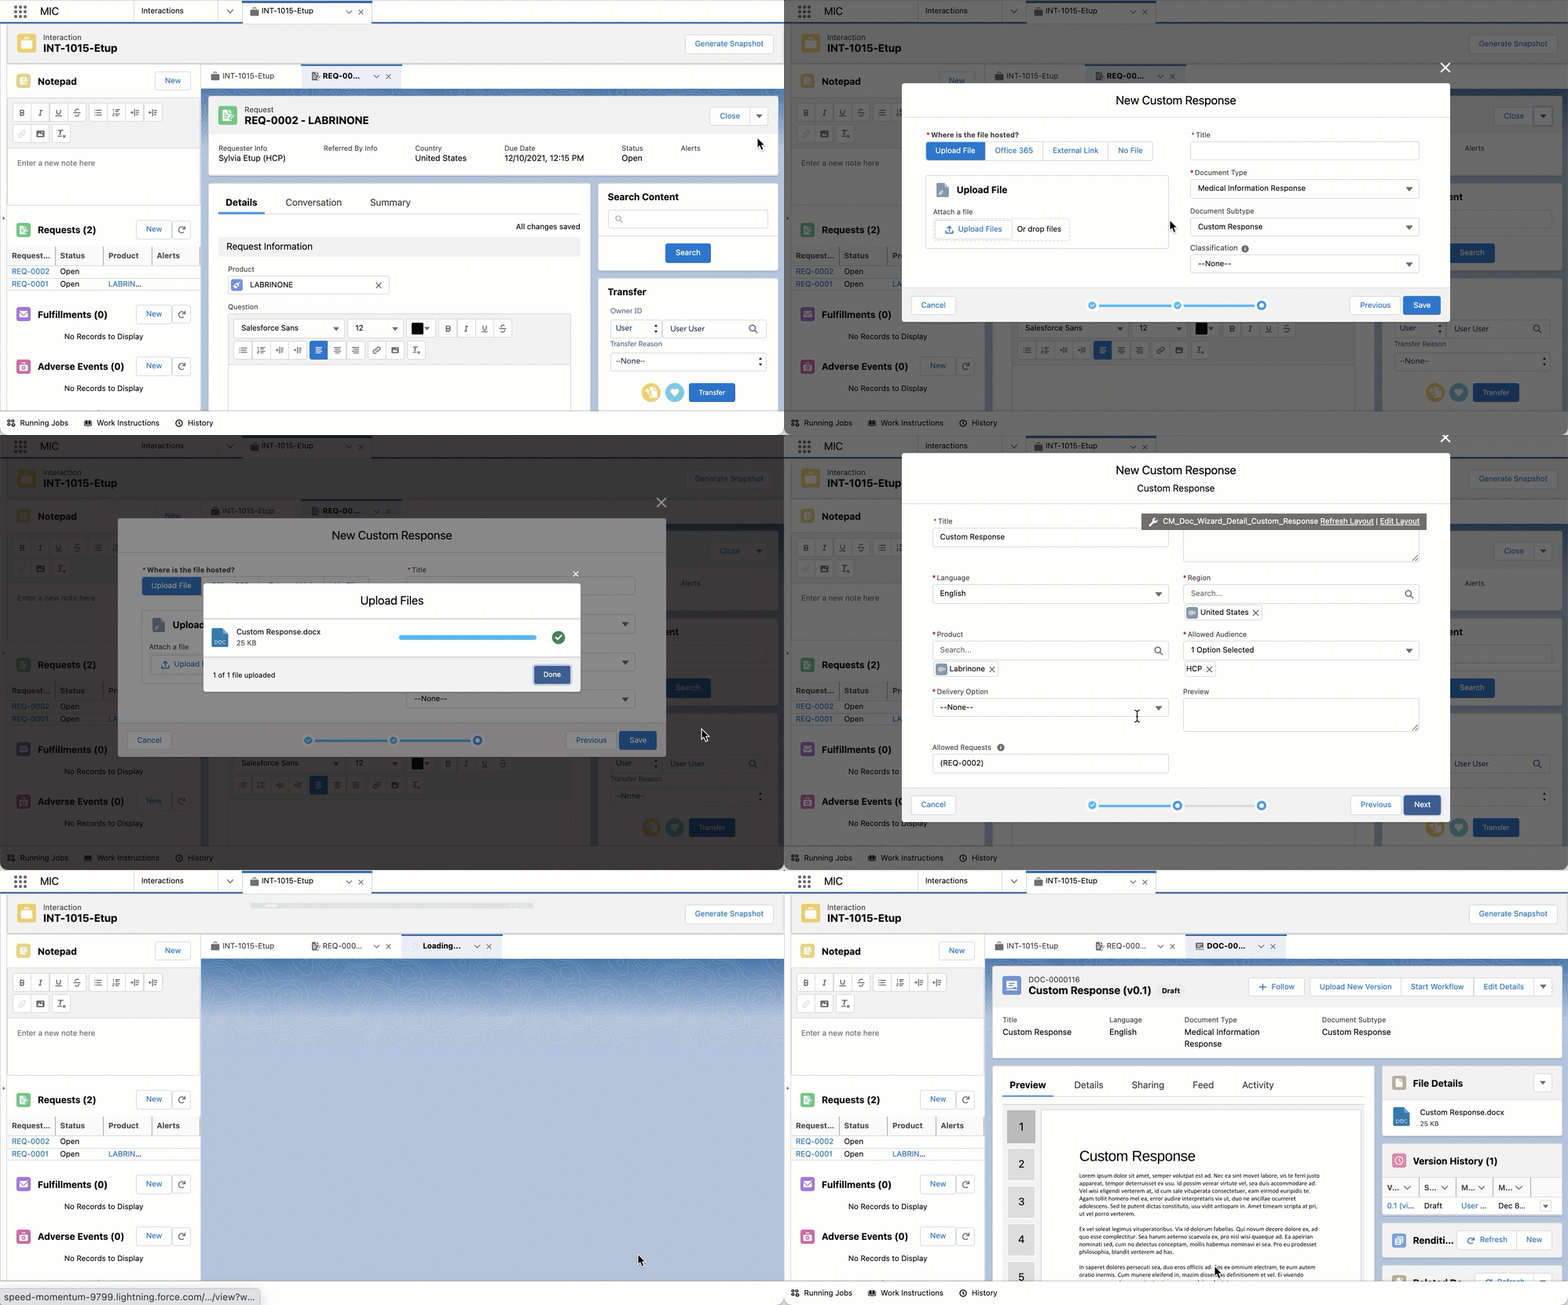
You can create custom responses and FAQs via quick actions by clicking on New Custom Response or New FAQ in a given Request record. Doing so opens up a document creation wizard modal that is pre-populated with data from the Request record or its parent Interaction object to reduce manual data entry. The modal also lets you complete and confirm any required or additional information.
You can also create custom responses by clicking on New Custom
Response in the search modal that opens via the Request Content Search
component. Once a new custom response is reviewed and has a status of
Approved, it will appear in search results going forward. For more
information about Custom Responses, refer to
Custom Responses.
Only users assigned to the CM_ContentAuthor Permission Set can use this feature.
Enable functionality
To enable this functionality for users:
-
Open the relevant Request record page in the Lightning App Builder.
-
Drag and drop the MIC -- Document Wizard Modal (
medDocumentWizard) hidden helper component onto the page. -
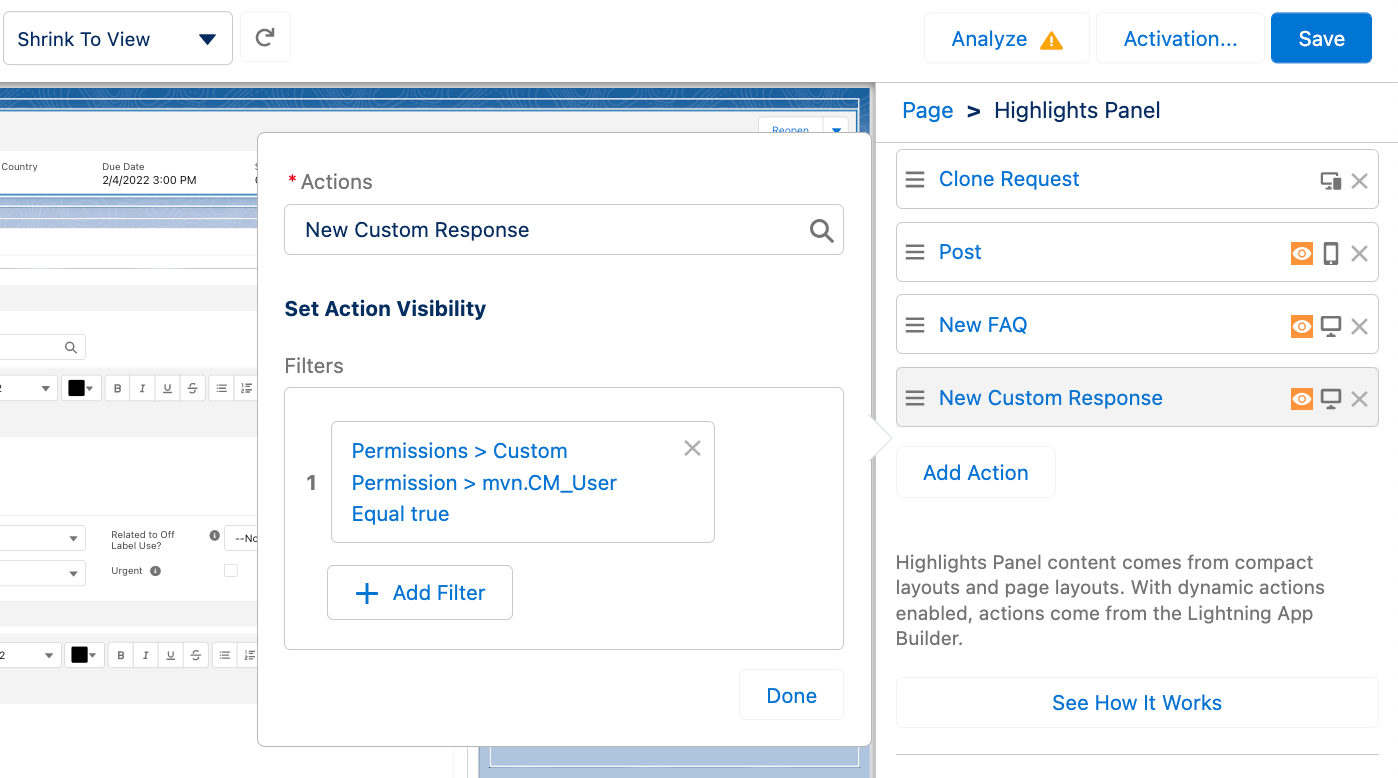
Click on the Highlights Panel component, and add the New Custom Response and New FAQ actions.
For each action, you can add a filter to ensure that only users with the correct permissions can view and use the feature. To add a filter:
-
Click Add Filter.
-
Click Advanced.
-
Set the Field to Permissions > Custom Permissions > CM_User.
-
Set the Operator to Equal.
-
Set the Value to True.
-
Click Done.
-
To add actions to the Highlights Panel component via the Lightning App Builder, Dynamic Actions must be enabled.
-
Click on the Request Content Search component, and check the Allow Document Creation checkbox. This lets users create custom responses from the Search Content component as well.
-
Click Save.
Configure modal
To modify the pre-populated Document Type and Document Subtype fields in
the modal, modify the Document Type (mvn__MED_Document_Type__c) and
Document Subtype (mvn__MED_Document_Subtype__c) fields for these
existing Document Wizard Settings (mvn__MED_Document_Wizard_Settings__mdt) records:
Document Wizard Settings records
| Label | API name |
|---|---|
| Request - Custom Response | MED_Request_Custom_Response |
| Request - FAQ | MED_Request_FAQ |
Do not modify the API names of the Document Wizard Settings records listed in the Document Wizard Settings records table.
To configure the layout of the document creation wizard modal and output, refer to Layout locations.