Integrated Language Translation
Medical Information Cloud's integrated language translation feature enables the translation of certain Interaction data and content using a 3rd party translation service. The translation service (also referred to as a vendor) provides a framework for applications such as Medical Information Cloud to translate field values within an Interaction. The vendor performs the translations asynchronously and stores the results within Medical Information Cloud and can be configured to integrate with custom vendors that offer this service.
Mavens recommends clients work with their Mavens representative for licensing options and preferred 3rd party translation service.
Translation types
The integrated translation feature can translate both data and content. Data includes the static text on records while content refers to documents and files. The Setup and configuration section below describes the setup and configuration steps that apply to both translation types while the following pages provide more detailed information and configuration instructions for each one:
Setup and configuration
To use either translation type, you must complete the following setup and configuration steps to enable them:
Add a custom vendor
To enable the integrated translation feature, you must have a custom vendor that provides and performs the content and/or data translation. To implement and add a custom vendor:
-
Create an Apex class that implements the methods in the Translator Interface (
CT_ITranslator). -
Create a Translation Vendor (
mvn__CT_Vendor__mdt) metadata record.-
Set the Translator (
mvn__CT_Translator__c) field to the name of the Apex class from step 1 above. -
Set the Translator Namespace (
mvn__CT_TranslatorNamespace__c) field to the namespace of the Apex class from step 1 above, if applicable. -
Check the Enabled (
mvn__CT_IsEnabled__c) checkbox (i.e., set totrue) to enable the vendor's translations to be used. -
Leave the API Endpoint (
mvn__CT_Endpoint__c) field blank.
-
Configure the vendor regions
Vendor regions determine the translation service the translation request
is sent to based on the region associated with the content and/or data.
To create a Vendor Region
(mvn__CT_VendorRegion__c) record:
-
In the App Launcher, search for and select Vendor Regions.
-
On the Vendor Regions page, click New.
-
Complete the following fields:
Vendor Region fields
| Field | Description | Values |
|---|---|---|
| Vendor Developer Name | The name of the vendor that should be used for the region. | This must match the name of an existing Translation Vendor (mvn__CT_Vendor__mdt) metadata record. |
| Region | The region that encompasses the area that will be serviced by the vendor. | Select the region to assign the vendor to. |
| Priority | The order in which this region applies. | Using numerical values, add the priority for the specified vendor region. The lower the number, the higher the priority. |
| Is Content Translation Enabled? | A checkbox that indicates if content translation is enabled for this vendor in this region. | This box must be checked to enable content associated with the selected region to be translated by the vendor. |
| Is Data Translation Enabled? | A checkbox that indicates if data translation is enabled for this vendor in this region. | This box must be checked to enable data associated with the selected region to be translated by the vendor. |
- Click Save.
A vendor region can be saved without selecting either translation checkbox. However, when neither content translation nor data translation is selected, no translation requests for that region will be sent to the selected translation vendor.
A vendor region can be defined for the same or overlapping regions to customize the translation routing process. Data and content can be routed to separate translation services for the same region by creating different vendor regions for each translation type. Vendor regions can also prioritize different translation services for overlapping areas.
Example vendor regions are shown below:
Example vendor regions
| Field | Vendor Region A | Vendor Region B |
|---|---|---|
| Vendor Developer Name | Custom Vendor | AWS |
| Region | Mexico | North America |
| Priority | 1 | 2 |
| Is Data Translation Enabled? | Selected | Selected |
Integrated language translation - Content
Content translation
The integrated language translation feature enables content managers to initiate the translation of documents using a 3rd party translation service without having to leave Medical Information Cloud. Specifically, a new configurable "Request Translation" workflow allows users to capture translation preferences, submit the translation request (including the document to be translated and metadata), and store the resulting translation within Medical Information Cloud, all while maintaining the document approval process, document relationships, and versioning.
When the document is in the process of being translated, a visual notification appears showing that the Document record is "Checked Out". This prevents other users from editing the record during the translation process. Additionally, if an error occurs during the translation process, a notification will appear notifying the user of the error. The error will also appear in the Audit Log History.
When the translation is completed, a notification appears, notifying the user that it is ready.
For general instructions on how to set up and configure a content translation service, see Setup and configuration.
Manual translation
Enable manual document translation requests
Users can manually request translations on documents in Medical Information Cloud.
To enable this functionality:
-
Navigate to the MCM Global Setting (
mvn__CM_Global_Setting__mdt) custom metadata type. -
Click the Default (
CM_Default) MCM Global Setting metadata record. -
Set the Enable Translation Requests field to
true.
Submit document translation request
To request a document translation:
-
Navigate to a Document (
mvn__CM_Document__c) record page. -
In the Related Documents component, click the dropdown arrow and then Request Translation. The Request Translation Wizard (
cmRequestTranslationWizardModal) will appear. -
On the Select Locale page, complete the required and relevant fields.
The regions available in the Supported Regions field are based on the configured vendor regions. The regions selected in this field are what determine which target languages are available and which vendor will be selected for the translation request. The regions selected in the Additional Regions field are not used to facilitate the translation request and are not sent to the vendor. The additional regions are only added as document metadata.
If a desired region is not available in the Supported Regions field,
users should use the traditional method of creating a Document
Relationship (mvn__CM_Document_Relationship__c)
record where the Type field is set to Translation.
-
Click Next.
-
On the Edit Document Details page, complete the required and relevant fields.
Some of the information provided on this page is sent to the vendor as part of the translation request and will also be translated to the target language.
-
Click Next.
-
On the third page, enter any additional information that the vendor needs to perform the translation.
-
Click Next.
-
On the Confirm page, review the information to be submitted to the vendor.
-
Click Submit.
Once the translation request is submitted:
-
The document, along with all its relevant metadata, is sent to the designated vendor based on the selected region and language.
-
A new cloned document is created and added to the Related Documents component as a placeholder for the final translated document.
Users can open the placeholder document at any time to monitor the status of the translation process.
-
The vendor completes the translations, which can take up to a few hours.
-
The placeholder document in the Related Documents component is updated and checked in with the final translated document.
-
The user receives a Salesforce notification that the translation has been completed, assuming the necessary system events have been properly configured.
Resubmit document translation request
If the source document is updated, users can resubmit a translation request.
To request a new translation on an already translated document:
-
Navigate to a Document (
mvn__CM_Document__c) record page. -
In the Related Documents component, click the translated document.
-
On the Document record page of the translated document, click Resubmit Translation Request. The Resubmit Translation Wizard appears.
-
On the wizard pages that appear, complete the required and relevant fields and click Next.
-
On the Confirm (
cmResubmitTranslationWizardConfirmStep) page, review the information to be submitted to the vendor. -
Click Submit.
Integrated language translation - Data
Interaction data translation
The integrated language translation feature also offers an Interaction data translation workflow for language translations within an Interaction. The workflow was built to enable configurability of which fields to be translated, where the translated values are stored within Medical Information Cloud, and which 3rd party service is used to complete the translation. Additionally, notifications can be configured to alert the content manager when translations have been completed by an integrated translation service.
Configuration requirements
To configure the interaction data translation feature, you will need a language translation connector license. Please reach out to your Mavens representative for more information.
Configuration steps
For general instructions on how to set up and configure a data translation service, including how to enable a custom vendor, see Setup and configuration. You must also complete the following steps:
-
Set up translation mappings that enable manual translation.
-
Optionally, setup automated translations.
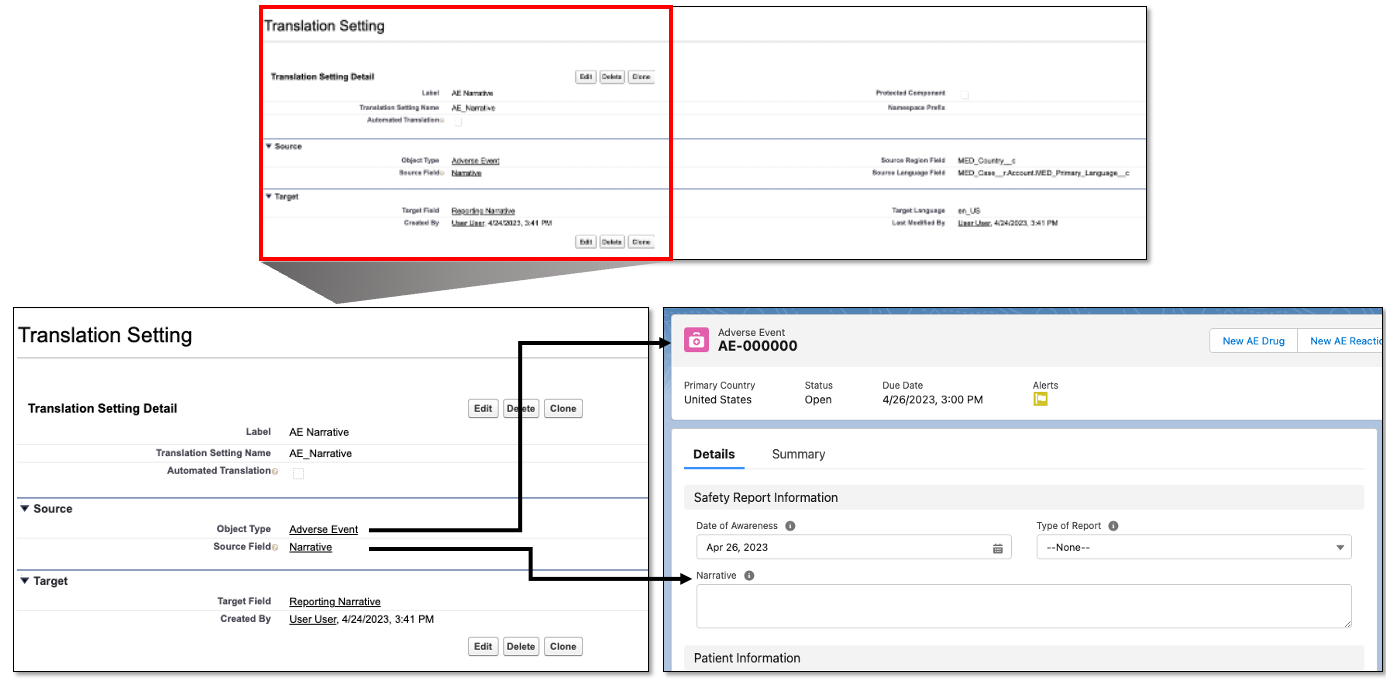
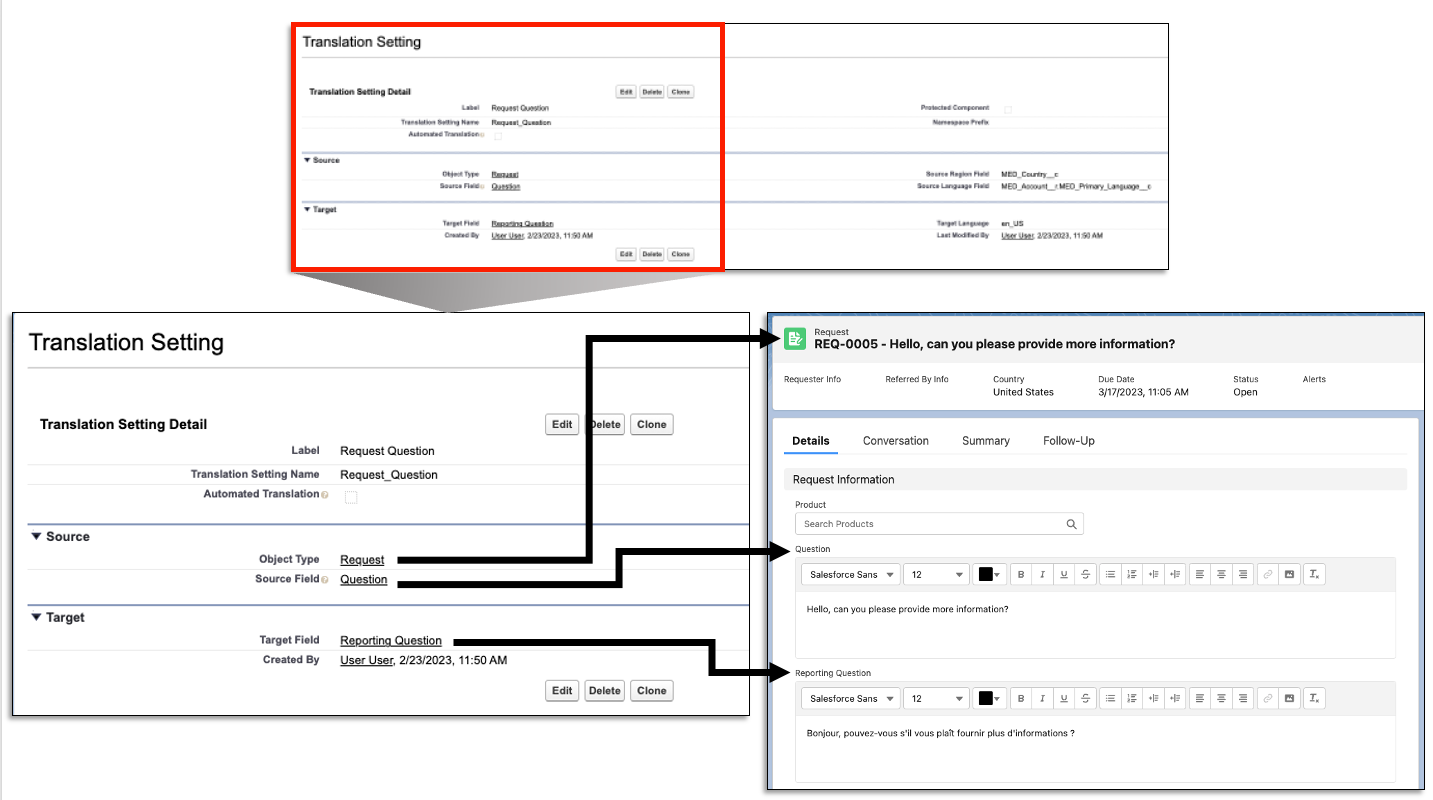
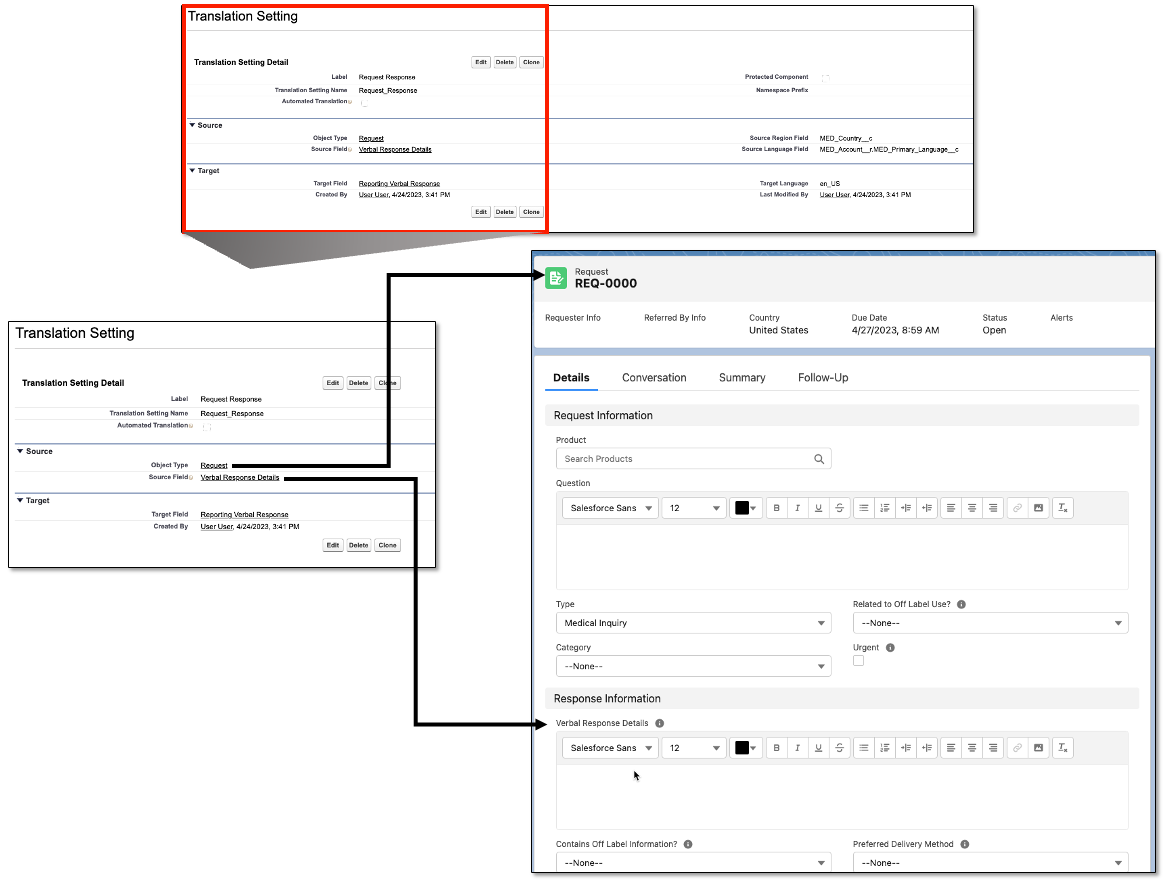
Translation settings
Medical Information Cloud ships with the following default records in the
Translation Setting
(mvn__MED_Translation_Setting__mdt) custom metadata records. These
metadata records can be edited as needed and new metadata records can be
added if desired. These records allow you to configure which fields
(source fields) will be translated and where they will appear (target
field) on the record.
-
AE Narrative
-
PQC Complaint
-
Request Question
-
Request Response
Data translation field configuration
The metadata records associated with the Translation
Settings (mvn__MED_Translation_Setting__mdt) custom
metadata type define which specific object fields are automatically sent
for translation upon record closure.
To create a new Translation Settings metadata record:
-
In the Quick Find box in Setup, search for and select Custom Metadata Types.
-
Click Manage Records next to Translation Setting.
-
Click New to create a new Metadata Record. Each record, when enabled, will automatically translate a defined field for every record of the defined object type.
-
Complete the following fields:
Translation Settings fields
| Field | Description | Required values |
|---|---|---|
| Label | Name of the custom metadata setting. | Must have a unique name. |
| Translation Setting Name | API name of the label. | N/A - Automatically populates based on the Label field. |
| Automated Translation | A checkbox that enables the automated translation upon closure of the record. | The box must be checked to enable automatic translation. Warning: The label can be saved without checking the box; however, the data will not be translated. |
| Object Type | Drop down list of the available object types. | Select the object type that contains the data for the translation request. |
| Source Field | Drop down list of the available fields within the selected object type. | Select the field that contains the data for the translation request. |
| Source Region Field | The field that contains the region associated with the data. | The API name of the field that contains the region information associated with this source field. |
| Source Language Field | The field that contains the associated language code. | The API name of the reference field. |
| Target Field | Drop down list of the available fields to translate the data into. | Select the field for the translated data to be returned to. |
| Target Language | The language the data is translated into. | A Salesforce supported ISO language code. |
- Click Save.
A Vendor Region must be defined for the region associated with the translated data to route the translation request to the correct service.
Add the translation quick action button
The Translate quick action can be added to any record page. To do so:
-
From a record page (e.g., Requests), click the gear icon in the top right of the page and click Edit Page.
-
Click to select the highlights panel.
-
On the right side of the page, at the bottom of the list of Actions, click Add Action.
-
In the modal that appears, search for Translate and click to select it.
-
Click Done.
-
Click Save on the top right corner of the page.
Automated data translation
The metadata records associated with the Translation Settings
(mvn__MED_Translation_Setting__mdt) custom metadata type define which
specific object fields are automatically sent for translation.
To create a new Translation Settings metadata record:
-
In the Quick Find box in Setup, search for and select Custom Metadata Types.
-
Click Manage Records next to Translation Setting.
-
Click New to create a new Metadata Record. Each record, when enabled, will automatically translate a defined field for every record of the defined object type.
-
Complete the following fields:
Translation Settings (mvn__MED_Translation_Setting__mdt) fields
| Field | Description | Values |
|---|---|---|
| Label | Name of the custom metadata setting. | Must have a unique name. |
| Translation Setting Name | The API name of the label. | Automatically populates based on the Label field. |
| Automated Translation | The checkbox that enables the automated translation. | The box must be checked to enable automatic translation. Note: The label can be saved without checking the box, however, the data will not be translated. |
| Object Type | A dropdown list of the available object types. | Select the object type that contains the data for the translation request. |
| Source Field | A dropdown list of the available fields within the selected object type. | Select the field that contains the data for the translation request. |
| Source Region Field | The field that contains the region associated with the data. | The API name of the field that contains the region information associated with this source field. |
| Source Language Field | The field that contains the associated language code. | The API name of the reference field. |
| Target Field | A dropdown list of the available fields to translate the data into. | Select the field for the translated data to be returned to. |
| Target Language | The language the data is translated into. | A Salesforce supported ISO language code. |
- Click Save.
A Vendor Region must be defined for the region associated with the translated data to route the translation request to the correct service.