User Interface Components
You can expose and arrange components on the Lightning record pages to make it easier for users to record and manage medical information inquiries and meet business requirements. The Lightning record components table below lists the available components in the Medical Information Cloud Inquiry Management system.
User interface components
| Component label | Description | Object(s) |
|---|---|---|
| AIMI Prompt Component | Appears as an Ask AIMI button that opens the AIMI Prompt Selection modal. For more information, reference the Artificial Intelligence in Medical Information page. | All SObjects |
| MIC - Adverse Event Child Record | Manages the related child records of an Adverse Event (MED_Adverse_Event__c) record. | Adverse Event |
| MIC - Attach Request Documents | The component displays all Request Documents that look up to a Request record. Allows users to add, edit, replace, download, and delete these documents. | Request |
| MIC - Console Config | Displays the value of a specified formula field as a workspace's tab label. | All SObjects |
| MIC - Enhanced Record Edit | Displays fields in an editable format and auto-saves entered field data. | All SObjects |
| MIC - Enhanced Record Edit w/Save Check | An Enhanced Record Edit component based on the LWC version but with a check for unsaved changes. | All SObjects |
| MIC - Helper Workspace API | Allows the Salesforce console workspace API access for Lightning Web Components. | - Request - Interaction - Fulfillment |
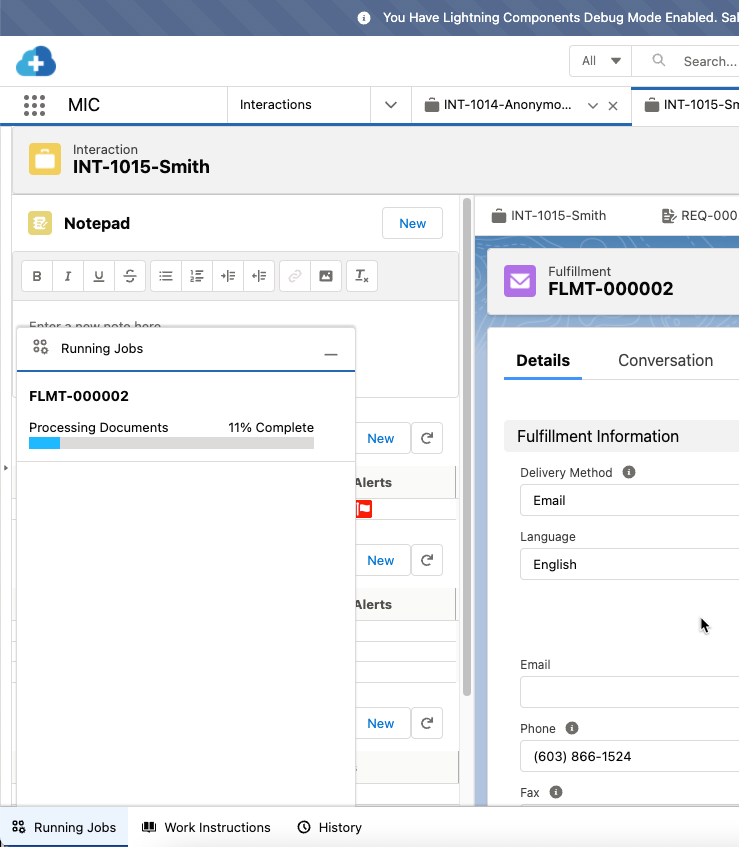
| MIC - Notepad | The MIC - Notepad component enables users to immediately enter inline notes from an Interaction and create new notes. All notes are auto-saved. When multiple notes exist for an Interaction, the component displays the most recently modified note. | All SObjects |
| MIC - Related List | Displays Request, Fulfillment, Adverse Event, Product Quality Complaint, and Interaction QA records related to a given Interaction and enables users to create new related records. While similar to the standard Salesforce Related List - Single component, the MIC - Related List component requires fewer clicks to create new related records. It also displays related records in a more compact, table grid-view, and includes more configuration points than the Related List - Single component. | All SObjects |
| MIC - Signature Viewer | Renders a Medical Inquiry Signature from a base64 encoded image. Only allowed on Request and Inbound Form record pages. | - Inbound Form - Request |
| MIC - SObject Record Edit View | The MIC - SObject Record Edit View is a Lightning Web Component that displays fields on Lightning record pages in a simple edit view with a Save button that is always in Edit mode. | All SObjects |
| MIC - SObject Record Read View | The MIC - SObject Record Read View is used to put arbitrary read-only fields into a Lightning record page. | All SObjects |
| Field Audit Trail Related List | Field Audit Trail Related List is a Lightning component that displays field-level change tracking information for a record. The displayed information is an aggregate view of audit trail events from three sources: - Salesforce's Shield's Field Audit Trail - Salesforce's normal field history tracking - Medical Information Cloud Inquiry Management Field Audit Trail | All SObjects |
| KH - Komodo Health Insights | Powered by Komodo Health's Healthcare Map, this component brings real-world HCP metrics to Salesforce. Put this component on a page that represents an HCP to better understand that HCP's leadership and influence within specific therapeutic areas. | All SObjects |
| MIC - Document Wizard Modal | A document wizard modal that is used to create a new Document Version. | All SObjects |
| MIC - Fulfillment Files List | Component that displays all Files attached to a Fulfillment and allows custom actions as well as enforces lockdown on closed. | Fulfillment |
| MIC - Request Content Search | Sidebar search field and modal for searching content from a Request. | Request |
| MIC - Case Accounts | Component that allows searching for accounts as well as viewing and editing the currently selected account. | Case |
| MED_LiveChatInteractionLauncher Note: Visualforce component | A helper page to be put on the Live Chat page layout that will create a case and automatically open an account search when starting a Live Chat. | Live Chat Transcript |
| MED_E2BGenerateSingle Note: Visualforce component | Page to allow the generation of an E2B XML file from an Adverse Event. | Adverse Event |
| MED_ChangeAdverseEventOwner MED_ChangeCaseOwner MED_ChangeFulfillmentOwner MED_ChangePQCOwner MED_ChangeRequestOwner Note: Visualforce components | Visit Change record owner. | - Adverse Event - Case - Fulfillment - PQC - Request |
Utility bar
The Utility bar is a Lightning record page located in the fixed footer of the Lightning Service Console. You can customize the Utility bar to expose utility items that your users need to frequently access throughout the whole application. For more information, visit Salesforce's Add a Utility Bar to Lightning Apps documentation.
Items that customers frequently use in the Utility bar include:
-
Running Job (MIC - Nintex Queue) - displays the progress of package generation jobs. For instructions on how to enable this component in the utility bar, visit Fulfillment Package Generation.
-
Work Instructions (MIC - Work Instructions) - displays contextual work instructions in line within the application. For more information, visit Work Instructions.
-
History - a helpful utility to quickly review and revisit pages recently viewed in Medical Information Cloud Inquiry Management. For more information, visit Salesforce's History Utility for Lightning Console Apps documentation.
Account Search
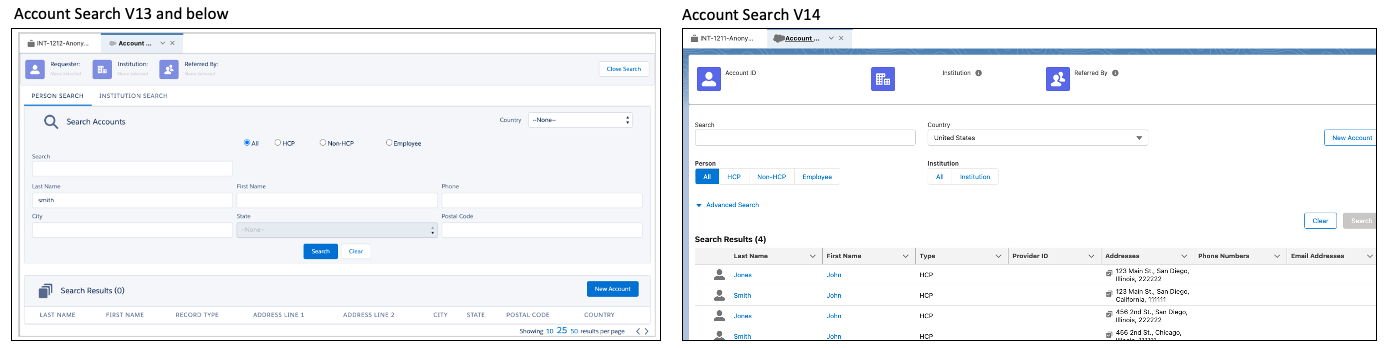
The Account Search feature helps you quickly find a Person or
Institution account and associate it with the Interaction (Case).
Further, as of the V14 release, the Account Search feature has changed
in several key aspects, specifically:
-
how the Account Search feature is launched
-
how results are displayed by making the columns that appear in the table configurable
-
an updated New Account modal
This documentation is relevant to all versions of Medical Information Cloud unless otherwise indicated.
Account types
Three account types can be associated with an Interaction record:
| Icon | Type | Description |
|---|---|---|
| Requester | The person making the actual request. | |
| Institution | The hospital/business the Requester is affiliated with. | |
| Referrer | The person/institution that referred the Requester. |
The record types above can be configured as a Referrer in the Account
Type
Setting (MED_Account_Type_Setting__mdt) custom
metadata type.
Account Type Settings
The metadata records associated with the Account Type Setting
(MED_Account_Type_Setting__mdt) custom metadata type define how
various record types are used and how the application handles them. The
following Account Type Setting fields should be defined when configuring
the Account Search feature:
| Field label | API name |
|---|---|
| Account Record Type | MED_Account_Record_Type__c |
| Account Search Order | MED_Account_Search_Order__c |
| Allow Filter by Affiliation Search | MED_Allow_Filter_by_Affiliation_Search__c |
| Allow Referred By | MED_Allow_Referred_By__c |
| Change Search Tab on Select | MED_Change_Search_Tab_on_Select__c |
| Create DCR | MED_Create_DCR__c |
| Default for Search | MED_Default_for_Search__c |
| Include in Create? | MED_Include_in_Create__c |
| Include in Search | MED_Include_in_Search__c |
| Is Person Record Type? | MED_Is_Person_Record_Type__c |
| Records Requested for Create | MED_Records_Required_for_Create__c |
| Require Institution on Create | MED_Require_Institution_on_Create__c |
| Segment | MED_Segment__c |
Creating requesters
Requester accounts are created using the Create as Requester button
on the New Account modal. The button will appear on the New Account
modal if configured using the Is Person Record Type
(MED_Is_Person_Record_Type__c) field on the Account Type
Setting (MED_Account_Type_Setting__mdt) custom
metadata type.
Creating referrers
Referrer accounts are created using the Create as Referred By button
on the New Account modal. This button appears if it is configured in the
Allow Referred By (MED_Allow_Referred_By__c) field in the Account Type
Setting (MED_Account_Type_Setting__mdt) custom metadata type.
Creating institutions
Institution accounts are created using the Create Institution button
on the New Account modal. This button appears if you click the
Institution icon at the top of the New Account modal. The button is
managed using the Is Person Record Type (MED_Is_Perfon_Record_Type__c)
field on the Account Type Setting (MED_Account_Type_Setting__mdt)
custom metadata type.
Require institution before create
To require the creation of an Institution account before a Requester is
created, configure the Require Institution on Create
(MED_Require_Institution_on_Create__c) field in the Account Type
Setting custom metadata type.
Custom labels
This component uses the following, configurable labels that can be configured within the Salesforce translation workbench to change the displayed text values.
| Label | Description |
|---|---|
| MED_Account_Search_All_Record_Type | The label for the generic "All" record type. |
| MED_Account_Search_Tab | The label for the Service Cloud Console tab when viewing the Account Search tab. |
| MED_Account_Successfully_Created_Message | The message that appears after creating an account using the New Account modal. |
| MED_Add | Combined with the contact information record type label and displayed under each contact info type on the New Account modal (e.g., Add Phone). |
| MED_Additional_Information | The header for the More Information panel. |
| MED_Add_Institution_Title | The title for the Add Institution button next to a search result. |
| MED_Add_Referred_By_Title | The title for the Add Referred By button next to a search result. |
| MED_Add_Requester_Title | The title for the Add Requester button next to a search result. |
| MED_Affiliate_X_with_Y | Displayed with selected accounts on the New Account modal when the following conditions are met: - Institution affiliation is required - Account settings have been configured for affiliations - The institution has been selected |
| MED_Associate_Institution_Success | The text that appears after successfully associating the institution during an account search. Note: This is available as of V14. |
| MED_Associate_Referred_By_Success | The text that appears after successfully associating the Referred By account during an account search. Note: This is available as of V14. |
| MED_Associate_Requester_Success | The text that appears after successfully associating the requester during an account search. Note: This is available as of V14. |
| mvn__MED_Back | The text that appears for the back button. |
| MED_Back_to_Top | The message that appears at the bottom of the Account Search page once the user has scrolled past the search parameters. |
| mvn__MED_Basic_Search | The text for the basic search pane control. |
| MED_Clear_Search_Results_Button | The title of the second button in the search parameters panel. |
| MED_Click_to_Affiliate | The text that appears when hovering over the "Affiliate" icon when the selected requester and selected institution are not already affiliated. |
| MED_Close_Account_Search | The label for the Close Search button that appears in the top right of the Account Search page. |
| MED_Contact_Result_Column_Label_Address | The text for the header of the address column in the Account Search results table. |
| MED_Contact_Result_Column_Label_Email | The text for the header of the email column in the Account Search results table. |
| MED_Contact_Result_Column_Label_Phone | The text for the header of the phone column in the Account Search results table. |
| MED_Create_Account_Button | The label of the button to create a Requester account in the New Account modal when using a standalone search (not linked to a case). |
| MED_Create_Institution_Button | The label of the button to create an Institution account in the New Account modal. |
| MED_Create_New_Account_Prompt | The message that appears at the top of the New Account modal indicating that the user must complete information to create an account. |
| MED_Create_Referred_By_Button | The label of the button to create a Referred By account in the New Account modal. |
| MED_Create_Requester_Button | The label of the button to create a Requester account in the New Account modal. |
| MED_Full_Search_No_Results | The error text that appears when no results are returned. Note: Available as of V14. |
| MED_Generic_Cancel | The label for the Cancel button on the New Account modal and the Cancel button on the Create Affiliation page. |
| MED_Go_to_Institution_Search | The link that appears when the application is configured to require an institution before creating a new requester and no institution has been selected. |
| MED_Institution_needed_before_Person_Account | The tooltip that appears on hover on the New Account button when it can be determined that an institution is needed before creating an account using the record type that was used to filter the search. This also appears on the New Account modal when a user selects a record type that requires an institution before account creation and no institution is selected for the interaction. |
| MED_Institution_Search_Tab | The label that appears on the Institution Search sub-tab just above the search parameters. |
| MED_New_Account | The text for successfully associating the Referred by account during an account search. Note: Available as of V14. |
| MED_New_Account_Button | The label for the New Account button that appears in the top right corner of the account search results. |
| MED_New_Account_Disabled_Message | The message that appears when hovering over the New Account button when a user changes search parameters after executing a search. The default value is: Changes were made to search parameters. You must now complete a new search before you can create a new account. |
| MED_Next_Page | The value for the next page pagination link that appears below the bottom right corner of the account search results. |
| MED_None_Selected | The value that is shown next to the Requester, Institution, or Referred By icons when no account has been selected for that account type. |
| MED_No_Alpha_in_Phone_Field | The error message that appears when a user searches for an account using an alpha character. The default value is: Alpha values are not allowed in Phone fields. |
| MED_No_Search_Results | The message that appears in the bottom of the screen when a search has been performed and no results are found. |
| MED_Parent_Accounts | The header for the parent account column in the Account Search results table. |
| MED_Person_Search_Tab | The label that appears on the Person Search sub-tab just above the search parameters. |
| MED_Previous_Page | The value for the previous page pagination link that appears below the bottom right corner of the account search results. |
| MED_Primary_Contact_Tooltip | The Alt-text for the primary contact check in the results table. Note: This is available as of V14. |
| mvn__MED_Record_Type | The text for the record type pane control. |
| MED_Remove_Account_Button | The title that appears when the user hovers over any of the X icons next to selected accounts. |
| MED_Remove_search_Restriction | The title for the X icon that appears next to the MED_Restricted_to_accounts_affiliated_with or the MED_Restricted_to_Institutions_affiliated_with label. |
| mvn__MED_Restrict_Search | The text for the restrict search pane control. |
| MED_Restricted_to_accounts_affiliated_with | The label that appears when an Institution record type is configured to restrict the search to the selected account. When a filtered search is executed, the user can click the X next to this label to remove the filter restriction and run the search again. |
| MED_Restricted_to_Institutions_affiliated_with | The label that appears when an account record type is configured to restrict the search to the selected account. When a filtered search is executed, the user can click the X next to this label to remove the filter restriction and run the search again. |
| MED_Restrict_to_Selected_Institution | The label for the checkbox in the search parameters that restricts the search to person accounts affiliated with the selected institution. |
| MED_Restrict_to_Selected_Requester | The label for the checkbox in the search parameters that restricts the search to institutions affiliated with the selected requester. |
| MED_Results_Exceeded_Max | The tooltip text that appears when there are too many results. Note: This is available as of V14. |
| MED_Results_Per_Page | The label that appears to the right of the options for results per page. |
| MED_Search_Parameters | The heading that appears in the top left corner of the search parameters. |
| MED_Search_Results | The heading that appears in the top left corner of the search results. |
| MED_Search_Results_Header | The text for the search results header. Note: This is available as of V14. |
| MED_Search_Term_Must_Have_2_Characters | The error message that appears when an agent enters a search term with less than two characters. |
| MED_Search_Term_Required | The warning that appears when an agent searches when no search parameters entered. |
| MED_Selected_Institution | The label that appears above the selected institution at the top of the page. |
| MED_Selected_Referrer | The label that appears above the selected referrer at the top of the page. |
| MED_Selected_Requester | The label that appears above the selected requester at the top of the page. |
| MED_Showing | The label that appears before the results per page options below the bottom right corner of the search results. |
| MED_Too_Many_Results | The warning message that appears when more results are returned than the configured Max Results. |
Account Search versions
Medical Information Cloud's Account Search feature and functions can be configured to use multiple sources of account data. For customers on Medical Information Cloud version 12, there are two versions of the Account Search feature to choose from.
The table below provides a comparison of the features and functions between Account Search V2 and Account Search V3.
Account Search version comparison
| Version 2 | Version 3 | Version 3 with Lightning user interface (UI) |
|---|---|---|
| Has the same reliable code as V11. | Newer looking backend. | Omni Search first. |
| Configured using Global Settings Account Search handlers. | Configured using the mvn__Interface_Handler__mdt custom metadata type. | Configured using LY_Layout system instead of Account Field Settings. |
Supports legacy MED_AccountSearchIntf based handlers. | Adds the new Omni Search box to the account search feature. | Not subject to view state limitations of the previous user interface. |
Account Search Handlers (sources)
Account searches rely on the relationships between Account Search handlers and Interface definitions. The table below shows the available Account Search handlers, applicable versions, and corresponding Interface definitions.
Account Search handlers
| Search handler class | Description | Available in V2 | Available in V3 | Interface |
|---|---|---|---|---|
| MED_AccountSearchHdlr | Facilitates account searches against data stored locally in Medical Information Cloud. | Yes | Yes (not recommended) | MED_MDMIntfDefinition.MED_MDMIntf |
| MED_NetworkSearchHdlr | Facilitates account searches against any registered Veeva Network instances. | Yes | Yes | MED_MDMIntfDefinition.MED_MDMIntf |
| MED_VeevaAccountSearchHdlr | Facilitates account searches against any registered Veeva CRM instances. | Yes | Yes | MED_MDMIntfDefinition.MED_MDMIntf |
| mvn.MED_AccountSearchHdlrV3 | Facilitates account searches against data stored locally in Medical Information Cloud. Note: Supports SOSL searches. | Yes | mvn.MED_IAccountSearchV3 | |
| MED_NetworkSearchHdlrV3 | Facilitates account searches against any registered Veeva Network instances. This handler has improved performance and enables searching and mapping of the special network fields phone and emails. Warning: This is a beta feature. To fix any issues, clone the search handler and follow the customization guidelines. | Yes | mvn.MED_IAccountSearchV3 | |
| mvn.MED_MICAccountSearchHdlr | Makes filtering by country more efficient because it uses the Country Summary (mvn__MED_Country_Summary__c) field on the Account object. Note: In order for this search handler to work, the following batch job must be run on pre-existing orgs: mvn.MED_CountrySummaryBatch countrySummaryBatch = new mvn.MED_CountrySummaryBatch();Database.executeBatch(countrySummaryBatch); | No | Yes | mvn.MED_IAccountSearchV3 |
| Custom handler | Any custom handlers used in the MED_AccountSearchIntf will be deprecated. | Yes | MED_AccountSearchIntf | |
| Custom handler | Custom handler that implements the MED_MDMIntfDefinition.MED_MDMIntf interface. | Yes | Yes | MED_MDMIntfDefinition.MED_MDMIntf |
| Custom handler | Custom handler that implements the mvn.MED_IAccountSearchV3 interface. | Yes | mvn.MED_IAccountSearchV3 |
To select an Account Search version:
-
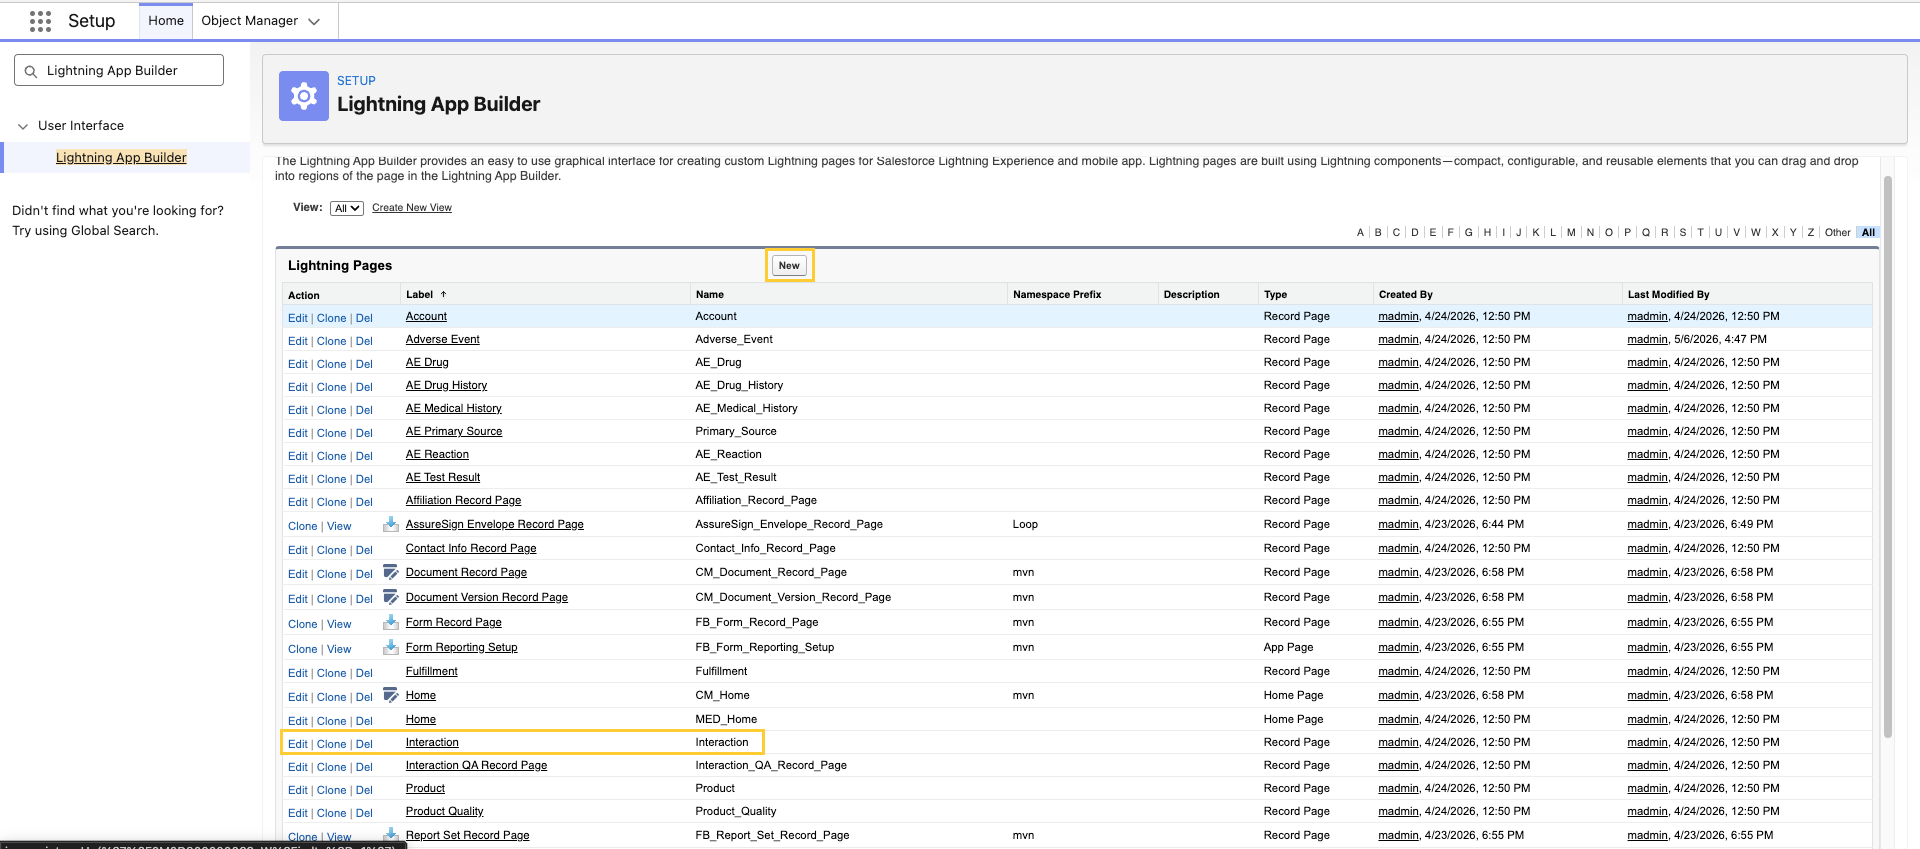
In the Quick Find box in Setup, search for and select Custom Metadata Types.
-
Click the Global Setting (
MED_Global_Setting__mdt) custom metadata type. -
Click Edit next to the User Account Search V3 (
MED_Account_search_V3_Enabled__c) field. -
Under the General Options section, click the radio button for Checked (recommended for using V3) or Unchecked if using V2.
-
Click Save.
Account Search V2
To configure the Interface handlers for Account Search V2, edit the
existing Global
Setting (MED_Global_Setting__mdt) custom metadata
type by updating the Account Search Handler
Classes (MED_Account_Search_Handler_Classes__c) field default value to
include the desired search handlers in your instance.
The Account Search Handler Classes
(MED_Account_Search_Handler_Classes__c) field supports ordered and
comma-separated lists. If accounts with matching External IDs are
returned from two different search handlers, the data from the handler
listed first will be used.
Search and result fields
The fields that appear in the search parameters and search results are
defined using the Account Field
Settings (MED_Account_Field_Setting__mdt) custom
metadata type.
Search fields
To configure a field to appear in the search fields, a numerical value
must be present in the Length field in the Search Field Order
(MED_Search_Field_Order__c) field in the Account Field Setting custom
metadata record. This number indicates, relative to other search fields,
where the field is presented on the search page.
Result fields
Account Field Setting (MED_Account_Field_Setting__mdt) custom metadata
records define the fields that appear in the search results. To specify
the order in which the fields are displayed, configure the Search Result
Order (MED_Search_Results_Order__c) field by adding a numerical value
to the Length field under the Number Options section. If two fields have
the same Search Result Order value, the fields are displayed in
alphabetical order by their translated label.
Results table
To make specific field(s) appear in the search results table, check the
Default Value checkbox in the Show in Primary Results
(MED_Show_in_Primary_Results__c) field.
More Information hover
To provide additional context using the limited space the search results
table provides, you can add fields to the More Information hover. To
configure a field to appear in the More Information panel, check the
Default Value checkbox in the Show in Secondary Results
(MED_Show_in_Secondary_Results__c) field.
The More Information hover feature is not supported in V14.
Relevance scoring for Account Field Setting metadata records that represent the same field
When multiple Account Field Setting (MED_Account_Field_Setting__mdt)
records exist for the same field, the record that is most relevant to
the context is used. The table below outlines the different contexts and
their relevance score. Multiple Account Field Setting records for the
same field exist when the records have the same value for all of the
fields listed below:
-
Object (
MED_Object__c), e.g., Account, Affiliation, or Contact Information -
Contact Info Record Type (
MED_Contact_Info_Record_Type__c) -
Is Person Record Type? (
MED_Is_Person_Record_Type__c) -
Field (
MED_Field__c)
Context relevance
| Relevance score | Segment (Country) | Account record type |
|---|---|---|
| 1 | Match | Match |
| 2 | Match | All |
| 3 | Default Segment | Match |
| 4 | Default Segment | All |
When multiple Account Field Setting records exist for the same field, you can use these special field order values:
-
0- enter this value to override and hide a field for a single segment when the same field is available globally. -
blank/null- do not enter a value when you want the next most specific order setting for the same field to apply. If blank for all instances of the same field, the field does not appear.
:::: ::: title Multiple Account Field Setting records for the same field :::
The records listed in the table below define search result
configurations for the same field. However, they have different Segment
(MED_Segment__c) and Account Record Type
(MED_Account_Record_Type__c) values. As a result, the search
determines the Account Field Setting record that is used. The
The table below contains example account searches and their most
relevant Account Field Setting record.
Example Account Field Setting records
| Record label | Segment | Account record type | Search result order |
|---|---|---|---|
| Record A | United States | HCP | 10 |
| Record B | United States | All | 20 |
| Record C | France | HCP | Null |
| Record D | Global | HCP | 30 |
| Record E | Global | All | 25 |
Example account searches
| Search # | Country filter value | Account record type filter value | Most relevant account Field setting record |
|---|---|---|---|
| 1 | United States | HCP | The most relevant record to this search context is Record A, which has a relevance score of 1. The field represented by Record A displays in the account search results based on the record's Search Result Order value of 10. |
| 2 | Spain | HCP | As there is no setting defined for Spain, the most relevant setting is Record D, which has a relevance score of 3. The field represented by Record D appears in the account search results based on the record's Search Result Order value of 30. |
| 4 | United States | Non-HCP | As there is no setting defined for Non-HCP, the most relevant record is Record B, which has a relevance score of 2. The field represented by Record B appears in the account search results based on the record's Search Result Order value of 20. |
| 3 | France | HCP | The most relevant record to this search context is Record C, which has a relevance score of 1. However, since the Search Result Order value for the record is null, the Search Result Order from the next most relevant record (Record D) is used. The field represented by Record D appears in the account search results based on its Search Result Order value of 30. |
| 5 | France | Non-HCP | As there is no setting defined for Non-HCP, the most relevant record is Record E, which has a relevance score of 4. The field represented by Record E displays in the account search results based on the record's Search Result Order value of 25. |
::::
Results per page and pagination

You can configure the number of results that appear per page in the Search Results section. If more results are returned than the configured page size, the result set will be paginated and an alert will appear, notifying the user that there are more results available than what appears in the table. You can click the links at the bottom right of the search results to navigate them.
The following values on the Global Setting (MED_Global_Setting__mdt)
custom metadata type can be configured to control the number of search
results that can be viewed.
| Global setting value | API name |
|---|---|
| Account Search Results Per Page | MED_Account_Search_Results_Per_Page__c |
| Account Search Max Results | MED_Account_Search_Max_Results__c |
| Account Search Results Per Page Options | MED_Account_Results_Per_Page_Options__c |
Configuring fields for the New Account modal
The fields that appear in the New Account modal are driven by the
segment and record type. To configure a field to appear in the modal,
you must edit the Account Field Setting
(MED_Account_Field_Setting__mdt) custom metadata record for that
segment (or the default segment) and record type. The fields that need
to be modified are:
| Field | Description |
|---|---|
Account Create Order (MED_Account_Create_Order__c) | If the field is from the Account object, set this value to order the field relative to other account fields that will appear on the form. The modal has two columns and the fields are rendered left to right. |
Required for Save (MED_Required_for_Save__c) | If true, the field displays with a red asterisk and the system will not allow the creation of the account with the field unpopulated. |
Enforcing contact information creation
If agents are required to capture certain contact information when
creating an account, set the Records Required for Create on the
proper Account Type Setting to a comma-separated string of Contact
Information record type developer names (e.g.,
MED_Phone, MED_Address).
When creating a new account, the required records are rendered and the agent is not able to remove them from the form.
Account Search V3
Configuring interface handlers for Account Search V3
Account Search handlers are configured in the Interface
Handler (mvn__Interface_Handler__mdt) custom
metadata type. By default, one Interface Handler record is installed
with its Interface (mvn__Interface__c) field set to
mvn.MED_IAccountSearchV3.
Earlier Interface handlers can be used by making a new Interface Handler
custom metadata type record with the class name and the interface it
implements (e.g., MED_MDMIntfDefinition.MED_MDMIntf).
When configuring Interface handlers for Account Search V3, keep the following considerations in mind.
Interface Handler Account Search V3 fields
| Field | Description | Value consideration |
|---|---|---|
| Class | The class that implements the Interface. Note: Class names are case-sensitive. | Use a standard handler class from the Account Search handlers table or a custom handler you create. Note: Do not include the namespace in the handler class. |
| Class Namespace | The namespace of the class that implements the interface. | Must match the namespace of the handler class. This will be blank for all custom handlers. |
| Context | The context within the product that this interface will be used in. Context names are case-sensitive. | Must be set to the exact value of MIC - Account Search. |
| Criteria | JSON criteria used to determine when the implementation should be used. Available data will differ by interface. | The handler will only be used if the context meets the criteria definition. Criteria can be created against the following information: - Countries: A list of countries that are relevant to the current execution context. - Account: A merged superset of account fields that list all values found for the field, either from search criteria or detailed information requests. For example, the criteria shown below means the criteria handler will only be used when a search includes the United States. { "path":"countries" "operator":"includes" "value":"US" } Note: If the criteria are blank, then the handler will always be used. For more information on the Criteria field, visit Criteria Definitions. |
| Interface | A fully qualified API name of the Interface class that is being implemented. | Must be one of the two currently supported values: MED_MDMIntfDefinition.MED_MDMIntf or mvn.MED_IAccountSearchV3. |
| Label | Name of the interface handler. | Must be a unique name. |
| Sequence | Determines the order in which the classes are searched if multiple classes are configured. If accounts with matching External IDs are returned from two different search handlers, the accounts will be merged, but the data from the handler that has a lower number will be sequenced first. | A numerical value greater than or equal to 1. Lower numbers take precedence over higher numbers. |
Custom Account Search handler
The configuration process for a custom Account Search handler is largely the same between V2 and V3, with the only exception being the interface selected in Step 1. To implement a custom Account Search handler in Medical Information Cloud:
-
Create a custom Apex class that implements the
MED_MDMIntfDefinition.MED_MDMIntfinterface (for V2) ormvn.MED_IAccountSearchV3(for V3). -
Write your custom search logic.
warningCustom handlers should never include DML.
warningWhen implementing mvn.MED_IAccountSearchV3, a global, no argument constructor must be used. This will be the only constructor called when this handler is used.
warningCustomers should not reference
MED_code or custom metadata types outside of what is detailed in the customization guidelines.tipUse the
MED_MDMSettingAccessorto retrieve field and value mappings as well as named credentials from the Medical Information Cloud configuration. -
Activate your custom handler by following the instructions in the Account Search Handlers section.
Configuring the Lightning user interface
To configure the Lightning user interface:
-
Add Quick Search to the layout.
noteThe Quick Search component can be added to any Interaction (
Case) record page or to any object's Lightning Record Page as long as the object has a relationship with the Case object. However, if the Quick Search component is added to the latter, the Case Lookup Field API Name field must be set in the Lightning App Builder in order to retrieve Case data from the correct Interaction record. For more information, reference the Quick Search component section below. -
(Optional) Open Quick Search in the Lightning App Builder and configure the default search fields and options that are visible. For more information, reference the Configure default visibility section below.
-
(Optional) Add Selected Accounts. If using with Account Search V3, you must edit the Interaction (
Case) page in the Lightning App Builder to select the New Search UI option. -
Configure layouts using the layout system. Visit Layout Configuration for more information.
Customizations can be made using the following custom metadata types:
-
Account Type Setting (
MED_Account_Type_Setting__mdt) -
Layout (
mvn__LY_Layout__mdt)-
MED_Account_Search_Filters_Full -
MED_Account_Search_Filters_Quick -
MED_Account_Search_Results_Full -
MED_Contact_Search_Results_Columns -
MED_New_Account_Contact_Order -
MED_New_Account -
MED_New_Affiliation -
MED_New_Contact_Info
-
-
Layout Type (
mvn__LY_Layout_Type__mdt) -
Layout Field (
mvn__LY_Layout_Field__mdt) -
Field (
mvn__LY_Field__mdt)
Adding the "Affiliations" column to person account search results
The affiliations column can be added to the person account search results to provide more details when selecting an HCP. This is currently out-of-the-box for those on V15, provided you install V15 with all of the setup configurations selected. For customers on V14.1 and below, follow the procedures below.
There are three primary "steps" to add the Affiliations column to the person account search results:
-
Step 1: Add a new Layout Section to the Layout Section (
mvn__LY_Layout_Section__mdt) custom metadata type. -
Step 2: Create a new
LY_Fieldrecord for the Affiliation (MED_Affiliation__c) object. -
Step 3: Create a new
LY_Layout_Fieldrecord to link the parent account name field record to the new section.
Step 1: Add the Affiliation column to the person account search results
in the Layout Section custom metadata type.
-
In Setup, search for and select Custom Metadata Types.
-
Click Manage Records next to the Layout Section (
mvn__LY_Layout_Section__mdt) custom metadata type. -
Click New.
-
Search for and select Affiliation Results Columns - Person (
MED_Affil_Results_Columns_Person) for the Layout Type. -
Add
MED_Results_ParentAcct_Columnin the Label field. The Layout Section name automatically populates with the label name. Each section you create becomes one column. The label entered here will serve as the column header.noteCreate a new custom label for this field if desired.
-
Click Save.
Step 2: Create a new LY_Field record for the Affiliation
(MED_Affiliation__c) object.
-
In Setup, click Manage Records for the Field (
LY_Field) custom metadata type. -
Click New.
-
Add
MED_Parent_Account_Name__cin the Label field, which automatically populates as the Field Name. -
Add
MED_Affiliation__cin the SObject field. -
Add
MED_Parent_Account_Name__cas the Field API Name. -
Click Save.
Step 3: Create a new Layout Field record to link the parent account name
field record to the new section.
-
In Setup, click Manage Records for the Layout Field (
mvn__LY_Layout_Field__mdt) custom metadata type. -
Click New.
-
Add "Search Results Parent Account" to the Label field.
-
Add
MED_Search_Results_Parent_Acctin the Layout Field Name field. -
Search for and select Affiliation Results Columns - Person (
MED_Affil_Results_Columns_Person)as the Layout Type. -
Add the name of the field created in the previous section (
MED_Parent_Account_Name__c) to the Field field. -
Search for and select the Affiliation Parent Account section (
MED_Results_ParentAcct_Column) you created in the first part of this process. -
Click Save.
Exclude records by status
By default, Account Search V3 excludes any Account, Contact Information
(MED_Contact_Information__c), or Affiliation (MED_Affiliation__c)
records that have a Status (MED_Status__c) value of Inactive from
the search results. For accounts, this means that Account Search will
exclude the row with the inactive account from the results table
entirely. For contact information, this means that Account Search will
exclude the address, email, fax number, phone number, or social
information from the results table but may still show the row with the
account if the account is still active.
To include inactive records in the search results (i.e., to not exclude any records from the search results):
-
Open Global Setting (
mvn__MED_Global_Setting__mdt) metadata record or create of there is not one already.- Leave the Account Search Excluded Statuses
(
mvn__MED_Account_Search_Excluded_Statuses__c) field empty.
- Leave the Account Search Excluded Statuses
(
To exclude records of other statuses from the search results:
-
Create a new Global Setting (
mvn__MED_Global_Setting__mdt) metadata record.- On the Account Search Excluded Statuses
(
mvn__MED_Account_Search_Excluded_Statuses__c) field, enter all of the status values that should be filtered out, separating each value with a comma. This will override, not supplement, the default Account Search V3 behavior where inactive records are excluded, so you must includeInactiveto continue to filter out inactive records. For example, to exclude both inactive and pending Account, Contact Information, and Affiliation records, set the field to equalInactive,Pending, not justPending.
- On the Account Search Excluded Statuses
(
Configure secondary information
In Account Search V3, secondary information is additional information in the search results that users can view in a popover by hovering over or clicking on the down arrow to the right of an account. By default, the secondary information popover includes the account source, credentials, primary language, and specialty for both person accounts and institution accounts.

To configure account information to appear in the secondary information popover:
-
Create a new Field (
mvn__LY_Field__mdt) metadata record for each piece of account information that should appear in the popover. -
Create a new Layout Field (
mvn__LY_Layout_Field__mdt) metadata record for each new Field metadata record created in step 1 above.-
If the secondary information should appear for person accounts, then set the Layout Section (
mvn__LY_Layout_Section__c) field toMED_Account_Secondary_Results_Personand the Layout Type (mvn__LY_Layout_Type__c) field toMED_Account_Search_Results_Person. -
If the secondary information should appear for institution accounts, then set the Layout Section (
mvn__LY_Layout_Section__c) field toMED_Account_Secondary_Results_Instand the Layout Type (mvn__LY_Layout_Type__c) field toMED_Account_Search_Results_Institution.
-
To configure contact information to appear in the secondary information popover:
-
Create a new Layout Section (
mvn__LY_Layout_Section__mdt) metadata record for each piece of contact information that should appear in the popover.- Set the Component Configuration
(
mvn__LY_Component_Configuration__c) field to
- Set the Component Configuration
(
    `{"Secondary": true,"RecordType":<ContactInformation_RecordType>`.
    For example, `{"Secondary": true,"RecordType":MED_Address}`.
-
Create a new Field (
mvn__LY_Field__mdt) metadata record for each contact information.- Set the Component Configuration
(
mvn__LY_Component_Configuration__c) field to
- Set the Component Configuration
(
    `{"Secondary": true,"RecordType":<ContactInformation_RecordType>`.
    For example, `{"Secondary": true,"RecordType":MED_Address}`.
- Create a new Layout Field
(
mvn__LY_Layout_Field__mdt) metadata record for each new Layout Section metadata record and Field metadata record created in steps 1 and 2 above, respectively.
To hide specific secondary information from the search results of Account Search V3:
-
Navigate to the Layout Section (
mvn__LY_Layout_Section__mdt) metadata records.- If the secondary information should be hidden for person account
search results, modify the Account Secondary Results - Person
(
MED_Account_Secondary_Results_Person) metadata record and either set the Component Configuration (mvn__LY_Component_Configuration__c) field to
- If the secondary information should be hidden for person account
search results, modify the Account Secondary Results - Person
(
    `{"Secondary": false}` or remove the `Secondary` property
    entirely.
- If the secondary information should be hidden for institution
account search results, modify the Account Secondary Results -
Institution (
MED_Account_Secondary_Results_Inst) metadata record and either set the Component Configuration (mvn__LY_Component_Configuration__c) field to
    `{"Secondary": false}` or remove the `Secondary` property
    entirely.
If no component configurations with `{"Secondary": true}` exist,
then the column with the **down arrow** for the secondary
information popover will be hidden entirely.
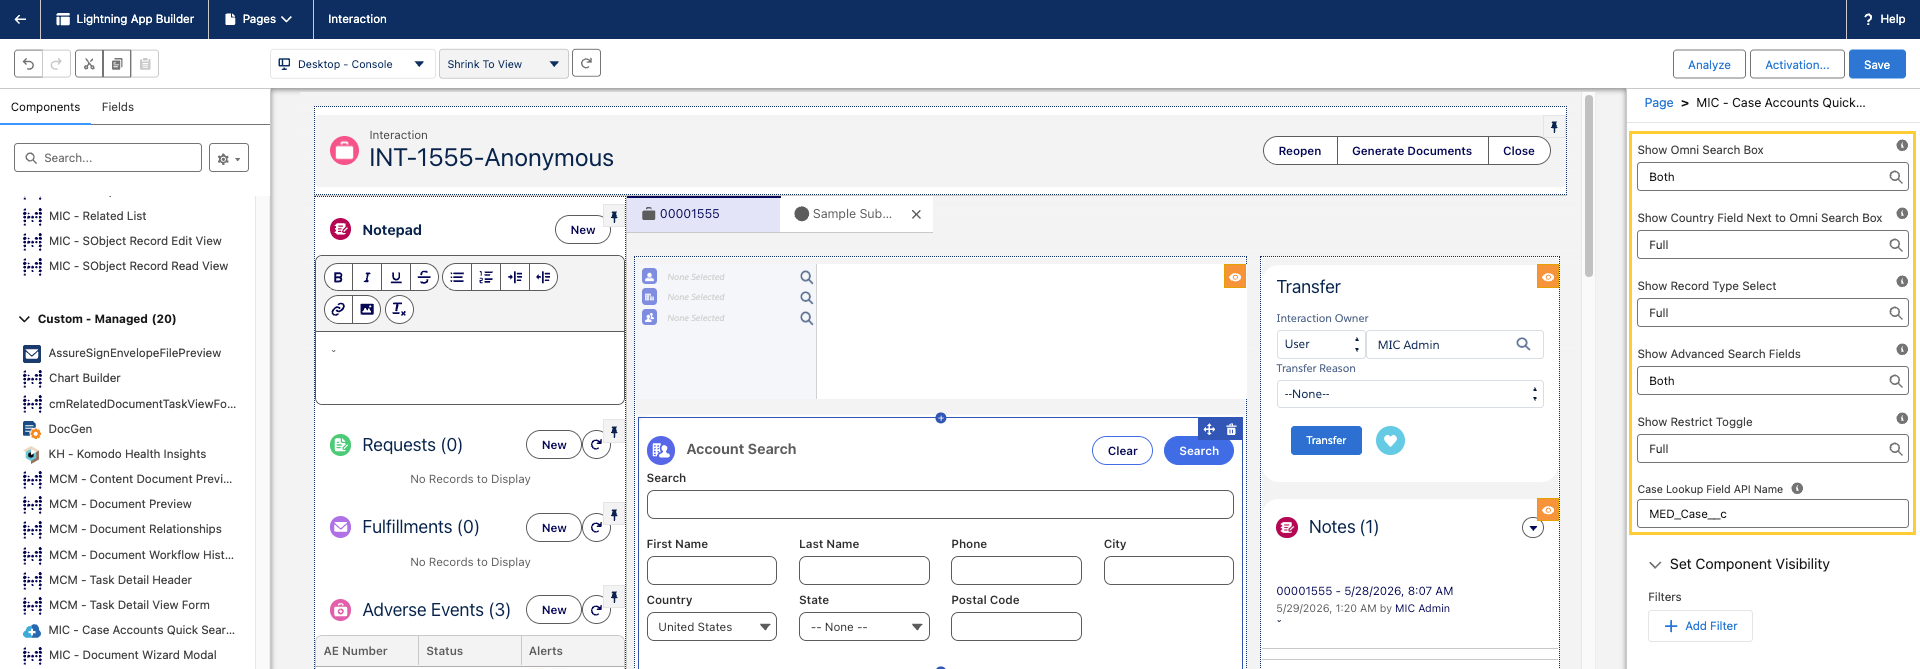
Quick Search component
The MIC - Case Accounts Quick Search (mvn.medCaseAccountsQuickSearch) component, also known as the Quick Search component or Account Search, lets you begin your search directly from an Interaction (Case) record page or from any record page that is related to an Interaction (Case) record. Administrators can add the this component to any object's Lightning Record Page or Experience Cloud Object Page as long as that object has a relationship to the Interaction (Case) object.
The placement of this component can be configured using the
Lightning App Builder by dragging the MIC - Case Accounts Quick Search
(mvn.medCaseAccountsQuickSearch) component and dropping it onto an
Interaction (Case) record page or any record page whose object has a lookup
field to the Interaction (Case) object.
To support generic placement, the component exposes a Case Lookup Field API Name property and an Apex method (MED_AccountSearchCtrl.getObjectApiNameByRecordId) that resolves the
host object's API name at runtime. When the component is placed on an
object other than Interaction (Case), the administrator must set
the Case Lookup Field API Name property to the API name of the
field on the host object that looks up to the Interaction (Case)
object so that Account Search can retrieve the appropriate
Interaction record and default the search filters from that record. If the Case Lookup Field API Name property is left blank, the component falls back to the standard mvn__MED_Case__c lookup field.
The full Account Search experience utilizes the
MIC - Account Search V3 (medAccountSearchV3) Lightning Web Component
for those using Account Search V3.
How to add MIC - Case Accounts Quick Search
-
In Setup, open Lightning App Builder. Then, open or create a Lightning Record Page for the object you want to host Quick Search on.
-
Drag the MIC - Case Accounts Quick Search (
mvn.medCaseAccountsQuickSearch) component onto the page.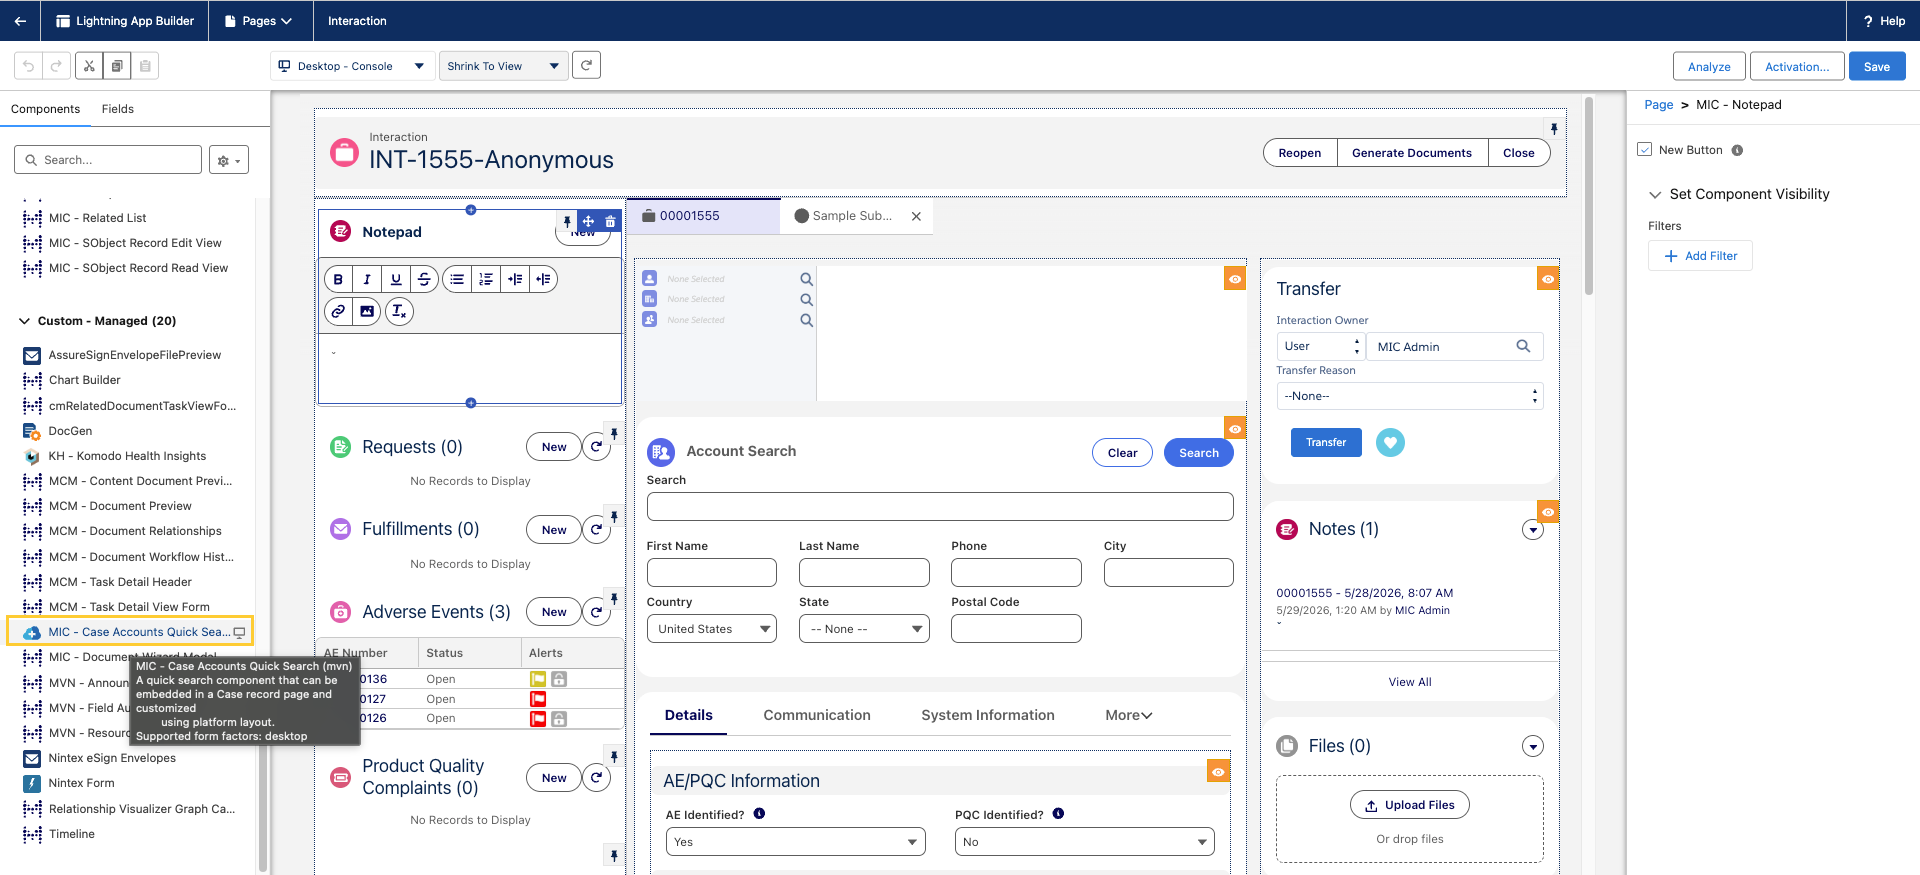
-
With the component selected, configure the following:
- Set the Case Lookup Field API Name property to the API name of the lookup field on the host object that points to the Interaction (
Case) object (for example,MED_Case__c). - Configure the remaining default-visibility properties to match the search experience you want users to start with:
- Show Omni Search Box
- Show Country Field Next To Omni Search Box
- Show Record Type Select
- Show Advanced Search Fields
- Show Restrict Toggle
- Save and Activate the Lightning Record Page.
- Set the Case Lookup Field API Name property to the API name of the lookup field on the host object that points to the Interaction (
Set the Case Lookup Field API Name property only when the component is hosted on an object other than Interaction (Case). On an Interaction (Case) record page, the component automatically uses the host record as the Interaction context, so this property can be left blank.
To extend Account Search to an Experience Cloud audience (for example, an external Messaging Session experience), repeat these steps in the Experience Builder for the equivalent Experience Cloud Object Page. The same Case Lookup Field API Name property is honored.
Fields in the component are configured using the
MED_Account_Search_Filters_Quick Layout record. This layout accepts
fields from both Account and Contact Information. When specifying
Contact Information fields, the Contact Information record type for the
field should be specified using the "Component Configuration" option
of the field, e.g., {"RecordType":"MED_Address"}.
Layout Fact has the following fields available:
-
accountRecord - Account from the case (if any).
-
accountRecordType - Account record type developer name. The default type is from Account Type Settings if no account is on the case.
-
accountCountry - Country for the case/account on the case.
Configure default visibility
You can open the Quick Search component in the Lightning App Builder to configure the default search fields and options that are visible to users, including:
-
the Omni Search box
-
the Country field
-
the Account record type options, which would allow users to filter by specific account types without having to first conduct an account search
-
the Advanced Search fields, such as the First Name and Last Name fields
-
the Restrict toggle, which restricts search results to records related to the institution and/or requester on the interaction
Full Search
Fields are configured using the MED_Account_Search_Filters_Full Layout
record. This layout accepts fields from both Account and Contact
Information. When specifying Contact Information Fields, the Contact
Information record type for the field should be specified using the
"Component Configuration" option of the field like this
{"RecordType":"MED_Address"}.
Layout Fact has the following fields available:
-
accountRecord - Account from the case (if any).
-
accountRecordType - Account record type developer name selected in the search.
-
accountCountry - Country for the case/account on the case.
Results table
Results matching your search criteria appear in the search results table. The columns and fields can be configured using the Layout system. Unlike a normal layout, this uses three layouts to build the full results table.
-
MED_Account_Search_Results_Full - Configures fields on the Account object to be shown.
-
MED_Contact_Search_Results_Columns - Specifies the Contact Information columns and the fields within them.
-
MED_Affiliation_Search_Results_Columns - Columns and fields to display in the affiliations search results section.
For the MED_Contact_Search_Results_Columns, sections represent columns of a particular record type and their label must match the developer name of a Contact Information record type. Each section's layout fields represent which Contact Information fields appear in the column. To reorder columns, change the order field of the layout sections.
To add a new column, create a new layout section looking up to the Layout Type with the label matching the desired Contact Information record type and populate with Layout Fields. Custom layout types and layout sections can be added to the custom metadata type using the criteria field to access the "contactRecordType" and "contactCountry" fact variables.
If secondary information has been configured, a column on the far right end of the results table will appear with a down arrow in each row. When users hover over or click on the down arrow, a popover will open with additional information for the account in the row. For more information, reference the Configure secondary information section above.
When a search returns more results than can be displayed, a message will appear at the top notifying you that it has exceeded the maximum number of results. As such, you are advised to refine your search by adding additional criteria.
By default, only active records are returned in the results table. To configure the statuses of the records that should be included or excluded in the search results, reference the Exclude records by status section above.
When a search result is selected, the icon on the left side of the row will be highlighted in blue.
Create a new Account record
Inquiry Management is designed to force the agent to search for an account first. After the agent has searched for an account, they have the option to create a new account.
The New Account modal helps guide the agent through creating a new account and ensuring the proper information is collected.
This modal can be configured to allow/enforce the capture of information by configuring the Account Field Setting record for the segment and record type.
New Account modal section configuration
New Contact Record sections in the New Account Modal are managed by
three layout records in the Layout (LY_Layout__mdt) custom metadata
type:
-
New Account Contact Info Order (
mvn__MED_New_Account_Contact_Order) -
New Contact Info Info Record Layout (
mvn__MED_New_Contact_Info) -
New Account Layout (
MED_New_Account)
The Account Search New Contact layout types contain the field set that appears on the modal.
The New Contact Records - Section Order (MED_New_Contact_Order) layout
contains sections with an order field that dictates the order in which
they appear on the modal. To add new sections, create a field set and
layout type for the Contact Information record type and then add a
section to the New Contact Records - Section Order layout.
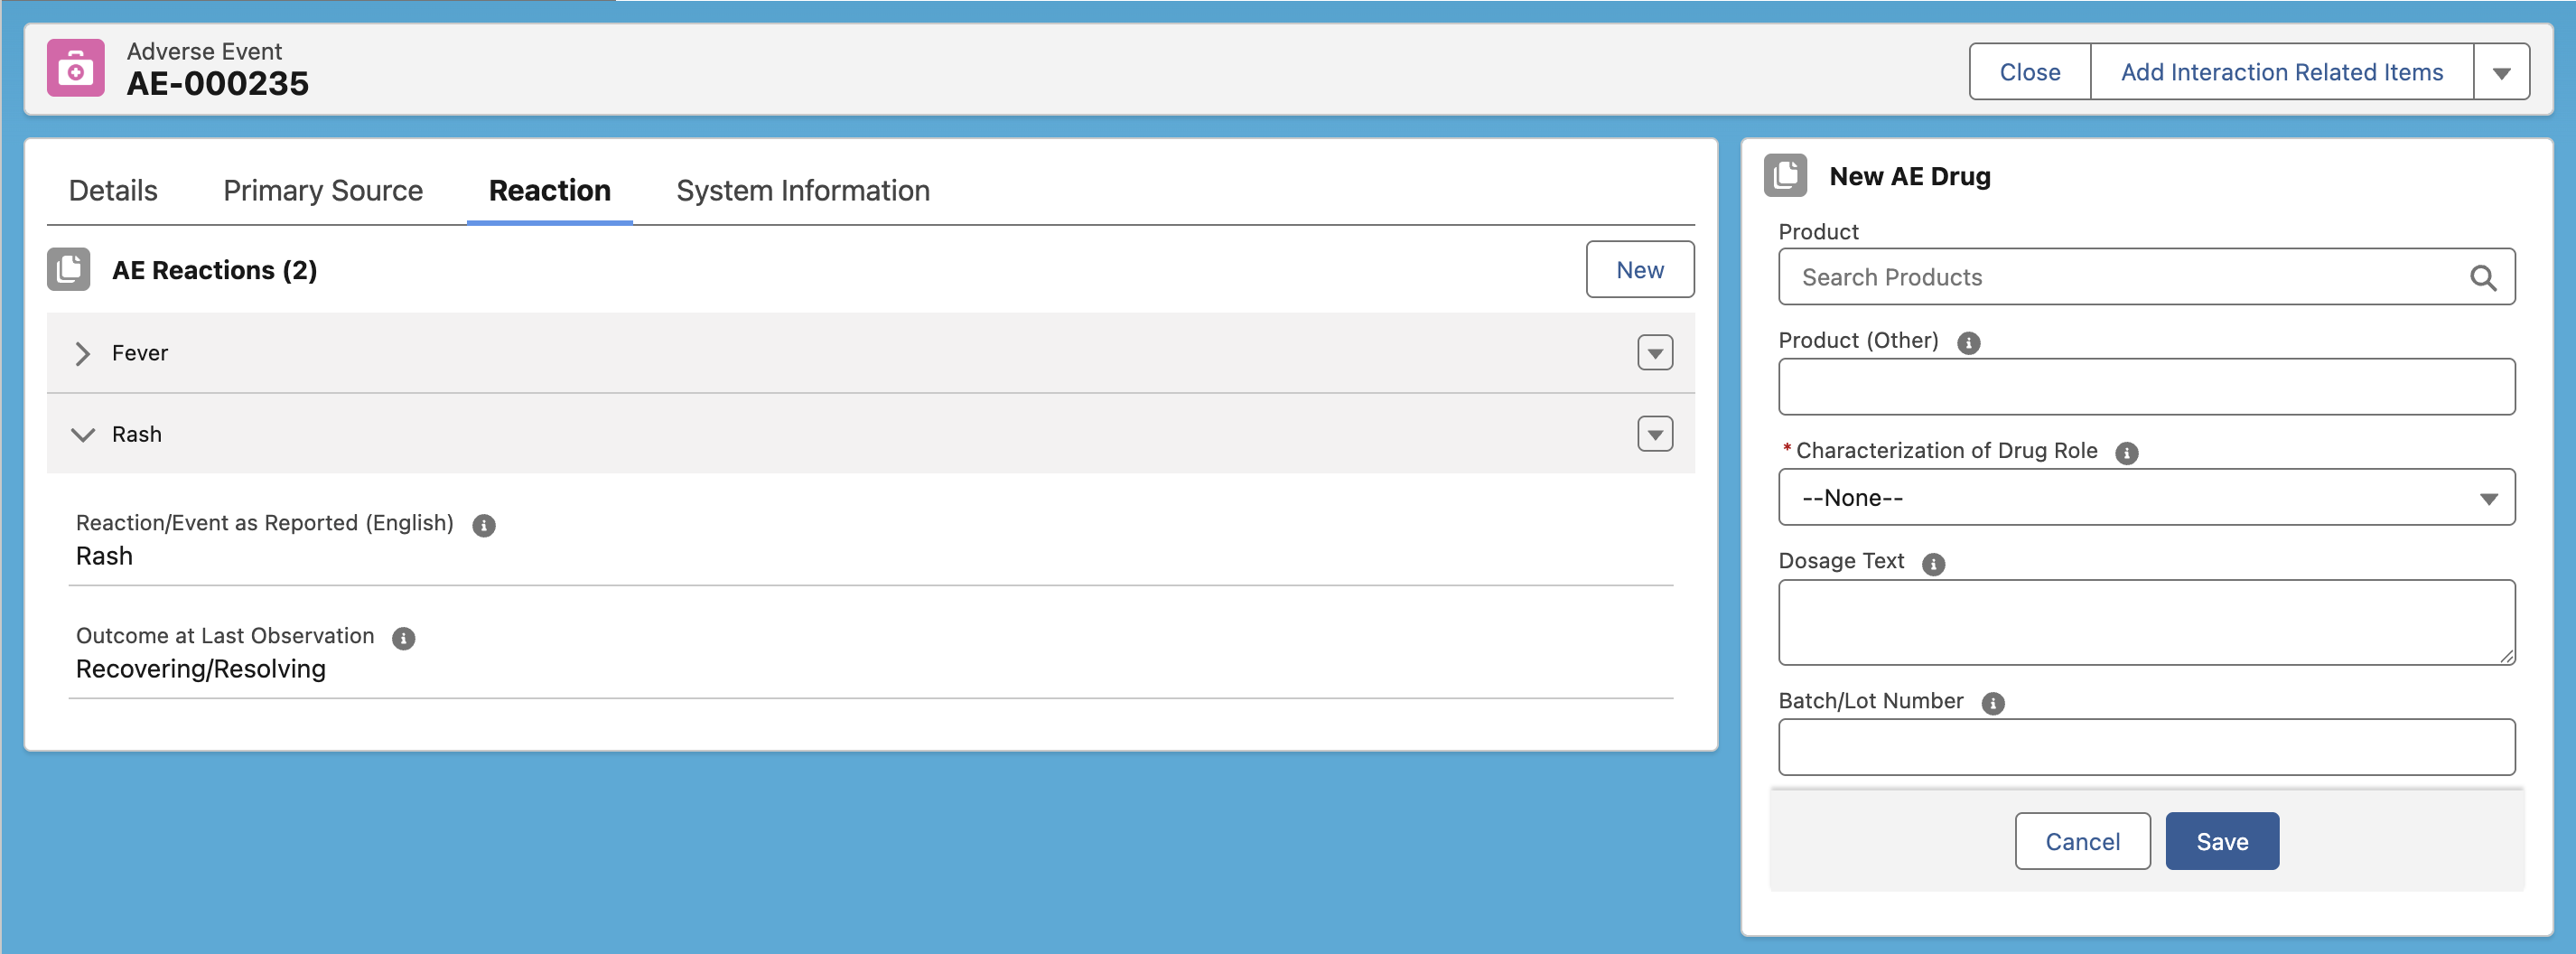
Adverse Event Child Record
The MIC - Adverse Event Child Record (medAdverseEventChildRecord)
Lightning Web Component (LWC) lets users manage the child records of an
Adverse Event (MED_Adverse_Event__c) record all on a single Adverse
Event page. For every child object that is configured on a component,
users can click New to create a new record within the component.
This means that users can continue to reference other information on the
page while entering new information about the adverse event. Users can
also collapse and expand on each record in the component.
Configuration
To configure the MIC - Adverse Event Child record component, open the LWC in the Lightning App Builder.
-
On the Related Drug Name field, enter or select the API name of the child object whose records are to be listed and created in the component. Possible options include:
-
MED_AE_Drug_History__c
-
MED_AE_Drug_Information__c
-
MED_AE_Medical_History__c
-
MED_AE_Primary_Source__c
-
MED_AE_Reaction__c
-
MED_AE_Results__c
-
-
On the FieldSet API Name field, enter the API name of the field set on the child object that contains the list of fields to appear in the component.
-
On the Number of Columns field, enter or select the number of columns that should appear in the component. Possible options include:
-
1 Column
-
2 Columns
-
-
On the What to show as Card Title field, enter the name that should appear for the column. If the field is left empty, the component will use the name of the child object.
-
On the Field API Name to show as Record Label field, enter the API name of the field on the child object whose value should appear for each collapsed record in the component.
-
Check the Default Edit Mode checkbox if a new record form should appear when there are no existing records to appear in the component.
-
On the Waiting time to autosave field, enter the number of milliseconds that the component should wait before it automatically saves any changes in the component.
Attach Request Document
The MIC - Attach Request Document (medAttachRequestDocuments)
Lightning component lists the documents associated with the
Request (MED_Request__c) record in
a compact, table-grid view. With this component, you can upload one or
more files up to 2GB in size to the request, delete documents associated
with the request, and open an associated document in the document viewer
in a subtab. For each document that is uploaded through this component,
a Request Document (MED_Request_Document__c)
record is created and related to the Request record. Any value that was
set on any of the fields in the MIC - Attach Request Document modal will
apply to all of the request documents that are created.
Permissions
Users who require the ability to upload documents to Requests need to have these custom permissions added to their profile:
-
Upload Request Documents (
MED_Upload_Request_Documents) - grants users the ability to use the Upload button on the component to add new documents to a Request. -
Customize Response on Request (
MED_Customize_Response_on_Request) - grants users the ability to replace existing files attached to a Request.
Custom labels
The Attach Request Document component uses the following labels that can be configured within the Salesforce.com translation workbench to change display text values.
-
MED_Attach_Article
-
MED_Attached_X_Documents
-
MED_Cancel_Button
-
MED_Document_Search_Textbox_Label
-
MED_Generic_Save_Button
-
MED_Generic_Search_Button
-
MED_No_Search_Results
-
MED_Question
-
MED_Response
-
MED_Search_Documents
-
MED_Search_Results
-
MED_Vault_to_many_records_being_returned
Case Accounts
The MIC - Case Accounts component enables users to search for and associate a Requester, Referred by, or Institution account with an Interaction.
-
Requester - the person receiving the information (e.g. response, Fulfillment Package, etc.).
-
Referred By - the person who calls on behalf of the requester. For example, a Medical Sales Representative reaches out to the Contact Center on behalf of a Health Care Professional (HCP). In this case, the Sales Representative would be the Referred By person.
-
Institution - the hospital/business the requester is affiliated with.
Account search
When no accounts have been selected, the agent is presented with a list of search fields, which can be used to initiate an account search. The set of fields displayed to assist in locating or creating an Account may be configured leveraging the Account Field Setting custom metadata type.
To include a field within the interface, an Account Field Setting custom metadata record for that field/record type/country combination (or the default country) and ensure the Quick Search Field Order has been set to a non-zero value. This order dictates the position the field will appear in the panel.
Contact Information records
Once an Account is selected within the MIC - Case Accounts, a corresponding list of Contact Information records is displayed. To configure the records displayed, an Administrator must modify the records for the Contact Info Case Mapping custom metadata type to change the list of records that appears for each account type when it is in focus. To configure one of these records, provide the following information:
| Item Name | Description |
|---|---|
| Label and Contact Info Case Mapping Name | System fields used to identify the record |
| Contact Info Field | This field provides the value which appears in the picklist. This may be a formula field if multiple fields need to be displayed (e.g. an address) |
| Case Field | The lookup field on the case which is used to link the case to the Contact Information record |
| Record Type Developer Name | The developer name of the Contact Information record type |
| Account Type | The type of account this list should be shown for (Requester, Institution, Referrer) |
Hiding institution data
If the institution search has been turned off, then the institution and the affiliation components of the panel will not be displayed. Institution search is turned off by editing the Local Setting custom metadata record for the given country (or the default record) and setting Enable Institution Search to false.
Custom labels
This component makes use of the following labels that can be configured within the Salesforce.com translation workbench to change display text values.
| Label Name | Description |
|---|---|
| MED_Affiliate | The label for the button to save the new affiliation after providing all the information to create the affiliation. |
| MED_Accounts_are_Affiliated | Shown when hovering the affiliation of two affiliated accounts. |
| MED_Cancel_Button | The label for the cancel button when creating new records. |
| MED_Clear_Search_Results_Button | The label for the second button shown on the search view. |
| MED_Click_to_Affiliate | Shown when hovering over the affiliation for two accounts that have not yet been affiliated. |
| MED_Generic_Save_Button | The label for the Save button when creating a new record. |
| MED_Generic_Search_Button | The label for the first button on the account search. This label is generic and used elsewhere in the application. |
| MED_None_Selected | The value shown next to the Requester, Institution, or Referrer icons when no account has been selected for that account type. |
| MED_Not_Affiliated | The label that is shown in place of the role value when the requester and institution have not been affiliated. |
| MED_Picklist_New_For_X | Displayed as the last picklist option for a contact info picklist and triggers the creation of that type of contact info record. |
| MED_Picklist_Select | The value is displayed as the first option of a contact info picklist if no records are currently selected. |
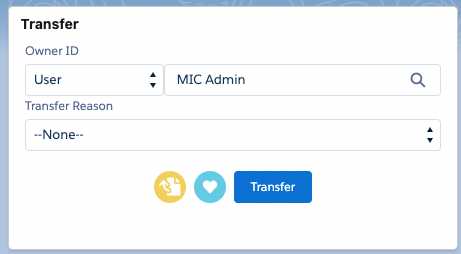
Change record owner
The Change Record Owner (MED_ChangeRecordOwner) Visualforce component
allows an agent to quickly change the owner of a record and indicate,
for audit purposes, why the ownership changed.
The agent can return the records to the Interaction owner by clicking
the Interaction Owner
icon . This will
set the transfer reason to "Returned to Interaction Owner".
. This will
set the transfer reason to "Returned to Interaction Owner".
The agent can quickly take ownership of the record by clicking the
Make it Mine icon
 . This will set
the transfer reason to "Assigned to Self".
. This will set
the transfer reason to "Assigned to Self".
Associated records
When an Interaction is transferred, any child records (listed below) with the same associated owner will be transferred as well.
-
Requests
-
Adverse Events
-
Product Quality Complaints
-
Fulfillments
If the child record has a different owner than the Interaction, the child record's owner will not be changed.
Custom Responses
Inquiry Management affords the ability to search for and attach custom responses when looking for product content. A custom response is a response that has been approved for delivery in response to an inbound request by a Medical Affairs organization.
Enabling custom responses
To enable custom response, ensure there is an entry within the Document
Field Setting (MED_Document_Field_Setting__mdt) custom metadata type
for a given segment with these fields populated:
-
Request Document Field -
MED_Custom_Response__c -
Search Field Order - <numeric value> to place the field on the search interface
-
Search Result Order - <numeric value> to place the field on the search result interface
Once enabled the custom response checkbox should appear within the Document Search interface.
Configuring custom responses
In addition to enabling custom response search, the field needs to be mapped to the target attribute within the content management system of choice. Mapping the field ensures the criteria are applied to the correct attributes within the target content management system.
Mapping is accomplished by making an entry within the CMS Field Mapping (not Document Field Settings) custom metadata type with these fields populated:
-
Request Document Field -
MED_Custom_Response__c -
Document Field - the name of the field or attribute within the target CMS. For example, for Veeva Vault a valid option would be
custom_response__c.
This field must be a checkbox-type field in the CMS/Vault.
This field must be a checkbox-type field in the CMS/Vault when working
with Regulated Content Cloud. If using a Yes/No picklist, the default value should be set as
No, and older documents should be back-filled with No as well.
Configuring action buttons
If the Request quick search component is configured to allow for documentation creation, a "New Custom Response" button will dynamically appear under the search criteria which will launch the Document Wizard.
Viewing custom responses
Once the custom response feature has been enabled and configured correctly, users can indicate within a document search whether or not to include custom responses within the scope of the search. It should be noted that this is an additive change to the search scope and is not a filter of the search scope.
Once a search is initiated including custom responses, users can view custom responses within the results, in addition to the content of the custom response. While visible, custom responses are not able to be added to the request unless explicitly designated for the request.
Attaching custom responses to Requests
For a user to be able to attach a custom response to a given request, the custom response must contain the request number as an attribute within the target content management system. The specific attribute that contains the request number is indicated in the CMS Field Mapping custom metadata type. To map ensure an entry exists with the following fields populated:
-
Request Document Field -
MED_Related_Requests__c -
Document Field - the name of the field or attribute within the target CMS that contains the request number. For example, for Veeva Vault a valid option would be '
related_requests__c'.
Once mapped and a custom response is marked with the request number within the target CMS, users searching for custom responses on the request in question will be able to both view and attach the content on the request.
Creating custom responses in Requests
A user can also create a custom response directly from a Request record or in a content search component. For more information about this functionality, refer to Custom response and FAQ.
Enhanced Record Edit
Medical Information Cloud - Enhanced Record Edit is a Lightning Web Component that always displays fields in an editable format and auto-saves entered field data. Administrators should add a single instance of the component to a page layout. Administrators can select a layout, set component and error notification visibility conditions, toggle data overwrite checks, and exclude key users from data overwrite checks, all of which override other configurations that exist for a given user.
Conditional fields
Conditional Field Rule custom metadata records specify when to hide and show fields on a layout based on values in other fields. For example, the Request - Subcategory conditional field rule record that ships with Inquiry Management states that if the Category field has a value, the Subcategory field should display on the layout.
Conditional Field Rule records only work with the Enhanced Record Edit component.
For more information, see Custom metadata settings.
Implementation considerations
Keep these considerations in mind when adding the Enhanced Record Edit component to Lightning page layouts:
-
A page should have a maximum of one Enhanced Record Edit component on it at a time. Multiple instances can cause save conflicts or odd behavior.
-
The MIC - Enhanced Record Edit component should only be used on open records. In the Lightning App Builder, set the MIC - Enhanced Record Edit component visibility to
Record \> Is Closed Equal false, and set the Record Detail component visibility toRecord \> Is Closed Equal true. -
The component only displays fields and sections on the main page layout. The component does not support:
-
Buttons
-
Custom links
-
Embedded Visualforce and s-controls
-
Embedded reports and dashboards
-
Quick actions
-
-
When specifying page layouts for Accounts:
-
Make sure that all page layout names are unique across both Account and PersonAccount objects.
-
In the Lightning App Builder, add component visibility filters to render a version of the component with the correct page layout based on whether the layout is designed for a Person account or not. The filter condition for a PersonAccount layout is
Record \> Is Person Account Equal true, and the filter condition for an Account isRecord \> Is Person Account Equal false.
-
-
When manually specifying an Adverse Event or Product Quality Complaint page layout for the MIC - Enhanced Record Edit component to display, lookup fields on the page layout may not render correctly unless they are also added to the Lightning Feed Layout. This includes lookup fields such as Owner and Created by.
-
For the component's user interface display density to match the user interface display density used throughout the rest of the environment, set the UI Layout field on the Global Setting custom metadata type to match the environment's default density setting.
-
Administrators can override other configuration that exists for a given user via the following configuration fields:
| Configuration field | Description |
|---|---|
| Layout Name | Layout used to display the fields |
| Error Modal Type | Indicates the persistence type of error toasts: - sticky (default) - Remains visible until closed - dismissible - Remains visible until closed or duration has elapsed - pester - Remains visible until duration has elapsed |
| Toast For Field Errors | Indicates how field errors should be handled: - Per Error (default) - Single Modal - No Modal |
| Exclude Users when enabled | Enables key user(s) to be excluded from the Enable Dirty Data Check configuration: - Running User - Automated Process User - Running User and Automated Process User |
| Enable Dirty Data Check | Enables the Record was edited by another user overwritten data check error |
| Set Component Visibility | Controls when the component appears via filter conditions and logic |
| Autosave Wait Time | Indicates the wait timeout in milliseconds before autosave is initiated on change of any field. If more data is entered before time is up, the timer restarts to the time from the last input or change. |
-
Enhanced Record Edit renders the Owner and Record Type fields as read-only. Users are not able to edit them.
-
When editing an older version of a record, the Medical Information Cloud - Enhanced Record Edit component blocks saving to prevent concurrent editing. Users must refresh the browser or reopen the record to retrieve the newest version before editing.
-
An alternate Enhanced Record Edit with Save Check component is available as a replacement for the Enhanced Record Edit component. The Save Check feature warns users of unsaved changes before users can navigate away from or close a tab. For more information, see Enhanced Record Edit with Save Check.
Enhanced Record Edit with Save Check
Medical Information Cloud - Enhanced Record Edit with Save Check is a Lightning Aura Component that always displays fields in an editable format and auto-saves correctly entered field data. If there is missing or incorrect field data, the save check will warn a user about unsaved changes and prompt users to correct any errors before a tab is navigated away from or closed. Administrators can add a single instance of the component to a page layout. Administrators can select a layout, set component and error notification visibility conditions, toggle data overwrite checks, and exclude key users from data overwrite checks, all of which override other configurations that exist for a given user.
Configuring auto-save
You can enable or disable the auto-save functionality using the MIC - Enhanced Record Edit w/Save Check component.
To disable auto-save, navigate to an Interaction and click Edit Page. In the Details section on the MIC - Enhanced Record Edit w/Save Check component, uncheck "Enable Auto Save".
To enable manual save, navigate to an Interaction and click Edit
page. In the Details section on the MIC - Enhanced Record Edit w/Save
Check component, check "Enable Manual Save". When enabled, a Save
button will appear on the page, allowing you to click to save your work.
Additionally, you may press Ctrl + S (for Windows) or Cmd + S (for
MACs) on your keyboard as a shortcut to save your work.
Field Audit Trail Related List
::: Field Audit Trail Related List is a Lightning component that displays field-level change tracking information for a record. The displayed information is an aggregate view of audit trail events from three sources:
-
Salesforce's Shield's Field Audit Trail
-
Salesforce's normal field history tracking
-
Inquiry Management's Field Audit Trail
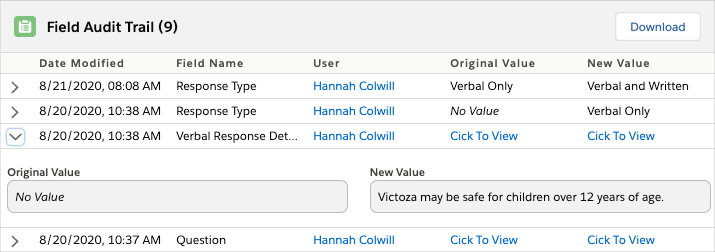
Shortly after a field change occurs, the component lists:
-
Date Modified - the date and time the field was modified.
-
Field Name - the name of the field that was modified.
-
User - the user who modified the field.
-
Original Value - the value of the field before the change occurred.
-
New Value - the new value of the field after the change occurred.
Implementation considerations
Keep these considerations in mind when working with the Field Audit Trail Related List:
-
The component is compatible with all Inquiry Management objects and any additional custom objects.
-
For the component to include data from Salesforce's Field History Archive and Shield's Field Audit Trail, you must enable them in your environment. Once enabled, test them to ensure they are working correctly. Visit Data Audit Trail.
-
In the Lightning App Builder, you can set values for Page Size and Page Overflow to configure the number of audit trail records to display per page and the number of pages to display before the remainder of the pages are hidden behind an ellipsis.
-
Mavens recommends reviewing the documentation listed in the table below before implementing the component.
Related documentation
| Mavens documentation | Salesforce's developer documentation |
|---|---|
| - Data Audit Trail - Salesforce Shield | - Field Audit Trail - Big Objects |
Test Shield's Field Audit Trail
Mavens recommends testing Shield's Field Audit Trail and the Field Audit Trail Related List component to ensure the correct data displays and is not duplicated. Plan for the testing process to take at least one month. To test Shield's Field Audit Trail and the Field Audit Trail Related List component:
-
Set up Shield's Field Audit Trail in your Salesforce.com instance.
-
Enable Shield's Field Audit Trail in your Salesforce.com instance.
-
Enable History Tracking on a compatible object and field. Visit Data Audit Trail.
-
Set a History Retention Policy using Salesforce's Metadata API. Visit Salesforce's History Retention Policy developer documentation.
-
One month is the minimum amount of time you can set for your History Retention Policy.
-
Create test data.
-
Modify field values to trigger a Field History entry.
-
Verify that a field History record was created. The entry should appear on the Field Audit Trail Related List component.
-
-
Wait for the prescribed time set in your History Retention Policy and verify that the data displays correctly in the Field Audit Trail Related List component. All accessible fields should be visible in the Field Audit Trail Related List component and should not be duplicated with Salesforce's Field History Archive data.
Download field history
With the Download button on the Field Audit Trail Related List component, users can export a record's entire field history as a CSV file. This feature enables users with the appropriate permissions and field-level security to respond to an auditor's request for a record's field history. Downloaded data honors field-level security.
Users must have the AT_Download_Audit_Trail custom permission to be able to see and use the Download button on the component.
Custom label AT_CSV_Title controls the name of the exported CSV file.
The custom label's default formula is AuditTrail-\{0\}-\{1\}-\{2\}.csv, and
the formula's default replacement fields are Record Name {0}, Record ID
{1}, and Timestamp {2}.
To change the value of AT_CSV_Title, create a translation. Do not edit the custom label.
Each download operation is considered a record-level event. For information about tracking record-level events, visit Data Audit Trail.
Custom labels
You can use the Salesforce Translation Workbench to configure the displayed text values of the labels listed in the table below.
Field Audit Trail Related List custom labels
| Label name | Description |
|---|---|
| AT_Collapsed_Value | Text to display in place of the original or new value of a field when the field's original or new value is too long and consequently collapsed in the Field Audit Trail Related List component |
| AT_Created_Label | Text displayed in the audit trail when an object is Created |
| AT_CSV_Title | Name of the CSV file that is created when a user downloads a record's field history via the Field Audit Trail Related List component. Note: To change the value of AT_CSV_Title, create a translation. Do not edit the custom label. |
| AT_Date_Modified_Label | Label for the date the tracked field was modified |
| AT_Download_Label | Text displayed on the download button in the Field Audit Trail Related List component |
| AT_Field_Audit_Value_Untracked | Text displayed when no value is available for the tracked field |
| AT_Field_Name_Label | Label for the column of the tracked field |
| AT_Field_UX_Title | Label for the title of the Field Audit Trail Related List component in the user interface |
| AT_Merge_Label | Text displayed in the audit trail for merge events |
| AT_New_Value_Label | Label for the tracked field's new value |
| AT_Next_Page_Button | Text displayed on the next page button in the Field Audit Trail Related List component |
| AT_No_Field_Audit_Records | Message displayed in the Field Audit Trail Related List component when no field audit records are found on an object |
| AT_No_Field_Audit_Value | Label displayed when no value is available for the tracked field |
| AT_Old_Value_Label | Label for the tracked field's old or original value |
| AT_Prev_Page_Button | Text displayed on the previous page button in the Field Audit Trail Related List component |
| AT_Toast_Error_Title | A generic Toast Title for errors related to the Field Audit Trail Related List component |
| AT_Transaction_Label | Label for the transaction for a field audit trail record |
| AT_User_Label | Label for the user who modified the field for a field audit trail record |
Fulfillment Files List
The MIC - Fulfillment Files List component displays a list of all attachments for the current Fulfillment. With the component, users can download, delete, rename, replace, and finalize documents. These actions are hidden from users when the parent Fulfillment is locked or when permissions prevent such modifications.
Implementation consideration
The Fulfillment Files List component only supports Salesforce Files. Before using the component, verify that DocGen is set to store attachments as Salesforce Files. If DocGen is set to store files as Salesforce Attachments, the Fulfillment Files List will not display files. For more information, see Nintex's Salesforce Files Storage Location documentation.
:::
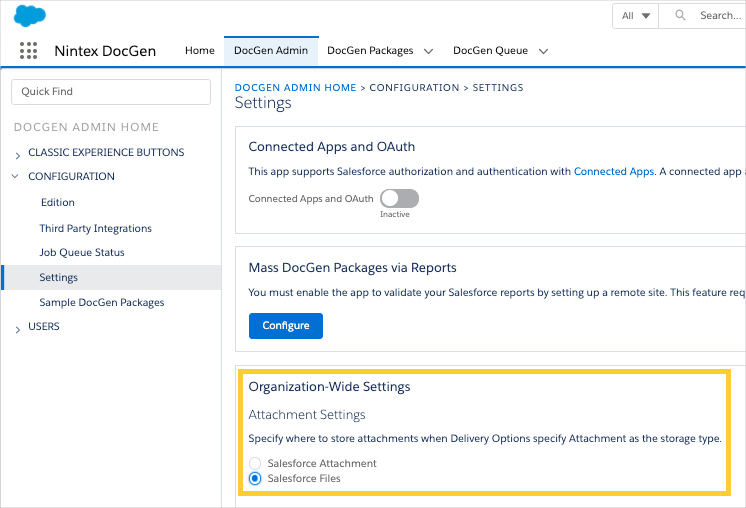 :::
:::
User workflows
From the Fulfillment Files List component, you can check out/in documents to either Microsoft 365™ or your local machine, finalize documents, and delete documents.
The terms "Office 365" and "Microsoft 365" are used interchangeably throughout Medical Information Cloud and this documentation. Therefore, some documentation will still reflect the older "Office 365" label.
Microsoft 365 workflows
Once the Microsoft 365 integration is configured, you can check out documents attached to a Fulfillment via the Fulfillment Files List component and edit the checked-out document in your browser. While it is checked out, the document and all changes made to the document are stored in an Amazon Web Services environment that Mavens maintains. If you make changes to the document and close the Microsoft 365 tab before checking in the document, you can reopen the checked-out document with all of your changes. For the changes to be saved in Medical Information Cloud, check in the document from the Fulfillment Files List component in Salesforce. If you cancel a checkout, all changes made to the document in Microsoft 365 are discarded.
The Medical Information Cloud product consumes the Microsoft 365 service as-is. Mavens makes no representations about the Microsoft 365 service and cannot guarantee the availability, reliability, privacy, or security of the Microsoft 365 service. Mavens has limited abilities to support and monitor the Microsoft 365 service. By using the Microsoft 365 integration, you agree to utilize the Microsoft 365 service as-is and agree to absolve Mavens of any and all liability that you or any person or entity associated with you may incur as a result of utilizing the Microsoft 365 service.
Checkout a document to Microsoft 365
To checkout a document in Microsoft 365:
-
Click the Arrow
 menu in the
row of the document that you want to want to check out.
menu in the
row of the document that you want to want to check out. -
Click Check Out Document. The Check Out Document modal opens.
-
Select Check Out in Microsoft 365.
-
Click Check Out. The modal closes, and in the Fulfillment Files List component, a Lock icon displays in the Title field of the checked-out document.
Open a document in Microsoft 365
After checking out a document listed in the Fulfillment Files List component to Microsoft 365, you can open the checked-out document in a Microsoft 365 browser tab and edit the document. To open the document in a Microsoft 365 browser tab:
-
Click the Arrow
menu in the
row of the document that you want to open in a Microsoft 365 browser
tab. -
Click Open In Microsoft 365. A Microsoft 365 tab with the checked-out document opens in your browser.
Navigate from Microsoft 365 to a Fulfillment record
To navigate from the Microsoft 365 browser tab back to the Fulfillment record:
Navigating back to the Fulfillment record or closing the Microsoft 365 browser tab does not check the document back in or cancel the check out.
-
From the Microsoft 365 browser tab, click [Document Name] - Saved. The Location dropdown opens.
-
Click the [Document Name] in the Location dropdown. The Microsoft 365 browser tab redirects to the Fulfillment record associated with the checked-out document.
Check in a document from Microsoft 365
Once you have finished making changes to the Fulfillment document, use the Fulfillment Files List component to check in the Fulfillment document. To check in the Fulfillment document:
-
Click the Arrow
menu in the
row of the document that you want to check in. -
Click Check in From Microsoft 365. The document is checked back in, and the Lock icon is removed from the Title field of the checked-in document.
Local workflows
With the Fulfillment Files List component, you can check out a document attached to a Fulfillment, download the checked-out document, make edits to the document on your local machine, and then check in the document by uploading the revised document version.
Checkout a document
To checkout a document locally:
-
Click the Arrow
menu in the
row of the document that you want to want to check out. -
Click Check Out Document. The Check Out Document modal opens.
-
Select Check Out for Download.
-
Click Check Out. The modal closes, and in the Fulfillment Files List component, a Lock icon displays in the Title field of the checked-out document
Download a document
After locally checking out a Fulfillment document, you can download and edit the checked-out document. To download the checked-out document:
-
Click the Arrow
menu in the
row of the checked-out document that you want to download. -
Click Download. The file downloads to your computer.
Once downloaded, you can edit the checked-out document on your computer.
Check in a document
Once you have finished making changes to the Fulfillment document, use the Fulfillment Files List component to check in the Fulfillment document. To check in the Fulfillment document:
-
Click the Arrow
menu in the
row of the checked-out document that you want to check in. -
Click Check In. The Upload File modal opens.
-
Upload the revised document. Upload options include:
-
Click Upload Files, and select the revised document.
-
Drag and drop the revised document into the modal.
The Upload Files modal opens and displays a upload progress bar for the file you attached.
-
-
Click Done once the file finishes uploading. The document is checked back in, and the Lock icon is removed from the Title field of the checked-in document.
Rename a document
To rename a document:
-
Click the Arrow
menu in the
row of the document that you want to finalize. -
Click Rename. The Rename File modal opens.
-
Enter the new name for the document and click Rename.
Finalize a document
To finalize a document:
-
Click the Arrow
menu in the
row of the document that you want to finalize. -
Click Finalize.
Cancel a checkout
To cancel a checkout:
-
Click the Arrow
menu in the
row of the checked-out document that you want to cancel the
checkout. -
Click Cancel Checkout. The checkout is canceled, and the Lock icon is removed from the Title field of the checked-in document.
Delete a document
To delete a document:
-
Click the Arrow
menu in the
row of the checked-out document that you want to delete. -
Click Delete. The document is removed from the Fulfillment Files List component.
Custom labels
You can use the Salesforce Translation Workbench to configure the displayed text values of the labels listed in the table below.
Fulfillment Files List custom labels
| Label name | Description |
|---|---|
| MED_Delete_Button | Label for the Delete button, which users click to delete the file from the Fulfillment Package. |
| MED_Download_Link | Label for the Download button, which users click to download the file. |
| MED_Finalize_Link | Label for the Finalize button, which users click to finalize the file. |
| MED_No_Records_to_Display | Label for the message that displays when there are no records. |
| MED_Processing_Text | Label for the message that shows in the actions menu when a document is being converted to a PDF by DocGen. |
| MED_Rename_Button | Label for the Rename button in the Rename File modal. |
| MED_Rename_Title | Label for the title of the Rename File modal. |
| MED_Replace_Link | Label for the Replace button, which users click to replace a file with another file. |
| MED_Cancel_Button | Label for the Cancel button, which users click to cancel an operation. |
| MED_Empty_Request_Documents_List | Label for the message that displays when there are no documents. |
| MED_Confirm_Delete | Label for the confirm delete message, which asks users if they are sure they want to delete a file from the Fulfillment Package. |
| MED_Delete_Title | Label for the title of the delete confirmation pop-up window, which asks users if they are sure they want to delete a file from the Fulfillment Package. |
| MED_Loading_Message | Label for alt-text for the loading spinner. |
Notepad
The MIC - Notepad component enables users to immediately enter inline notes from an Interaction and create new notes. All entered notes are auto-saved. When multiple notes exist for an Interaction, the component displays the most recently modified note.
Keep these considerations in mind when working with the MIC - Notepad component:
-
For the MIC - Notepad component to work, enhanced notes must be enabled. Out of the box, enhanced notes are enabled. For instructions on how to enable enhanced notes, see Salesforce's Enable Notes documentation.
-
If you add the MIC - Notepad component to an object page, also add the Related List - Single component for Notes to the object page, so users can access older notes. The Related List - Single component for Notes lists all notes associated with the object record.
-
The Utility bar does not support the MIC - Notepad component. If you want to expose notes functionality in the Utility bar, add the standard Notes component.
-
Users can add one new note after an Interaction (
Case) record is closed. However, users cannot edit that note, edit any other existing notes, or create any additional notes on closed interactions. -
When a user opens an Interaction (
Case) record page that contains the Notepad component, the page automatically places the cursor in the Notepad's rich text editor so the user can start typing notes right away without first clicking into the component. This initial focus runs once when the Interaction page loads and applies to both new and existing interactions. If the Notepad component is not on the Interaction's Lightning record page, focus falls back to the Salesforce default for that page (typically the first editable field in the Highlights Panel or Layout).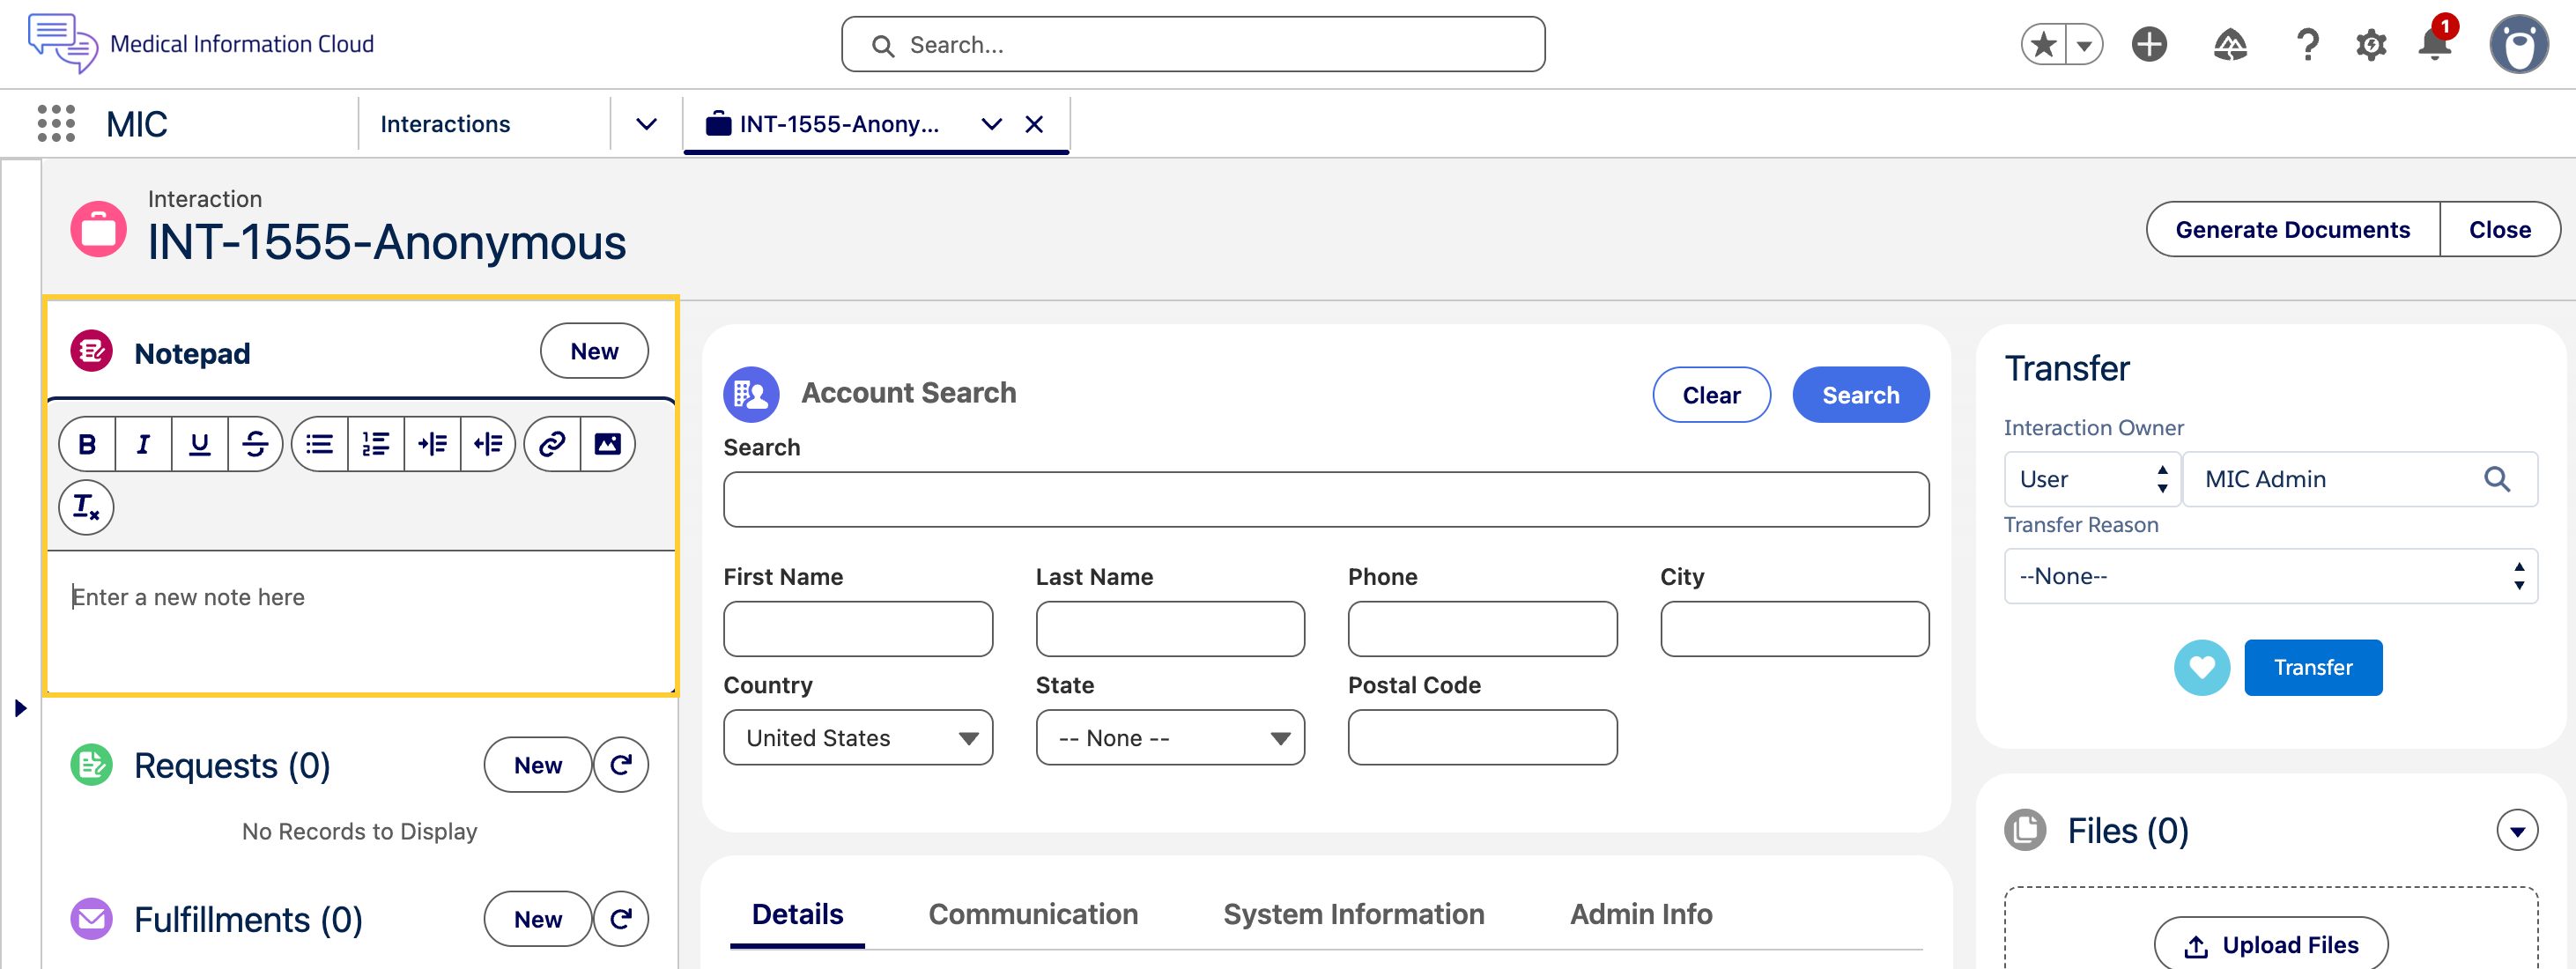
Product Lookup
The Lightning Product Lookup component enables users to search the
product database and select a product value for MED_Product__c.
The Lightning Product Lookup component follows the same rules as the Classic Product Lookup component for selecting and searching products. However, unlike the Classic Product Lookup component which only supports up to 1,000 products, the Lightning Product Lookup component has no hard limits on the number of products it can search, and it displays up to 30 results. For more information about the Classic Product Lookup component, visit Change record owner.
Each product result contains the name of the product and a subtitle. The subtitle is comprised of product metadata separated by the "•" character.
Configuration considerations
Keep these considerations in mind when working with the Lightning Product Lookup component:
-
Customers cannot add the Product Lookup component to Lightning page layouts.
-
Both the Enhanced Record Edit and Request Content Search components automatically use the new Product Lookup when
MED_Product__cis on the page. -
The Product Lookup Component Fields field on the Global Setting custom metadata sets the metadata that is displayed in the subtitle. To configure the subtitle, add Product field API names as a comma-separated list to Product Lookup Component Fields.
Behavior
:::
The product lookup component shows relevant MED_Product__c object
records. It shows active Product records that meet any of the following
criteria:
-
Record Type is
MED_General_Product -
Global Setting "Use simplified product catalogue" is
false-
Record Type is
MED_Productand there is a parent product with record typeMED_Product_Family. It will then show ALL records perMED_Product_Familyrecord from ONE of the following conditions (not both):-
Product country matches the Request country and is active
-
Product country is
ZZand there is no product under the same product family whose country matches the request country (active or inactive)
-
-
-
Global Setting "Use simplified product catalogue" is
true- All products where Record Type is
MED_Product_Family:::
- All products where Record Type is
Custom labels
::: This component makes use of the following labels that can be configured within the Salesforce.com translation workbench to change display text values.
| # | Label Name | Description |
|---|---|---|
| 1 | MED_Search_Products_Placeholder |
Related List
The MIC - Related List component displays Request, Fulfillment, Adverse Event, Product Quality Complaint, and Interaction QA records related to a given Interaction and enables users to create new related records. While similar to the standard Salesforce Related List - Single component, the MIC - Related List component requires fewer clicks to create new related records, displays related records in a more compact, table grid-view, and includes more configuration points than the Related List - Single component.
The configuration of the MIC - Related List component is controlled entirely by the configuration of the underlying Lightning record page supporting a given User within Inquiry Management Lightning. You can alter the default configuration of the Interaction Record Page to change the following aspects of this component:
| Configuration point | Description |
|---|---|
| Related item inclusion | Add or remove related items from appearing within the component (e.g. Requests, Fulfillments, etc.). |
| Vertical sequencing | The vertical order in which related items are presented. For example, the Requests related item can be lowered to appear below the Product Quality Complaints related item. |
| Parent lock field | The field that indicates if the Interaction is locked. If the Interaction is locked, the New button on the component is hidden. In most cases, this should be set to MED_Locked__c. Do not set the Parent Lock Field if you want to disable user interface locking. |
| Display Fields | Comma-separated list of fields to display. See Configuration considerations. |
| Max Rows | Maximum number of rows to show. Blank means no limit. |
| Sort field | Field to sort the list by. Blank is unsorted. |
| Sort order | Order to sort the list by. The sort order can be ascending or descending. |
The MIC - Related List component does not support these field types:
-
Geolocation
-
Address
-
Encrypted/EncryptedString
-
base64
Configuration considerations
-
The component does not support these fields:
-
Geolocation
-
Address
-
Encrypted/EncryptedString
-
base64
-
ComboBox
-
ComplexValue
-
Polymorphic relationships, such as WhatId
warningWhile it is a polymorphic relationship, OwnerId is supported.
::::
-
-
The
Alertsfield allows you to view all alerts for a record in a single field via icons for new alerts, escalations, locked records, urgent flags, urgent icons, and updated SLA flags. On Interactions, theAlertsfield will also include any child records that have escalations, locked records, urgent flags, and SLA flags as well. The icons below are the default icons for Medical Information Cloud V10. Customers upgrading from versions prior to V10 may see different icons.
| Icon | Alert | Action |
|---|---|---|
| Urgent | Remains until the Urgent checkbox is unchecked. | |
| Past due SLA flag | Always remains - SLA was not closed before the due date. | |
| Warning SLA flag | Always remains - Due date is coming soon. | |
| Escalated | Remains until the Escalate checkbox is unchecked. Note: Prior to V10, escalations remain until the record is returned to owner. | |
| Locked | Remains until the closed or canceled record is reopened. |
The field does not take user permissions into account. Aggregate alerts can potentially be seen by users without access to underlying child records.
Search Content
Overview
Medical Information Cloud's Search Content feature allows users to quickly find and attach relevant content to a Request. Doing so helps create a more holistic package of information for the requester.
Two content search Lightning components can be added to the Request record page:
-
MIC - Request Content Search (
medRequestQuickSearch) - adds a search bar and button to the Lightning record page. -
MIC - Inline Content Search (
medRequestInlineSearch) - provides the same functionality as the MIC - Request Content Search component without launching a modal. This means that the search fields, filters, and results are all available directly on the Request record page.
Best practices
Mavens recommends reviewing the sections below, which provide helpful information to assist you in getting the most out of your Search Content experience.
Using the Search Content modal
The Search Content modal allows you to search for content using specific
keywords and/or field values to filter search content results. Keyword
searches are case-insensitive. For example, a search for content related
to medication doses can be executed using Dosing, dosing,
or DOSING, all of which will return the proper results. Keyword
searches may include
search operators to
perform more advanced searches.
To narrow down your search results:
- In the Search Content modal, enter/select values for the following fields:
The fields below are a standard set and used for example purposes. The actual fields you may see will be dependent upon your organization's configuration.
-
Keyword - select from All searchable fields or Document Number.
-
Type - select the type of content: Internal Document, Medical Information Response, or Reference Document.
-
Subtype - select an option from the dropdown menu. Available options appear based on the type of content selected in the previous field.
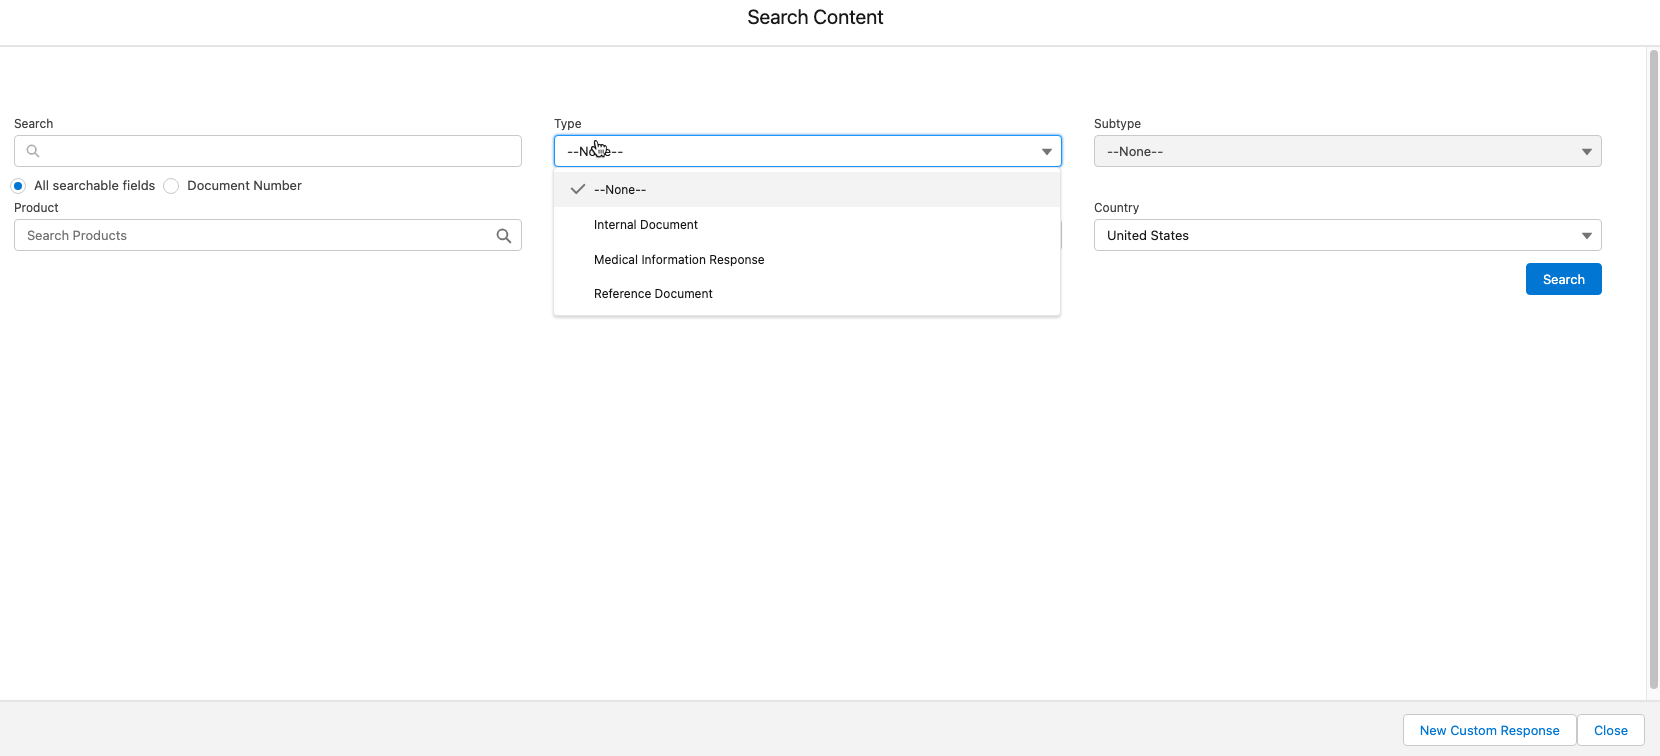
The Subtype field is only enabled when a Type has been selected.
-
Product - search for content based on a single product.
-
Language - search for content in a specific Language.
-
Country - search for content based on Country.
-
Click Search. A list of results will appear based on the criteria entered above. Results can be sorted by column by clicking the column header.
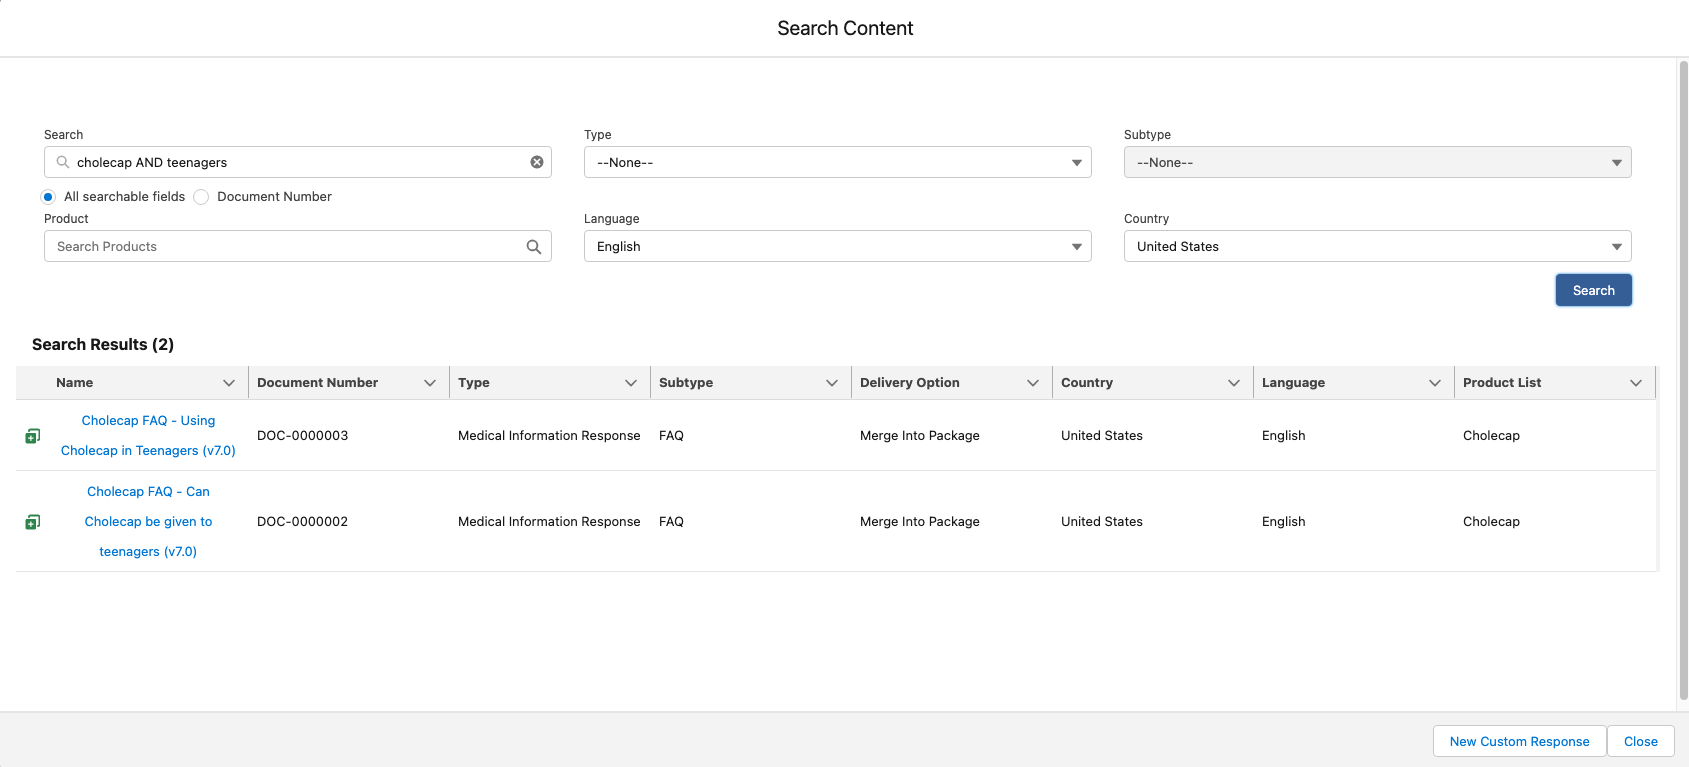
To perform a wider search, leave all fields blank and click Search.
Operators
Using Operators can also assist you in finding specific content. The tables below describe each operator as well as examples of their usage.
Search operators
| Operator | Description |
|---|---|
| * | Asterisks match zero or more characters at the middle or end of your search term. For example, a search for Asterisks matches zero or more characters at the middle or end of your search term. For example, a search for john* finds items that start with john, such as john, johnson, or johnny. A search for mi* meyers finds items with mike meyers or michael meyers. |
| " " | Use quotation marks around search terms to find matches in the order you entered your search terms. A search for Monday meeting finds items that contain Monday meeting in that order. To include the words "and," "or," and "and not" in your search results, surround those words in double quotes. Otherwise, they are interpreted as the corresponding operators. |
| AND | Finds items that match all the search terms. For example, must be specified because OR is the default operator and is the default operator. However, when searching for articles, documents, and solutions, and. Usually, if an operator is not specified, smith and the word john finds items with both the word john AND smith finds items that match all the search terms. |
| OR | Finds items with at least one of the search terms. For example, john OR smith finds items with either john or smith, or both words. |
| AND NOT | Finds items that do not contain the search term. For example, john AND NOT smith finds items that have the word john but not the word smith. |
| ( ) | Use parentheses around search terms with logical operators to group search terms. For example, you can search for: - ("Bob" AND "Jones") OR ("Sally" AND "Smith")--- searches for either Bob Jones or Sally Smith. - ("Bob") AND ("Jones" OR "Thomas") AND Sally Smith--- searches for documents that contain Bob Jones and Sally Smith or Bob Thomas and Sally Smith. |
Examples
The examples below show how you can use operators to search for specific content.
Search Content Examples
| Keyword(s) | Search description |
|---|---|
| dosing guide | This search returns all records whose fields contain both words: dosing and guide, in any location of the text. The order of words in the search term does not matter. |
| dosing OR guide | This search uses the OR logical operator. It returns records with fields containing the word dosing or records with fields containing the word guide. |
| dosing AND teenagers | This search uses the AND logical operator. It returns records with fields containing the word dosing and records with fields containing the word teenagers. |
| dosing AND NOT teenagers | This search uses the AND NOT logical operator. It returns records with fields containing the word dosing but not records with fields containing the word teenagers. |
| teen* | This is a wildcard search. This search returns all records that have a field value starting with teen. |
| "dosing guide" | This search returns all records whose fields contain the words dosing guide, in order, in any location of the text. |
Configuring custom search content
Users can invoke their own custom search content handlers to be used in either of the content search components. The custom search content handler must be configured within Inquiry Management. To implement a custom search content handler:
-
Create a custom Apex class that implements the
MED_CMSIntfDefinition.MED_CMSIntfinterface. -
Use
MED_CMSSettingAccessorto retrieve field and value mappings from the Medical Information Cloud CMS settings.
Create at least one CMS_Connection with the handler class specified in the Handler class field. Input all desired fields and value mappings under the created CMS_Connection.
Do not directly reference custom metadata.
::::
-
In the Local settings where the custom handler will be used:
-
Set the CMS Source to
Custom -
Enter the
Handler class namein the Custom Handler field
-
Configuring search content
There are several field configurations and search options you can set when using either of the search content components, including:
Implementation considerations
To begin, keep these considerations in mind when adding a content search component to Lightning page layouts:
- Search fields display with labels stacked, even if users select Compact for their Display Density setting.
Document search parameters
The content search components use specific fields to configure document search parameters and result fields. The search parameters the agent selects for document search are configurable per segment. To configure which fields appear in the document search parameters, edit or create the appropriate Document Field Setting record. The table below lists the Document Field Setting fields that configure the search fields.
To configure which document types are searchable in the document search
parameters, utilize the Restrict to picklist values setting on the
Document Field
Settings custom metadata type. Turning on this setting
allows only specified document types and subtypes to be searched. If the
type filter is left blank, only the types, subtypes, and
classifications specified in the Request Document picklist will be
searched.
Document Field Setting fields that configure search fields custom-style="sorted-asc-type-text-col-1"}
| Field Label | Description |
|---|---|
| Default Value (Request) | API path to the field on the Request or other object to pull a default value from, e.g., MED_Request__r.Name. This value will be pre-populated in the search fields. |
| Default Value (Static) | A static value that is set. If Default Value (Request) is configured, this value will not be used. |
| Hover for Value | The field value is replaced with an image and the value is shown when hovering over the icon. |
| Link to Viewer | Whether the field should link to the document viewer. |
| Restrict to Picklist Values | When set to true for a picklist field, a search will be filtered to only values in the picklist if no value is chosen. |
| Search Field Order | The order that this field should show up in the search parameters section. When populated, this field becomes a search parameter. |
| Search Result Order | The result column order for this field. When populated, this field displays a result column. |
Optional search by Document Number
You can also choose between two search options when using a content search component:
-
All searchable fields -- use any of the search criteria fields configured by an administrator. This option is selected in the background by default.
-
Document Number -- enter a full or partial document number into the search box to only search the document number and any forced filters. This option must be enabled.
To display these options and enable the ability to select Document Number:
-
Open the Request page in the Lightning App Builder.
-
Click on the content search component you are using.
-
Select the Allow Document Number Search checkbox.
-
Click Save.
Configuring the Search Content experience for V13
As of V13, users can configure their content search experience to use either the current modal or a dedicated local tab.
To enable the local tab experience:
-
Navigate to the Request page in the Lightning App Builder.
-
Click to select the MIC - Request Content Search component.
-
Check the box next to Enable Content Search as Local Tabs.
-
Click Save.
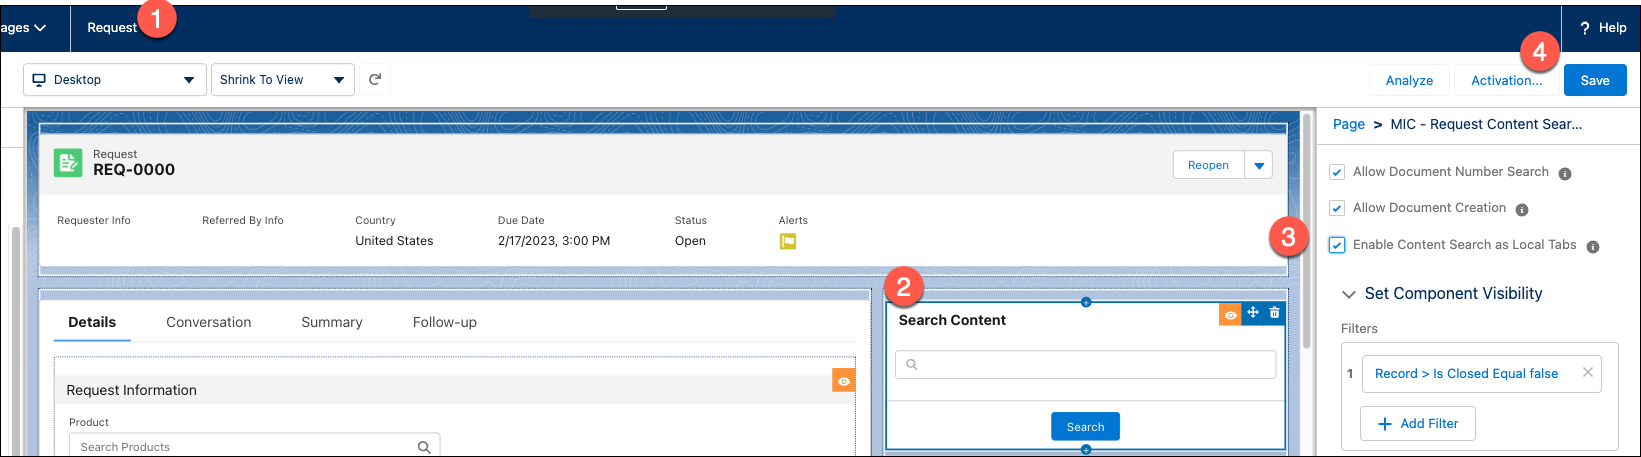
Configuring action buttons
If the Request quick search component is configured to allow for documentation creation, a New Custom Response button will dynamically appear under the search criteria which will launch the Document Wizard.
Custom responses
For information on Custom Responses and configurations, visit Custom Responses.
SObject Record Edit View
MIC - SObject Record Edit View (medSobjectRecordEditView) is a
Lightning Web Component that displays fields on Lightning record pages
in a simple edit view. The component includes a Save button that is
always in Edit mode.
Special considerations
Keep these considerations in mind when adding the SObject Record Edit View component to Lightning page layouts:
-
The component only displays fields.
-
Multiple instances of this component may be used alongside a single instance of the Enhanced Record Edit component of a Lightning record page.
-
The component should only be used on open records.
Configure component
To configure the MIC - SObject Record Edit View component, use the following process:
-
In the Lightning App builder, select the page on which the component should appear (e.g., MIC - Adverse Event).
-
Add the MIC - SObject Record Edit View component to the page.
-
Add the desired values in the Header, Fields, and Columns fields.
Fields should be comma-separated and will be displayed in the order entered.
-
Set the MIC - SObject Record Edit View component visibility to
Record \> Is Close Equal falseand set the Record Detail component visibility toRecord \> Is Closed Equal true. -
Click Save.
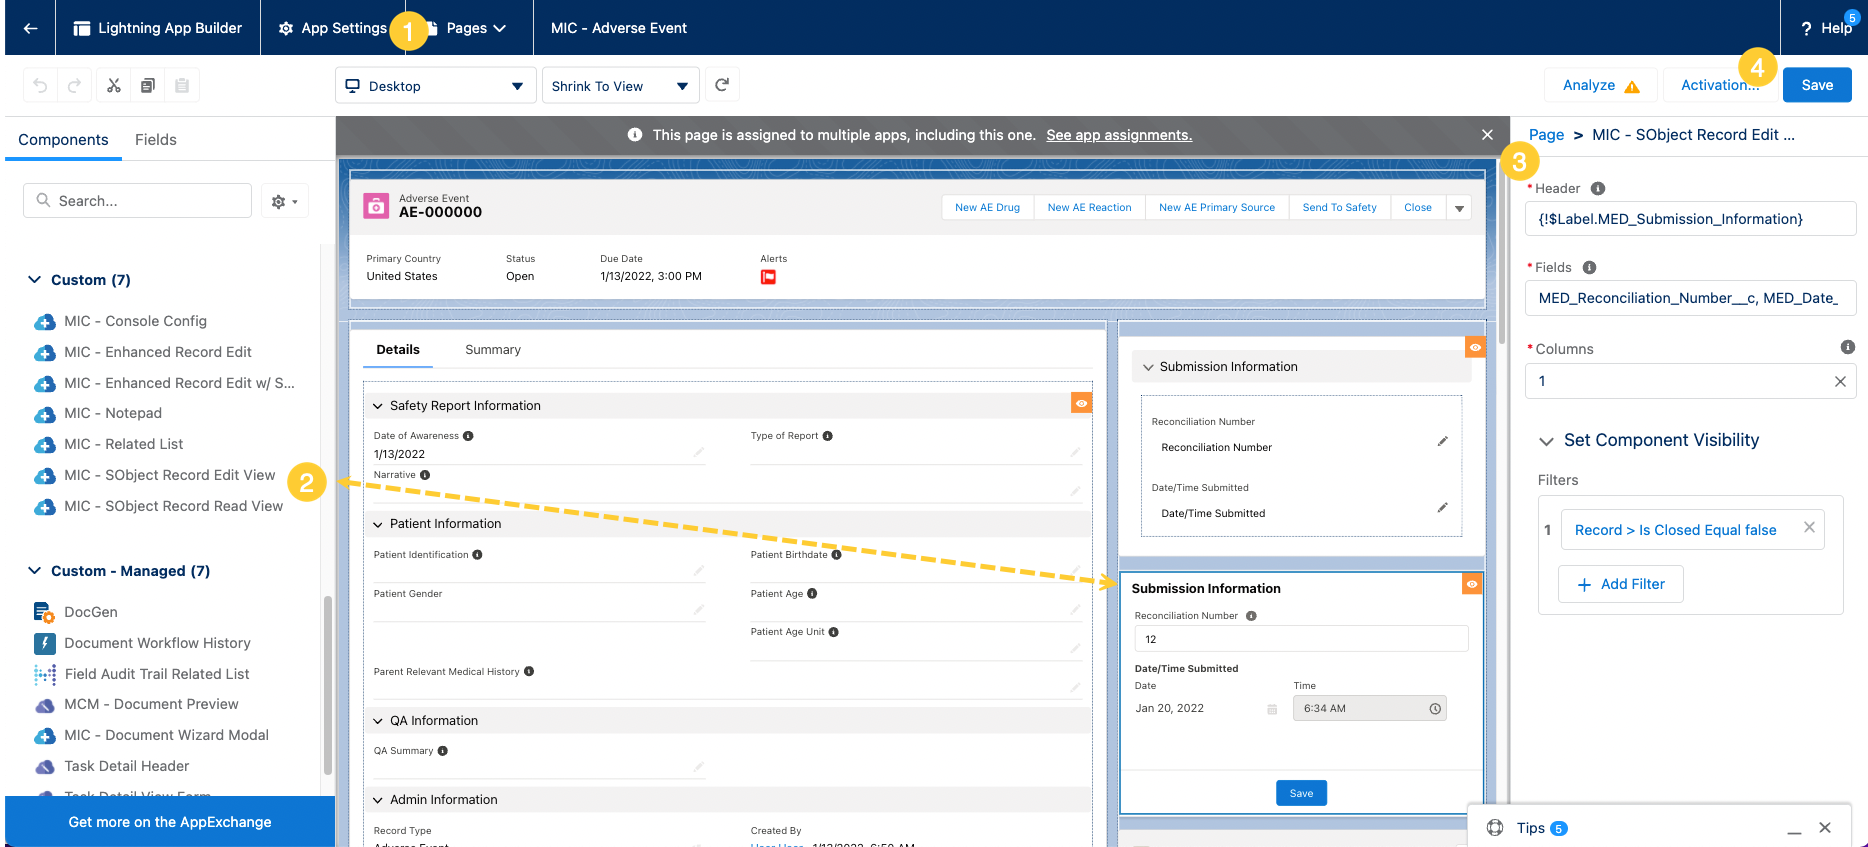
Work Instructions
The Work Instructions component renders a preview of relevant, internal documentation files in a document viewer. Configured parameters determine the list of documents that you can view in the component. For example, the available documents may change as you move throughout the application and/or enter data, such as the name of a product and/or the type of Requester, into the application. The component appears in a collapsible window that you can launch from the utility bar from anywhere within the application.
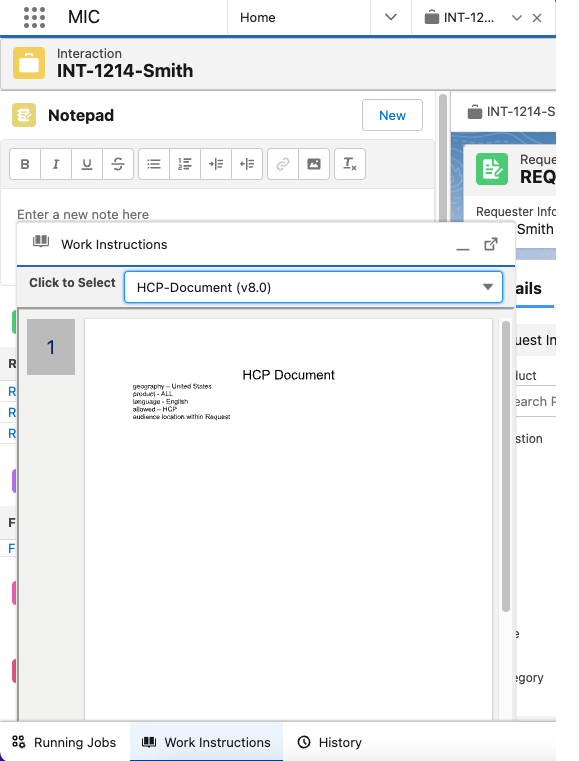
::: title Contextual internal documentation :::
Kalos Pharma, a pharmaceutical company, configured the Work Instructions component to only display internal documentation files that are relevant to the record that a call center agent is viewing and that are in the agent's language. This means that when Riley Equest an agent at Kalos Pharma who speaks English creates an Adverse Event record and opens the Work Instructions component from the utility bar, the component only displays the company's Adverse Events documentation in English. However, when her French co-worker opens the component while editing a Fulfillment record, only Fulfillment instructions in French display. Since both Riley Equest and her co-worker can access the appropriate work instructions within Inquiry Management, they do not have to spend extra time searching for answers in an external knowledge base.
Component features
Once configured, the Work Instructions component appears in a collapsible window that users can launch from the utility bar. The table below describes the core features of the component.
In the annotated screenshot below, the Work Instructions component displays a preview of a document from the Veeva Vault content repository. Documents from other repositories may appear differently.
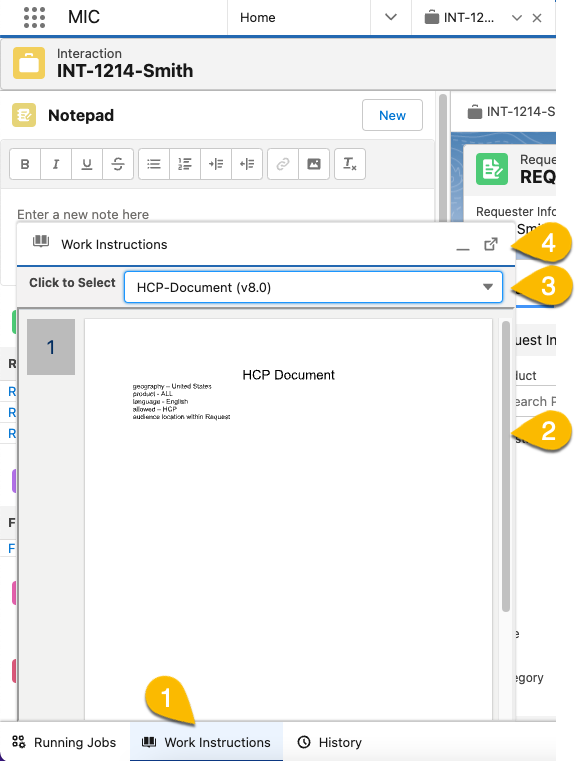
Features
| Number | Feature | Description |
|---|---|---|
| 1 | Component launcher | Click the name of the component in the utility bar to open and close the component. |
| 2 | Document viewer | The document viewer renders a preview of the file selected from the document's list. Controls in the document viewer depend on the content repository where the file is stored. Content repositories have different document viewer controls. |
| 3 | Documents list | Select the name of the document from the documents list to render a preview of the document in the component. The list of documents may change as you move throughout the application and enter information, such as the name of a product and the type of requester. For more information on the types of parameters that can be configured to control the list of documents that appear in the component, visit Contextual and dynamic content. |
| 4 | Pop-out | Click the pop-out icon to display the component as its resizeable window. You may want to open the component as its own window, so you can display it side-by-side in Medical Information Cloud. 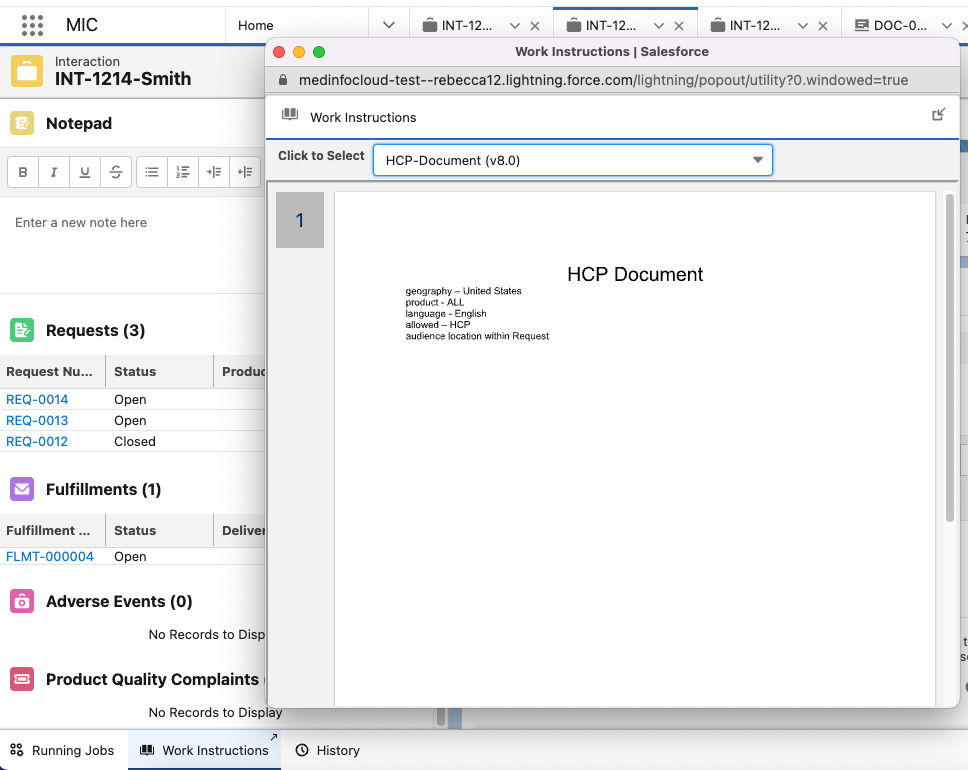 |
Contextual and dynamic content
Work Instruction content updates as a User navigates throughout the application and enters data into the application. Distinct work instructions may be configured based on the following parameters:
-
Language of the Agent (User)
-
Selected Product on a Request or Product Quality Complaint
-
Country in which the Interaction occurred
-
Location within the Inquiry Management application (e.g., Interaction, Request, etc.)
-
Type of Requester (e.g., HCP, Non-HCP, etc.)
In addition to the variables above, the running user must also have visibility to the document. This allows for overlapping configurations where two separate pieces of content that target the same variables can be displayed separately to different sets of Users.
When a User navigates to a location in Inquiry Management that supports Work Instruction attachment, a real-time request will be made within the Work Instruction component to your configured content repository to retrieve any content items that have been configured to match the criteria of the location of the User within the application. It is important to note that when evaluating items like selected products it must have been committed to the database within Inquiry Management to support inclusion of that value in the retrieval of work instructions.
Content repository integration
The Work Instruction feature is designed to work with your existing
content repository already configured within your Inquiry Management instance, requiring
only configuration to enable. To verify your existing configuration,
navigate to Setup > Custom Metadata Types > Local Setting
(MED_Local_Setting__mdt) to review your configured document search
settings.
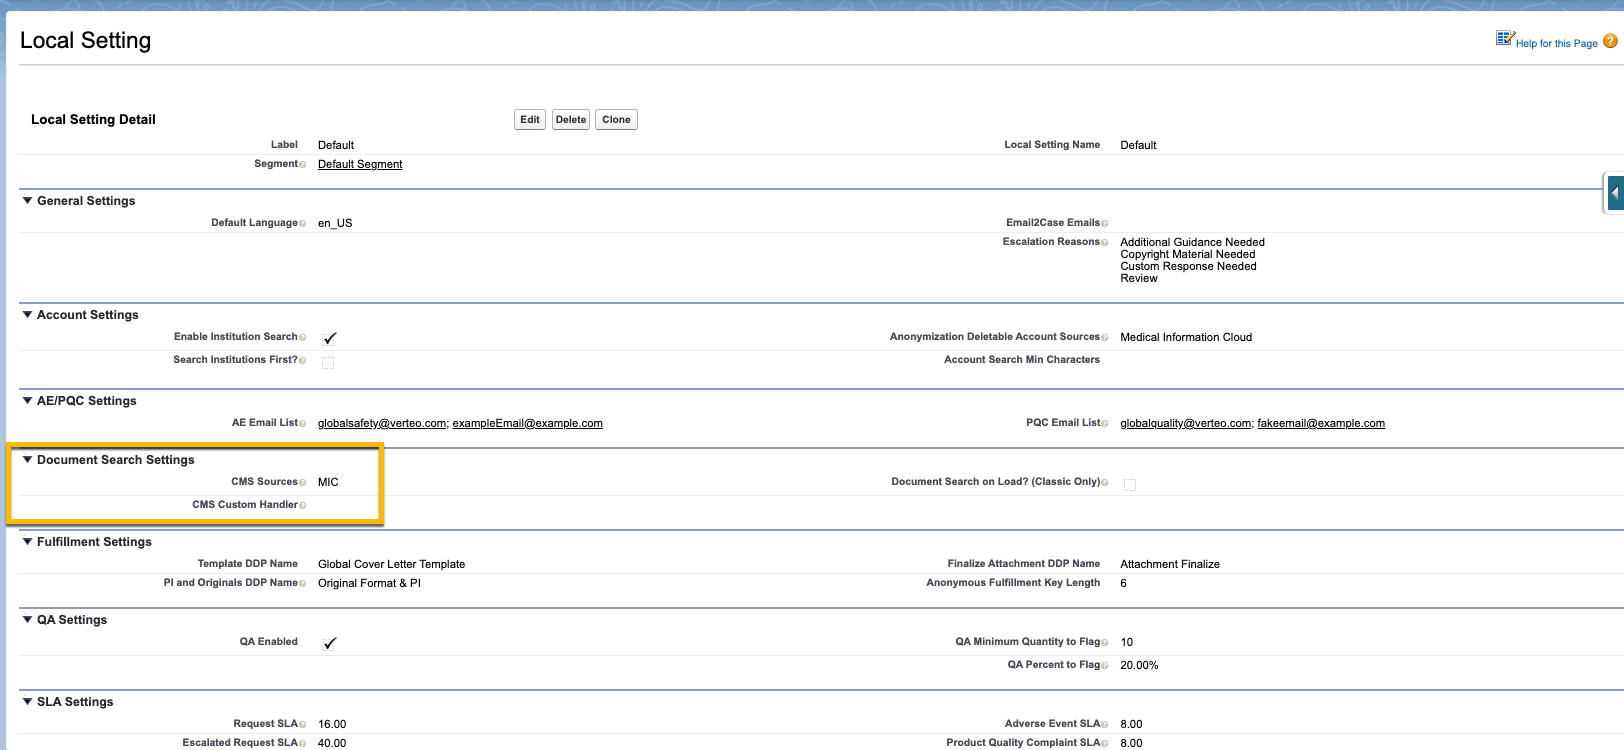
Enablement and configuration
To enable Work Instructions for your instance of Inquiry Management, the following high-level steps must be taken.
-
Create or update the necessary fields within your content repository to facilitate mapping & correlating content for use within the Work Instructions feature.
-
Expose the Work Instruction utility bar user interface component within your application.
-
Update the Global Settings within Inquiry Management to designate the key content classification values that correctly identify work instruction content.
-
Create a CMS Field Mapping custom metadata type entry to map the Inquiry Management location values (designation of where within the application a given user is, to be able to target content. For example, Interaction Detail, Request Detail, or Home Page).
-
Verify language value maps between systems.
Each of the above steps is described in more detail below. The steps below will be specific to connecting a Veeva Vault instance as the Work Instruction repository however the same general rules apply should you be leveraging a custom content store.
Create and update content repository fields
Before you can configure the Work Instruction feature to function across applications, the requisite fields must be in place to perform the necessary setup. The fields that must be created are as follows:
-
A document type field that denotes whether a given piece of content is a work instruction.
-
An optional document subtype field that denotes whether a given piece of content is a work instruction.
-
An optional document classification field that denotes a given piece of content is a work instruction.
-
A sort order field that denotes an integer sort order that should be applied when presenting a piece of content as a work instruction.
-
A language field that denotes the language the instructions are written in.
-
A product field that denotes the product(s) that the instruction applies to (only used for Request and Product Quality Complaint).
-
A country field that denotes what countries the work instructions should be displayed in.
-
A requester type field that denotes what type of requester the instructions apply to.
-
A multi-select/multi-value field that captures the location within Inquiry Management where a given work instruction should be surfaced. Allowed values are as follows:
-
Case(Interaction) -
MED_Request__c(Request Detail) -
MED_Fulfillment__c(Fulfillment Detail) -
MED_Adverse_Event__c(Adverse Event Detail) -
MED_Product_Quality_Complaint__c(Product Quality Complaint Detail) -
The API name of any custom object that you would like to expose content for. Note, for content to be displayed the native lightning record page must be leveraged within Inquiry Management. If a custom page such as a Visualforce page or lightning web component is being leveraged to display a given object it will not be available for work instruction.
-
MED_Account_Search__c(Account Search Page). Note: Account search is only supported when launched as a sub-tab under an Interaction and not as a top-level navigation item (such as the Home Page).
-
Navigating work instruction attachment
Please note that the complete list of supported navigation attachment points within Inquiry Management is defined above. Locations within Inquiry Management not stated above are not currently supported within Inquiry Management (e.g., Home Page, Interactions Home Page, etc.).
Expose the Work Instruction component
Within the Salesforce setup, navigate to your application setup and expose the Work Instructions Utility Item. Within the lightning experience, this can be found in Setup > App Manager > Application edit. The recommended configuration is displayed in the image above.
:::
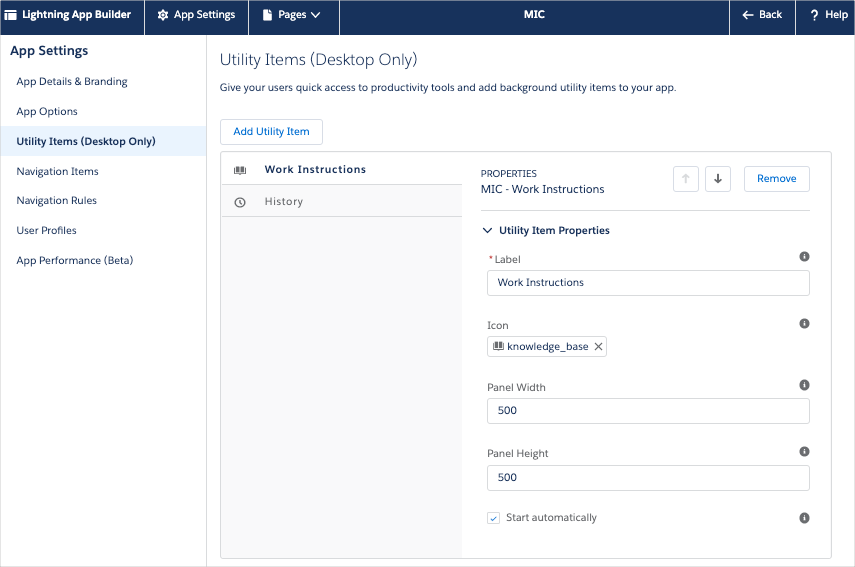 :::
:::
Update Global Settings
The Global Setting (MED_Global_Setting__mdt) custom metadata type
possesses the document classification for Work Instruction content
items. The specific fields that must be populated within the Inquiry Management Global
Setting custom metadata type are as follows:
-
MED_Work_Instructions_Type__c -
MED_Work_Instructions_Subtype__c -
MED_Work_Instructions_Classification__c
These three fields represent a hierarchical structure, top-to-bottom (Type > Subtype > Classification). Not all fields are required, however, the configuration must match across environments. For example, if a Type, Subtype, and Classification are configured within Inquiry Management, documents within Vault must have all three values populated with the matching values to be retrieved for display within Inquiry Management (assuming they match the other criteria).
:::
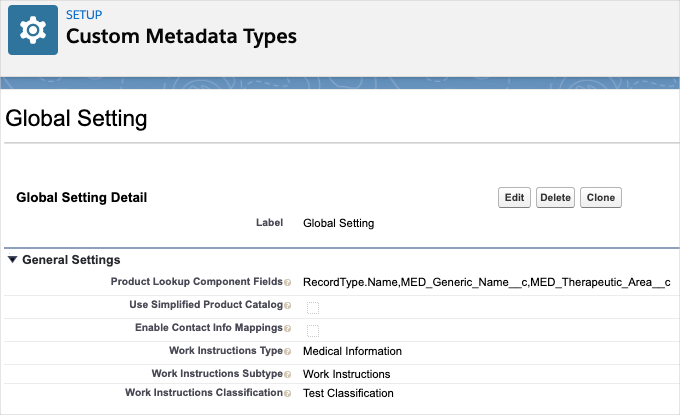 :::
:::
Create CMS Field Mapping
The CMS Field Mapping custom metadata type stores the field maps that correlate document attributes within your source content repository (e.g., Veeva Vault) with fields contained on the Request Document object within Inquiry Management.
To account for new attributes specific to Work Instruction integration the following fields within Inquiry Management need to be mapped to attributes within your content repository:
-
MED_Location__c- the navigational attach point where a given piece of content is to be presented (e.g., Request Detail page). -
MED_Sort_Order__c- the order in which a piece of content should appear in cases where multiple content items are mapped to the same permutation of variables.
Corresponding attributes for these fields may need to be created within your content repository if they do not already exist.
Verify language maps
As noted in the sections above, work instructions are presented in the language of the Inquiry Management user and are not tied to the language of the requester for a given inquiry. As a result, the available language values within Salesforce must be mapped to the values present within your source content repository.
To configure these value maps, User Languages must first be mapped to the Inquiry Management language picklist value set leveraged throughout the application, which is in turn mapped to your configured content repository.
To review the values present within the language picklist value set
navigate to Setup > Picklist Value Sets > Language (MED_Language)
and review the list of API names for the various values.
To review the values present within the user language field refer to Salesforce's documentation.
To create value maps, the MIC Value Mapping
(MED_MIC_Value_Mapping__mdt) custom metadata type is leveraged to
define the necessary rules. These settings can be found by navigating to
Setup > Custom Metadata Types > MIC Value Mapping.
Entries for Work Instruction Languages should be entered similar to the following:
| Field | Value |
|---|---|
| Type | User.Language |
| Source Entity | User.Language |
| Source Value | <User.Language picklist value API name> (e.g., nl_NL) |
| Target Value | <MED_Language picklist value API name> (e.g., nl_NL) |
| Unique Key | User.Language:User.Language:<Source Value>:<TargetValue> |
| Inbound | Checked |
| Outbound | Checked |
Values in the table above surrounded by <> are meant to serve as placeholders that should be replaced with a value entered or to be determined by an administrator.
The mapping of values between the MED_Language picklist value set and
your content repository of choice is outside the scope of this feature.
For more information, visit Veeva Vault.
Workspace tab relabeling
MIC - Console Config is an Aura Lightning component that displays a workspace tab label with the value of a specified formula field. To configure a workspace tab label in the Lightning App Builder, set values for the Tab Field Name and Default Tab Label on the component.
-
Tab Field Name - the name of the formula field used to determine the workspace tab label. If the Tab Field Name does not resolve with a valid value, the Default Tab Label sets the tab name.
-
Default Tab Label - the static text used to determine the workspace tab label if the Tab Field Name does not resolve with a valid value. If set, the exact text is set. Do not put a field name here, as the field name (not value), would appear.
warningMavens recommends setting the Tab Field Name to
MED_Display_Name__c.::::
If Tab Field Name and Default Tab Label are not set, the tab label remains as the Salesforce determined one. :: ::: title Request record tab label :::
Sylvia Etup is Kalos Pharma's Inquiry Management system administrator. At Kalos Pharma, Request record tab labels need to have this naming convention: [Short Question] - [Owner Name]. If there is no value for Short Question, the Request record tab label needs to display this format: [Requester Info] - [Owner Name].
To meet these requirements, Sylvia adds the MIC - Console Config
component to the Request Lightning record page and configures the
component per the table below. She adds Request as the Default Tab
Label in case the Tab Field Name does not resolve with a valid value.
MIC - Console Config configuration
| Component field | Value | Formula |
|---|---|---|
| Tab Field Name | KLS_Tab_Name__c | IF(ISBLANK(MED_Short_Question__c),MED_Requester_Info__c, MED_Short_Question__c) + IF(ISBLANK(MED_Owner_Name_Formula__c),' ',' - ' + MED_Owner_Name_Formula__c) |
| Default Tab Label | Request | N/A - this is exactly the text that will be display unmodified. If you put "Request" then the tab label will appear as "Request". |
To test the configuration of Tab Field Name, Sylvia Etup creates an
Interaction, adds Jane Smith as the Requester, and creates a Request
record. Upon creation of the Request record, the Request tab label
displays Jane Smith (HCP) - Sylvia Etup.
:::
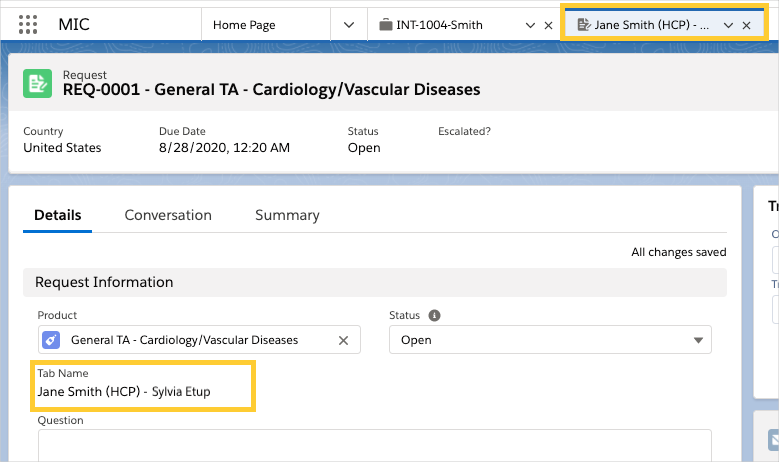 :::
:::
Sylvia then adds this question to the Request record:
Can I use Victoza for a teenager? The tab label displays
Can I use Victoza for a teenager? - Sylvia Etup.
:::
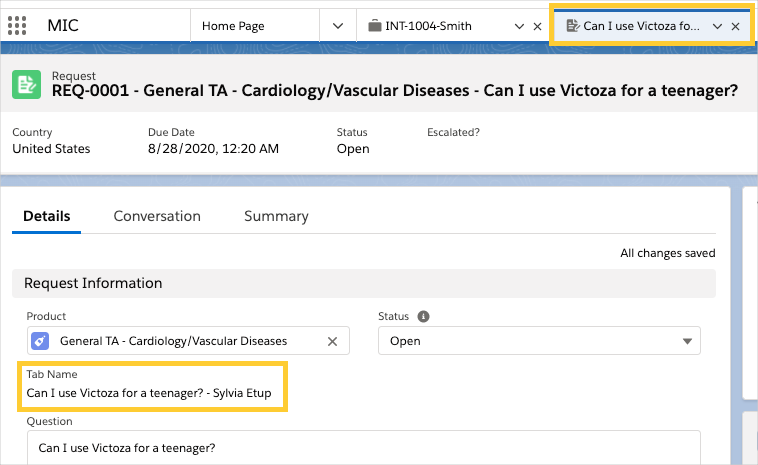 :
: